Search This Blog

Saturday, December 12, 2020

THANK YOU, With a Little Holiday Sale!

This is just a quick post to say thank you for your support in a year like no other!

I have marked all of my tutorials down 15% from now until Christmas Eve, and the three Holly Bauble Ornament kits are also 15% off until Christmas.  

If there is a tutorial you have been considering, now is the time! I try to keep my prices as low as possible, and don't run sales often.

Please stay safe and healthy!  I so look forward to a gradual return to normalcy in the new year.

Friday, December 4, 2020

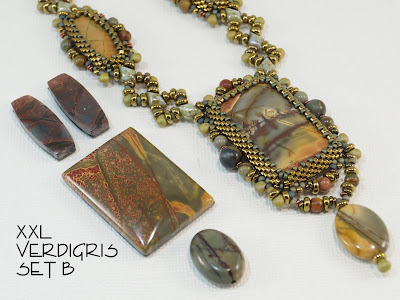
Preview of all the New Vintage Jasper Cabochon Sets, in size XXL!

I have new cabochon sets for the Vintage Jasper Necklace!

 They will post to my Haute Ice Beadwork Etsy shop on Saturday the 5th of December 2020.

First a quick explanation.  These rectangular cabs are both longer and wider than previously.  It's how they arrived from my supplier, Intrinsic Trading.  I have made an additional tutorial for the larger bezel required, and am giving it to those who already own the tutorial.  Just send me a convo on Etsy so I can look up your purchase, and include your preferred email address.  If you purchase the tutorial from this point forward, the larger bezel instructions are included.

Here is an original necklace, next to my new sample so you can see the size difference.

Now, on to the yummy new Red Creek Jasper cabochon sets! If you like the soft pink in my sample, there is a similar set in the Antique Silver group. So we'll start there!

4 Heirloom Silver Kits

Love the energy in this set! Forest, gold, and taupes.


Blush-y, with bits of green and gold.

Almost raspberry, with taupe, and dark fracture lines.  
I gave this kit a Rainbow Burnt Sienna bead to hint at the warmth in the chain.

The other pink one.  I gave it a coral Rainbow Orange Sunset bead for warmth in the chain.

3+ Antique Bronze Kits

Mostly gold with soft greens and some red details. Uplifting!

Another one with so much energy!  Mostly gold with green and red accents. Symphony of neutrals.

Burgundy and gold symphony.  Especially nice barrel cabs.

This kit needs a smaller, XL shorter bezel that is not illustrated past Row 3.  If you are experienced with bezels, and want to try it with the guidance given in the tutorial, I will list it just for you. 
Let me know through Etsy Convo.

3+ Verdigris Kits

Light and dark greens, with a lovely red and gold edge.  More really nice barrel cabs.

Awesome red speckle pattern on a mostly green surface.  Hints of gold.

Taupe with speckles and fracture lines in dark grey.  Sunset barrel cabs.

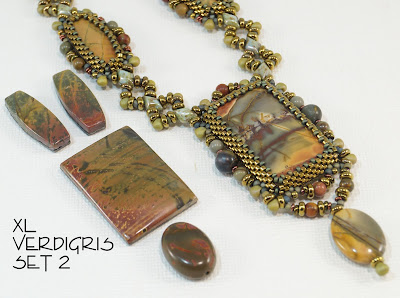
This is the other smaller XL cab.  
If you love its blush sliding into mossy green, let's talk via Etsy Convo.

3 Copper Patina Kits

Yummy warmth with some forest green and gold accents.  Nice set of barrel cabs too.

All the wonderful colors of Cherry Creek Jasper in one stone!  Nice deep red edges.

Rich and deep coppery colors, with gold accents.

OK!  That is the parade of Jasper.  Hoping you enjoyed it, and wishing you a Safe and Happy end to this year of mayhem!

How TOTALLY 2020!

 This won't be easy to explain.  It should have been simple.

Someone fell in love with the Vintage Jasper Necklace which she found on Pinterest.  She asked if I would still sell the tutorial, and I said sure, so I turned on the listing.  Then I thought, "Gee, I still have some of the materials for those kits.  What if I just buy some new cabochons?"  The buyer was enthusiastic, so I contacted Intrinsic Trading, (via telephone, I usually see them in person at the G&LW Show, but we all know how things like that were eliminated to keep us all safe) and bought 16 new rectangle cabochons and enough of the barrel pairs to allow me to make up some nice sets.  

The sales person mentioned that the rectangles were not all exactly the same size.  She showed me a photo.  I had designed the bezel to be largish, in order to make for easy fitting and finishing, so I thought and extra mm here or there would not be a big deal.  

An extra 4 mm however, is quite a big deal.  And 4mm in width, plus another two in length is an even bigger deal.  

There were two Millenial pinkish cabs.  Usually I choose the least worthy cabs to make my samples, leaving the best of everything for buyers.  But this time, (it being 2020 and all) I took one of these yummy pink ones.  I started with the basic bezel base to try to estimate what I needed to do.  Then I made my first try at an enlarged version.  I could tell it was too small by Row 8. So I made a third effort, all the way to the end, with a very thready corner which I found deeply unsettling.

 I thought the third one was good until the last couple bezel rows, and illustrated as I went along.  But I was wrong. 

So, time for a fourth effort.  Which was nice, and fit beautifully!


I created cab sets and allotted a few of each to the four colorways I had designed, and then faced the big dilemma.  There is simply NO WAY to show you the size and scale of what the kit will make, without making a sample in each color, and I already have 5 of these necklaces, and only 15 possible kits to sell.  Hence this long blog post.  I will try to write a more succinct version of this 2020 epic tale to put in each listing, but bottom line, I chose to show the cab and the color over making 4 more samples.

SO...  in a separate blog post to follow, I will show you the cab sets available, which I will post at noon, Saturday the 5th of December, CST, in my Etsy shop.  The new tutorial for the larger bezel will be a freebee if you already own the tutorial, and included with the purchase of the tutorial if you are buying now.  

PLUS there is a final page which explains how you can weave 6 possible rectangle bezels in a range of sizes from the tutorial.  It does NOT diagram them past the third row.  But it is possible, after setting up the framework at the right size, to use the tut to finish the bezel by just paying attention to what happens at the corners. 

Here's the chart of possible bezels.    

"You can increase or decrease the width or length of this bezel by the simple addition or subtraction of 4 beads, 2 on two opposite sides.  I think of these sizes in terms of the number of up beads on a side after Row 3 is woven.  The original bezel is 12 tall by 7 wide, and the XL above is 12 tall x 9 wide.  I’ll make you a little chart for your own use."


Original Bezel 34x20mm 80 beads in Rows 1&2 12 x 7 up beads in Row 3

Possible Bezel 34x22mm 84 beads in Rows 1&2 12 x 8 up beads in Row 3

XL Bezel         34x24mm 88 beads in Rows 1&2 12 x 9 up beads in Row 3

Possible Bezel 36x20mm 84 beads in Rows 1&2 13 x 7 up beads in Row 3

Possible Bezel 36x22mm 88 beads in Rows 1&2 13 x 8 up beads in Row 3

XXL Bezel 36x24mm 92 beads in Rows 1&2 13 x 9 up beads in Row 3


 You might notice there is an XL Bezel size mentioned.  That is because two of the cabs are smaller than the rest.  They are these:


I am not going to list these sets, because I believe the confusion factor will be huge, and I don't want someone buying one of these sets and then not having the exact illustrations they need to make them.  If you have already made this necklace, I think it would not be difficult to make them.  But as a first go, maybe more challenging.  But if you want to try one of them, I will make you a special listing and even give you a little markdown for the effort you will need to spend, choosing how to create your embellishment rows.  There are plenty of beads and rounds to play with.  The designer in you might enjoy that.

OK.  Enough already.  Stay SAFE and HEALTHY!  2020 is almost over, and next year promises to be better!

Thursday, October 29, 2020

A Purplish Day

  I have spent this week replenishing some of the kits that have sold out in my Etsy shop.  First, there is the popular Fuchsia kit for Pineapple Blossom necklace.  It really is elegant.  I've worn it twice this week and it's only Thursday.  

I also finally got the focal jewels for the Orchid Mist kits and got them listed too.


What a different feel the two necklaces have!

Since I was in Purple land, I also finished up a few more Grape kits for Caramel's Claws, using a new acorn bead.  The silver one is just no longer available, so I have found a pretty good substitute and am happy with the result.  


I think the lavender references the strung purple beads in the yoke nicely.

I am putting the focal bead images from that listing here, so you can have a closeup look.


A is evenly mottled with light and dark purples, only very minor pitting.


B has lots of lighter color, with minor pitting near the edges.  I like the concentric lines.


C has especially nicely arranged color, lighter at the center, and darker at the edges.  Quite smooth.


D has really interesting markings and the two sides are quite different, giving you a nice option.  One small nick on a long edge will be covered by the bezel.

I don't know what happened to the other image of E!  It has deep rich color with flashes of light.

I have to paint the dragons for Paradise Dragon Necklace tomorrow, and should get them listed sometime tomorrow, with a little luck and stamina!  Still in the Purple theme!

Thank you so much for keeping my busy during these crazy times.  
Stay SAFE, and GO AND VOTE!!!

Saturday, October 24, 2020

That Sweater Needed a Necklace

 It came from Target.  It's a color that is in the Pantone array for Fall and Winter this year. I had the Orchid Mist Pineapple Blossom necklace that worked with it.  But I had made that necklace shorter to wear on my skin with an orchid summer top, and it felt not long enough.  

Here's the original (but short) Orchid Mist.

So I made a new, longer one, with a silver demi bead.


I really like the result.  It has a dressier look than my original, because of the silver framing and the richer finish (Pink Metallic Suede) of the Czech round accent beads.  I designed the original colorway to work with a range from Orchid through Purple, but somehow, this lively Magenta wanted a different feel.  I'll show you the two together so you can compare and contrast.


This necklace sold out in all of its colorways last month after a kind gentleman posted his finished work in Seed Beads and More on Facebook.  Then another client posted her beautifully finished work and I have been scrambling to get some kits in stock! 


I now have all the colors available except Orchid Mist, and I am just waiting on the focal jewels to assemble those kits.  


Please visit my Etsy shop for the Pineapple Blossom Tutorial and the many kits available. 

Stay safe in this crazy weird year of chaos and surprises!  


Thursday, October 1, 2020

Leaf Adaptations from Joni

Joni, a buyer of my Fall Flame Leaf tutorial, contacted me a couple weeks ago and told me she wanted to work out her own colorway for the leaf.  She asked very kindly if I could possibly create a blank chart for her to make that possible. I did so with reasonable ease, and sent her a .png file.  Above is her first result, and I really like it!  My buyers often show me things that stretch my own imagination, and Joni surely did.

I pick up leaves as I walk each day, and this pile was from last week.  I think Joni has worked in a more realistic way than I have in any of my own stylized colorways.  Although those of you who own the pattern know I encourage the occasional moving of colors in each row (especially on the second side) to tend gently more toward Mother Nature's results, Joni is full on Au Naturel!  The two sides of Joni's leaf are totally different, as often is the case in nature.  She has even gone to the point of creating a bug or hail hole on one side, the whimsy of which I find delightful. She has also used a different vein color from the edge color, a further step into realism.  

Then yesterday, she sent my photos of the complete necklace.  It's so similar to the lower right leaf in my pile!

She has also substituted my rope base with a piece of 3mm tubing and found the PERFECT button to use as a clasp.

Here's how it looks in use.  I love it when people use my designs so innovatively!


Pretty cool, huh? Joni has also messed with the gradation a bit at the rope ends, and to great effect with the button.

When I modified my tutorial to include my most recent "Conflagration" colorway, I added the blank chart to the tutorial as a final page. I am encouraging you to enjoy yourself and design your own results as Joni did.  I'll post it here too.  

In a way, I suppose you could think I am handing out my tutorial, but I believe my text instructions and step by step diagrams are necessary to success with this project.  If you want the updated version of the tut, you may be able to download it from your receipt, and if not, just ask and I will send it along if you convo me from your purchase receipt.  You also have my permission and blessing to steal it here, from my blog, if you have purchased the tutorial.  

If you don't own the tutorial, here's a link to my Etsy shop, where you can purchase it and several kits currently available:  https://www.etsy.com/shop/HauteIceBeadwork

Happy Leaf Season!  Stay SAFE!

Friday, September 18, 2020

A Tale of Four Bails

EDITED TO ADD: I am having a 20% off sale on the tutorial for this project this weekend, Sept 19 and 20.  In fairness to those shopping for the tutorial because of the sale, I am posting the new kit at 8:00 am, since I feel the need to tell those buying other kits that this one exists.  If you want one and did not get one, I will make more this week.  Sorry for my change of plans! 

I have a new colorway for my Fall Flame Leaf kits.  I wanted to capture the full color of the Sugar Maples, and ended up also realizing imagery of the Forest Fires on the West Coast in this 2020 edition.  I think this particular color scheme is especially dramatic worn on black clothing

I have added this colorway to my tutorial and if you have an older edition and want these color names and numbers, please just Convo me on Etsy and I will send the new version along to you.  I also found an F near the end of Row 4 of the original tutorial that should have been an E.  So amended, AND corrected.  

As most things Pandemic, this was a little struggle.  I made four leaf samples to get one I liked, and them also created 4 bails to find one that supported the rope and leaf without taking too much focus.

Here are the leaf efforts.  I wanted to use silver-lined beads for their luminosity, and found many I liked.

I saw a little pink in the leaves I was collecting as models, and used a Toho #2226 Raspberry Silver Lined (Raspberry Fade above) at the very edge in my first sample.  But it was a dyed bead.  I rarely have trouble with those, but in this case, the color rubbed off, leaving silvery blue glints I kinda liked, but I worried about long term wear and durability.  So I switched to a Matsuno #638JS Silver Lined Rainbow Ruby, which had the blue and pink flashes I liked in the original.  I thought it looked BODACIOUS! But the work was extremely curly, given the larger size of those Matsuno beads with the tiny shiny black Miyuki Delicas I was using for the vines and edges, the Matsuno beads really pushed forward, both visually and physically.  That leaf was amazing, but more challenging to bead and very curvy indeed.  So I thought I would switch to Miyuki beads for the entire project., but the yellows (Lemon-Lime above) were a little too lemon-lime yellow, and the orange and flame red too close to each other in hue.  So I thought I could switch to Toho shiny black edges and veins, but I needed wholesale quantities and could not find them at my local supplier.  So I switched to Toho Jet Black Matte for the veins and their Semi Glaze Black for the edges and Went back to some of the Original Matsuno colors I loved, with a Miyuki Ruby AB E bead, and finally!!!had a leaf I thought was good.  

Let me say right now, if you like the Bodaciousness of the Matsuno S/L Rainbow Ruby, just tell me, and I'll replace the Miyuki beads in the kit for you with the Matsuno.  I have made the kit I think it easiest to bead and representative of the results I was aiming for. 


 I really like the matte black beads over my original shiny choice.  It looks all the more like flames and forest fires to me, and that seems so right for this year.

Now, about those 4 bails.  Most of the other kits have a rainbow finish Aiko or Delica as their bail, and some have a mix of beads.  My first two guesses for the bail failed to belong to the work in any real way.  I used both colors in the original sample, one in the first few rows and the second in the last few, to equally poor results!  GAH!

Then I tried a black matte bail.  It became complete focus of the necklace to my eye.  Nope.

Then I mixed Delicas in the B, C, and D colors of the leaf.  This was a step in the right direction and seemed a part of the whole.  You could choose to do it with the kit as provided.

My final bail choice was to take the three BCD colors from the leaf and organize them into a gradation similar to the leaf.  I felt like it pointed at the leaf, and put the focus where I wanted it.  I have included a closeup photo of this work in the kit, and I was not super strict with where the beads went exactly, just tried to put as close to the same number beads of each color in each row as I could, given row counts.  The color shift is subtle, and gently random, but I really felt it was a good solution to the problem.

The pile of beads purchased and not used is ridiculous.  BUT I am at peace with what I have to present and that means more to me than anything else.  I might also feel a new beaded Autumnal Bag coming on.  I might need all those rejects after all!  I am so spoiled by the two great Twin Cities Bead shops Bobby Bead and Stormcloud Trading.  Thank you for being here!

Kits for the new colorway will be available in my Etsy shop tomorrow, September 19th, probably 10:00AM CST.  I doubt there will be a huge rush, but if I am wrong, I can re-kit fairly quickly, now that all the hard work is done.  Stay safe, my beady buddies, and enjoy this beautiful autumn! I'll drop in a link tomorrow for the kits, and if you want the updated tut, just convo me and I'll be sure you get a copy.