I am so honored that so many of you read my blog, that I want to offer up a little gift to you all. I am also celebrating my second place ribbon in the Ms. Maddie's Fabulous Florals category at the Bead Dreams competition. Last year I posted a square bezel tutorial, and this year, I think I will give my readers a little flower component, in honor of Merle Berelowitz. This is an almost-no-strings-attached gift, although if you are planning to teach this component or sell it, I would really appreciate design credit. If you give me credit for the design, I give you my permission to use this component as you like!
You will be making a 5 petal flower, so how sensible to begin with a base of five beads! We will be using primarily circular flat peyote stitch and the beginning part of square stitch to create this component.
On a wingspan of thread, coated with a sticky conditioner like beeswax or microcrystalline wax, pick up 5 15/0 seed beads and sew through all five again to form a ring, leaving an 8" tail. Don't tie a knot.
 Now, stitch in circular flat peyote, one round of 15/0 seed beads, one between each of the original beads, and step up into the new round.
 Next, stitch in circular flat peyote, one round of 11/0 seed beads, just like the last row and step up again.
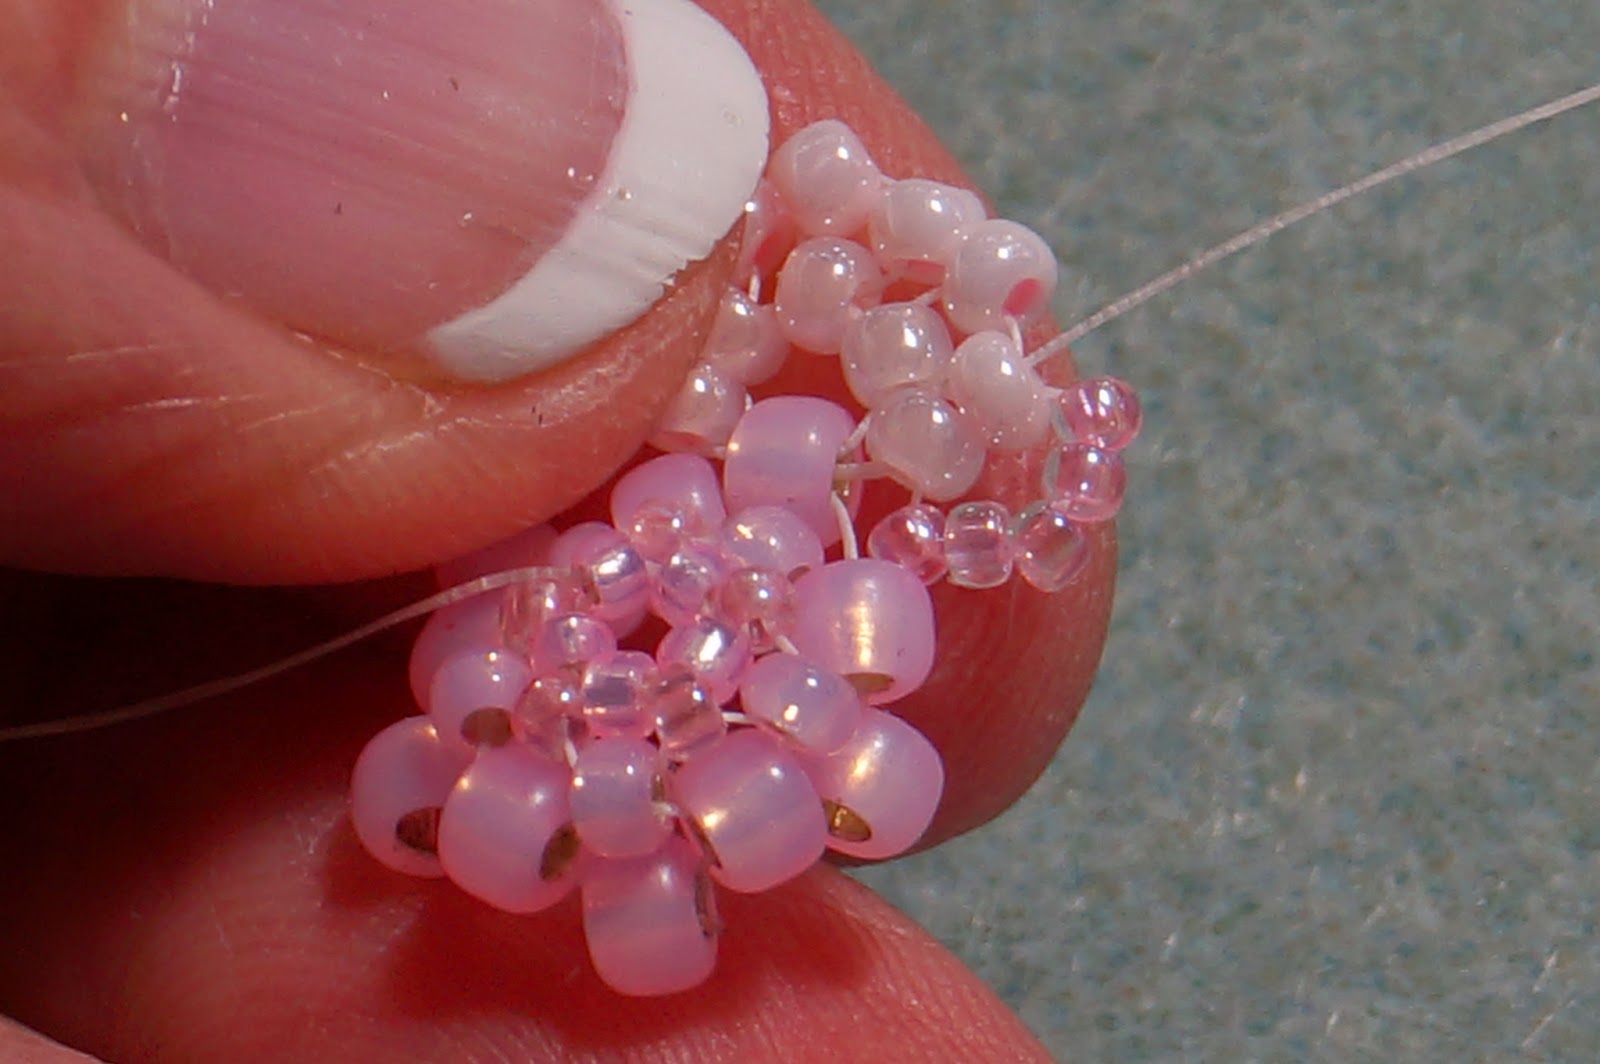
 Now, we want to cup the little base of the flower, so as we stitch the next round, we will wrap our generous tail around our little finger to allow us to pull its little bottom down. We will add, using circular flat peyote, a row of 8/0 seed beads, pinching as we stitch to help the little cup form. This is where the sticky thread conditioning helps, and you can add more at any point if your thread becomes slippery.
 And then, after the step up, add a second row of 8/0 seeds, and step up a final time, continuing to help the work form and maintain a cup shape. Now our base is finished and it is time to work the five petals, one off each of the five up beads.
 To make the first petal, begin by adding three 11/0 seed beads, in a picot or sorts to the 8/0 you just exited, using square stitch, by stitching through the 8/0 again, in the same direction. That is the essence of square stitch. In the real stitch, we would link this square to others with common side beads, but here, we use only the first portion of the stitch, without the connection.
 Turn you work upside down, and we will work the rest of the petal from the back of the flower. Add one of the 11/0 seeds and step into the first bead in the picot. Then, square stitch a two bead picot on the bead your just entered. I like to use a slightly different bead here, to make it easier to see what I am doing and to help create the illusion of depth.
 Step into the next bead and add a two bead picot again and repeat the process on the third bead in the original picot. Keep your tension snug.
 Now, add a final 11/0, the same bead as the original three bead picot, and pass through the 8/0 petal base bead again.
 Now you have a three bead, inside cluster (the original picot), and an eight bead surround. We are going to add one more row of square stitch picots, this time, using two beads in our eight bead surround row for each set of picots. Go through two 11/0 beads in the outside row of eight, and pick up five 15/0 beads and sew through the two beads again, using square stitch. The first set of two will be two different beads.
 And here is the first five bead 15/0 picot in place.
 Step into the next two beads, they will belong to two different picots, and pick up four 15/0 seed beads. We will borrow the fifth bead from our picot from the original five bead picot. Sew through the second set of two beads again, in square stitch, this time, the real deal and connected! (although traditional square uses only four beads)
 Repeat this step two more times, with the remaining four beads in the outside row, picking up the fifth picot bead from its neighbor each time. Here's the third set.
 And the final set will have two different 11/0 beads, just like the first. After you apply the last five bead picot with square stitch, go through the 8/0 base again. Your petal should look like the photo below.
 In this last step of petal making, we will pull the petal into a little cup shape, like the base. Pick up a 15/0, and go through the four beads standing up in the first picot.
 Pick up another 15/0 and stitch through the three beads in the second picot.
 Repeat this step twice more, going through the third three bead picot and the fourth four bead picot. Pick up a final 15/0 and stitch through the 8/0 base again.
 Flip the work over, looking at the front of the flower and step ahead through the down 8/0 to and through the next 8/0 up bead. This is the base for the second petal. Now tighten the stitch, so the petal edges cup up, just like the base of the flower.
 Add the first three bead picot to the base in the second petal, flip the work over and repeat the above petal process, until you have five petals complete. Here are two petals finished and a third, waiting to be flipped over, and pulled up into a cup.
 And here is our little five petal flower, finished!
 And here is what the back view looks like. You may weave in your threads to finish the flower, or use them to attach other parts to your flower, or to attach the flower to other things.
 I added a pearl to the center of the flower, and rings to the back to create earrings, but the possibilities are endless.

You will be making a 5 petal flower, so how sensible to begin with a base of five beads! We will be using primarily circular flat peyote stitch and the beginning part of square stitch to create this component.
On a wingspan of thread, coated with a sticky conditioner like beeswax or microcrystalline wax, pick up 5 15/0 seed beads and sew through all five again to form a ring, leaving an 8" tail. Don't tie a knot.
Please, show me what you make with my five petal flower tutorial gift!
I would love to see whatever you create on my facebook page.
In a few weeks... or maybe a month... or maybe... well, EVENTUALLY...
I'll show you what else I did with it.
Happy beading! :o)