Search This Blog

Sunday, February 28, 2016

February Flurries

February began with a visit to the Upper Midwest Bead Society meeting on Monday the 1st.  It had been a while since I had been. My fall was insane! Many of the people I know best were in Tuscon.  They were smart, given February in Minnesota!

Anyhow, the topic of the night was a little beaded bead, from a British bead shop, Crystals and Ice. The pattern is free, if you would like to try it out. (Our presenter had their permission to share it with us, in case you are wondering.) I had to hunt to find a picture of the beaded bead, and this is not a good one; ugly knot, mistake, bad lighting, but you get the idea...


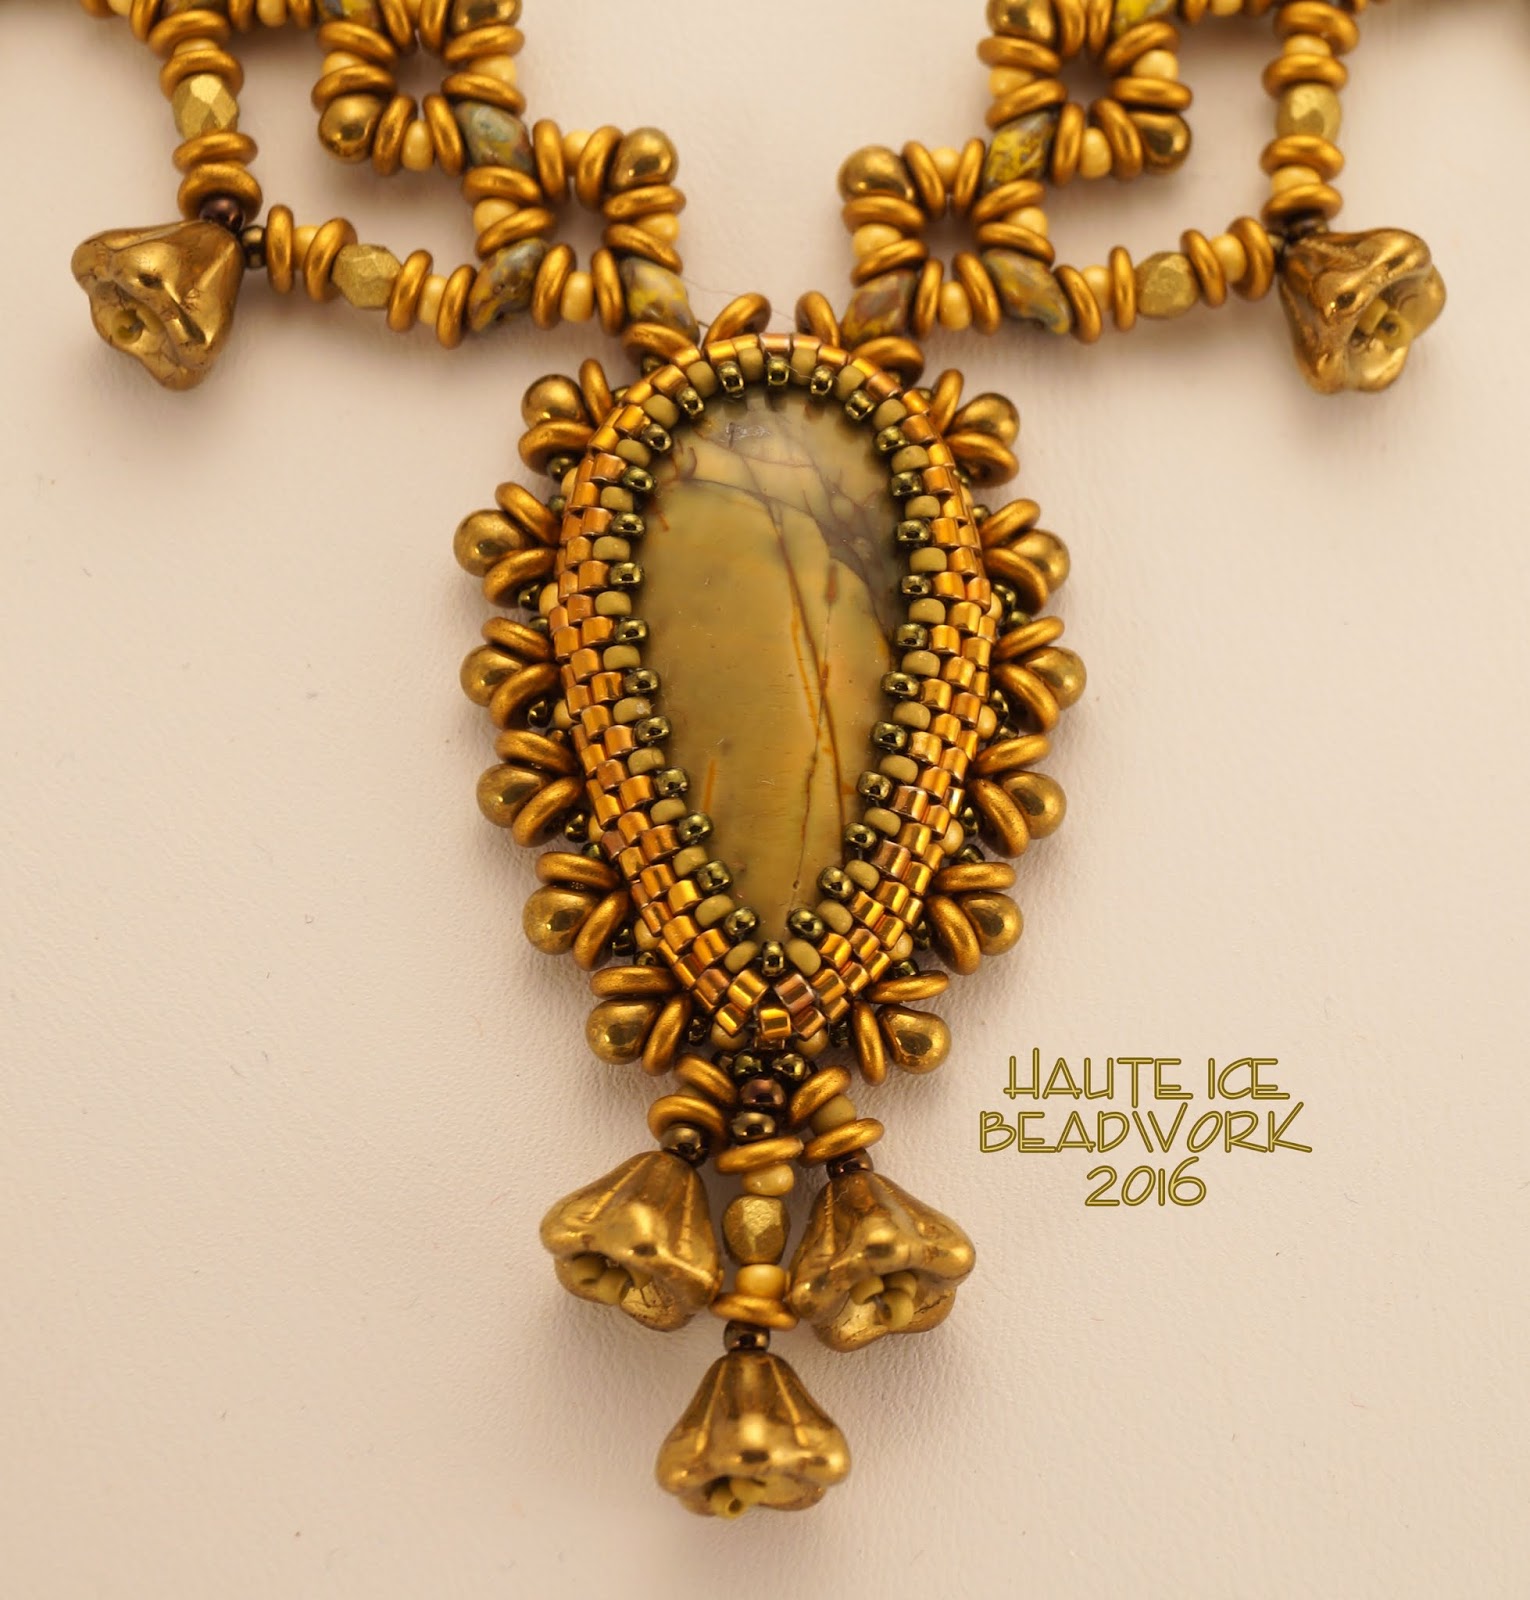
I loved the color way I used in my bead, and when I got home I hunted through my stash for things that might allow me to use those colors again.  This little quest became a month long event of trying and testing ideas with out spending much time perfecting anything.  I had some pieces of Jasper that had the soft gold of the 11/0 and the range of greens, grays, and tans in the SuperDuo, plus a hint of the matte gold O beads, so that became my first project.


I had two shield shapes like this one, and two teardrops.  What I liked best about the beaded bead was the O bead hiding the Superduo holes.  So I set out to see how that might be used in rope and other structures.  I thought the beaded beads were a little too thick, and too "jewelry-ish" for my small and earthy jasper.


I ran out of both SuperDuos and O beads fast, and re-designed to use what I had allow the finishing of one necklace.  Thanks to Cath Thomas, it has a name!  Meet, "Bells and Buds".


I especially loved the little brass buds I created for bezel embellishment.  


I started another piece with the two shields and the other teardrop, but ran out of O beads AGAIN, and had to order them, with some delays involved.  I was pretty psyched about it, and nearly tore the first necklace apart for beads!

I will show you what it looks like now, but I am not going to finish it right away.  I want to take it all apart and put a little breathing room in between the components.  I like the components, but they are just too crowded, and ripping didn't fit into my Ferbruary Flurry plan, so here's just a peek.


Lol, this is probably the kiss of death, because in the past, when I have shared things in progress, they have NEVER been finished.  But I do really like this, so hopefully this piece will break the trend.

I had only begun my Flurry of February work with these bits...


Next up, stay tuned for Purple Painted Turtle!


Sunday, January 31, 2016

Springtime Dragon


There is a new Dragon kit in my Etsy shop.  Meet Springtime Dragon.  I think they are all girls.
You can name your own yourself.  Maybe, for you, it's a boy dragon. :)

Last year, I started playing with the idea of using gradation in Chenille stitch.  I also decided to try working a series of similar pieces, instead of bouncing around at will, as I usually do.  So I made friends with dragons, and dragon scale beads, and the idea of multiple colorways.  It was kind of a quest for mastery of an idea.  I began with gradation that ran vertically around the cord.


I did the fuchsia one first, with a Fuchsia jewel, and a pink to purple rope ombre.

Then I used a Crystal Astral Pink jewel, and used color from the jewel for my ombre. from gold, through pumpkin to pink.  I gifted that one to a dear longtime beading friend.
Because she liked it.  :)


To better explain the ombre gradation, I have laid the rope on its side.  The outside edge of the rope is chartreuse, which deepens across the top to a middle value and then to a dark forest green on the inside.  And since I was thinking of writing tutorials, I gave this third version a fuchsia "belly" because I knew it would be easier for students to see mistakes in the pattern if there was a bold reference point.  I think there is some mastery to be had with repetition.


Here's a similar ombre, from "Second Hand Rose" which I have other plans for.  

Then I worked with spiraling the ombre around the rope, and that too, is a tutorial in my Etsy shop.


And I did a couple dragons with that gradation as kits. The Volcano sold out really fast, and two of the Chili Pepper are still available in my shop.


I think Springtime is the last Dragon kit I will do.  How many dragons might people want to bead??


I think she (or maybe yours would be a he?) would be fun to wear for Valentine's Day, or St. Paddys, or maybe even Easter!  For sure the vernal equinox!  The project takes about 10-12 hours, (intermediate level with a knowledge of Peyote required and the ability to follow a chart) so there is plenty of time if you get started right away, lol.

But I have a couple other dragons to show, and if this is the end of dragons for me, now is the time.


Expect more gradation.  It is one of my favorite things to do.  And I love Chenille, so meditative.
But if you want a dragon, now is the time.  


Find her in my Etsy Shop here!

Sunday, January 17, 2016

A Dark and Twisted Salute to Alan Rickman

I gave up.

I am too busy.  I am sick with a nasty cold/ sinus infection/ bronchitis.  And although I thought I had a great idea for Bead Dreams, my first component took forever and I only liked it.  I have to be in love to work that hard.  And the deadline is way, way too early this year for my schedule.

So, I gave up, and let me fingers wander as they chose.

I had a hand stitched Russian embroidered cab that I have always meant to work with.  I used a similar one to create something for my mother years ago, and fingering through my stash, it felt timely.

And then Alan Rickman died.  And the rope Slithered in my fingers.  And the darkness of the cab seemed right.  So it became a little tribute to an actor and character I loved.  Nothing super special, but a good little dialog to have with my beads.


I was kind of addicted to my spiral chenille stitch last fall, so it popped up, this time, worked over a 3mm leather cord, to which I added my own brass end caps. Plus I wanted something snakey with a hint of green.  I don't really like silver, so I just ignored that bit.


And I added a little twist to the bezel, and a few bits of flower, leaf, and bud, because it is very cold and white and barren here, and I miss the growing things.  And flowers are often gifts for the dead.


It would have been very sensible to do "real" bead embroidery here, but I just couldn't bring myself to do that.  I am a weaver first, and when seeking comfort, I revert to form.  The little cab was cardboard backed, so I did add a little leather.

Do you recognize the line?  "After all this time?"  Dumbledore says it to Snape, about his love for Lily Evans.  Snape calls forth his Patronus, a symbol of protection and support.  It is a doe, like Lily's own Patronus. And he replies "Always."  And Alan Rickman delivers that line in what some believe to be an anticlimactic fashion.  But I admired the delivery.  It was a simple statement.  An "of course".  Because that is what love is.  I think the actor understood that.  He married his high school sweetheart, his love of 50 years, before he died.  Because love is not contingent on reciprocity, or what a partner might have to offer, or the circumstances of a relationship.  
It is because of who two people are.  And it is forever.  


Wednesday, December 23, 2015

Damsel Dragon Corrections

Two mistakes were found in my Damsel Dragon tutorial by a sweet and helpful buyer.  I have corrected my tutorial and reprinted the final three cds.

The mistakes are below, both on Page 9, which I must admit gave me all sorts of trouble in general!

FIRST MISTAKE

Page 9, second paragraph of just one sentence in bold should say:

Stitch the Scale Sequence on page 7 (rows 1-16) a total of seven (7) times.

Unfortunately, my text says "page 5". The Scale Sequence chart appears on page seven and is diagrammed on page 8.

SECOND MISTAKE

Page 9, bottom of the page, left column, should say:

Row 10 - E(cc), E(dS), E(aa), E(bb). Step up.

The letters in parentheses are the beads you pass through to get to the next addition, and I mistakenly suggested some beads that were not available for the last two pass throughs. (ab) and (bc).

I took time to re-read the entire document (for what feels like the gazallion-th time :), and I HOPE there are no more mistakes, but should you find one, please let me know!

Happy Holidays, and wishing you a Bead-Filled and Joyful New Year!

Thursday, December 10, 2015

A Goal is a Dream with a Deadline

I should begin by crediting Napoleon Hill for the title.  They are his words.

Well, I did it.  I was afraid to voice my New Years resolution for 2015, because I has doubting both my ability, and my willingness to devote the time and money to learning to illustrate. But I did it!


See??  Diagrams and everything!!

Kassie Shaw Inman showed me the way.  Kassie, author Beadweaving Beyond the Basics, has written a tutorial teaching the use of Microsoft Word to create beadwork diagrams.  If you have ever considered learning to work with vector graphics, but were hesitant to commit to paying Adobe a monthly fee of $19 for the rest of your life for the pleasure of working with Illustrator, (a daunting thought to a 62 year old hoping to retire sometime soon) this tutorial might just be for you.

Kassie's tutorial is written specifically for Microsoft Word, but I applied her information to Apple Pages with reasonably good results.  Her ease and relaxed confidence is infectious.  Whenever I could not find a way to solve a problem, I went back and watched the tutorial again, sometimes only for a few minutes, and with her encouraging attitude in my head, went back and FOUND A WAY.  I highly recommend this tutorial.  And Kassie, for that matter, because her simple, Can-Do attitude is an anodyne for all things on which you think it might be best to give up.

And before I leave this topic, Cynthia Newcomer Daniel has an equally fine tutorial introducing the basics of Adobe Illustrator for beady purposes.  But I just could not make a commitment to the monthly "membership".  Plus, I bought a fancy pants Mac Book Pro, and I am trying to make it earn its keep.

I also used Pages for layout, instead of Adobe Publisher, (thus avoiding another monthly fee) and while it was not without its problems, I conquered enough of them to manage to mostly get it to do what I wanted.  One Apple Genius suggested that I plan better before starting the document, when I went in for help with why the document parts jumped freely from section to section without my permission.  I am really proud that the guy is still alive.  I did try to explain that it is hard to know if you are going to need an explanatory image to go with your words until on second final edit, when it seems clear.  I have just one word of advice.  LOCK.  "Stay on page" and "no text wrap" although important, are not sufficient to the task.

Also in Pages, when starting your document Begin with a NEW DOCUMENT, and in the file menu, before you do ANYTHING, "Convert to Page Layout".  Put all your text in text blocks and size them to the size of your text.  Otherwise, things jump about at will.

SO, here it is!


And it has a friend too...


And as you can see, while I was having the tutorial experience, I thought I would also try making a kit.  And that was a VERY BIG learning experience too.

You can see this tutorial in my Etsy shop.  The 12 Volcano kits sold out, although I have more dragon scale beads on order that will enable me to create one final kit in that colorway.  There are still a few Chili Pepper kits to be sold. and the listing is HERE.  (Note: these kits sold out fairly quickly, but I am working on a new set of Volcano ones for late this year, 2016)

I am so deeply thankful for the support for these, my first kits.  If you purchased one, THANK YOU! Please let me know if you have any problems or questions, and show me how it turned out when you are finished.

Note the publication date.  December 10, 2015.  I think a 2015 resolution needs a 2015 deadline, and I think I sneaked in under the wire.  :)  Dream fulfilled!

Tuesday, November 3, 2015

Spiral Chenille Rope

Since mid-August, I have been working on producing my first tutorial.  This has been an amazing journey.  In the process, I have woven thirteen different necklaces, in varying degrees of difficulty.  I can show you a few of them now, because I have published that FIRST TUTORIAL!!  Meet base 8, four color Chenille Spiral Rope!  You can find it in my Etsy shop here!

For those who have purchased the tutorial, I have done a re-write, which I hope clarifies and better organizes my ideas.  I have also added a chart and pictures for 6 base spiral rope worked over a smaller cord.  If you would like a copy of the edited version, send me a convo with your order number and e-mail addy and I will send the new version along!!  Being a first timer, I am still working actively on improving my presentation.


The others you have to wait a bit to see.

All these pieces are based on a design principle.  Maybe I should explain that first.  There are elements of design, right?  Most of us are familiar with color, texture, line, shape, space, light, movement... the list varies depending on who you are talking to, and what they design.  But then there are also principles.  Principles are ways to manipulate the elements.  That list would include harmony, repetition, transition, scale, proportion... I name just a few, and again, it depends on who you ask, how many there might be.

One of my favorite principles, always on my mind when I design, is gradation. It is gradation I am using primarily in this collection, if you want to think in terms of fashion.  You could call it a series, if you wanted to be more arty.

As I work to assemble my ideas into print and picture and diagram, the questions are many!  How to communicate, and then, how much information should be presented at once, to challenge a learner, without overwhelming.  How do I teach a project, AND a technique, AND a design principle, all at once without confusion, and especially, without needless words.   I just love to write.  Can you tell?  I'll show you another picture, just to break up the monotony of my jibber-jabber.


When I started beading, I took several classes.  When I took my first class, I had seen "500 Beaded Objects" and I wanted to learn how to do what the artists in the book had done.  I didn't want to make anything they had made particularly, I just wanted to DO THAT THING!

Technique was given for each project in the book, and peyote stitch was the most common.  So I found a bead shop, teaching a class using peyote stitch.  I didn't really want to make the project.  I just wanted the stitch. SO, I made the project to learn the stitch.  And then I learned Russian Spiral Weave,  RAW, Herringbone, and Spiral Stitch, some beaded beads...  There was a Brick Stitch class, but it never fit into my schedule, and that has always been my weak spot.  Sheesh.

Even now, when I choose a class, I choose it to learn a technique, or sometimes, to see how a designer's mind, (or hand) works.  I mostly could not care less about the project, but it helps to sell me on the class if it's appealing.

Time for another picture?  Here's how I finished one of the ropes, with a lampwork bead by Jeff Barber. That bead suggested the colorway.


But I don't think I am your average bear.  I think people who buy tutorials and take classes, mostly want to make the project.  Nothing wrong with that!  But for someone like me, its a bit daunting.

I bet you see my dilemma.  I have been a teacher.  I taught costume design and stage makeup at Purdue University.  I taught ballroom dance to groups and individuals for the Arthur Murray franchise.  Certainly I used projects, (or a syllabus of steps for the dancers) to teach my subject.  But it was never ONLY the project or the step that was the lesson.  It was design, or the dancing I was teaching, not the project, or the step.  And the advantage I had was, I was there, in person.  And when the eyes glazed over, or the going got too rough, I could SEE when to back off.  I could see how to customize the message for the recipient.

SO... This first tutorial, is principally a technique tutorial.  I have charted, photographed and even... illustrated! a way to make Chenille stitch create a wonderful spiral, using four gradating colors, with a handy chevron reversal at the mid point.  And then, I tried to throw in a little lesson about gradation, and how to maximize the look of the spiral with gradation.  If you have read the tutorial, I would love feedback.  Was that part a waste of your printer ink, or did you feel better prepared to create your own colorway?

I also assembled samples with charts of four other possible spirals in 8 base Chenille stitch.  I can think of some more, but I imagine if you work through all of my charts, you will be able to as well.

One uses gradation,  the same principle I explained in my tutorial.  The other two use different principles (contrast, sequence) and more elements, (texture, light) to accomplish their effects. I didn't talk about that.  Hopefully, with experience and feedback, I can improve and more effectively target what I present.

For my next effort, I will present a project, and create a kit.  Meet Spiral Damsel Dragon.


I have been honored by the support I have received on Facebook and in my Etsy shop for my first effort, and I look forward to trying a first kit experience.  Thanks for reading, and and to each of you who are trying my spiral rope tutorial.  Please feel free to offer advice and opinions. I have already edited my text twice, to try to clarify improve it,  and I value your input, as I try to become adept at passing along my ideas and designs.  The beady world is such a lovely place to try fledgling flight!

Tuesday, August 4, 2015

Playing with Trinity Beads

When I visited Steven Weiss and his Beadsmith booth  at the Bead & Button Show, he handed me a few samples of new beads. I admit, I am a traditionalist, and have not messed with many of the new shapes.  But, I finally had time to play with some of them over the last couple weeks.  I have three bracelets to show you, the results of that play.

First, here's the Trinity Bead.  It is a sleek meld of three beads, about equivalent to size 6/0, laid flat, side by side.  I understand there is an infinity bead that is just two lobes, similarly positioned.  And I have a mini version of the Trinity, that looks like an 8/0 size to me.  I have plans for that too, but not enough time yet.


I felt the trick to working with these beads would be in keeping them from becoming rigid when stitching them together. What could be more rigid, strong, inflexible, and structurally stable than a triangle? I fiddled with my needle and thread for a while, and found a happy combination that was very flexible and created my Squiggle Berry Bracelet first.


I used the beads diagonally.  Here's a picture of the back of the work. See the layout?  Reminds me of a bicycle chain a bit.  I LOVED the O-beads with Trinities, and used them in each of my projects.


I was really pleased with the flexibility of my weaving, both in terms of wrapping around a wrist comfortably, like little hinges...


...and in terms of flexing side to side in movement.  I could even curl it into a circle.


I have been toying with the idea of writing tutorials for real, and of course, this is the first thing I try to imagine illustrating.  Holy freaking cow! Anyhow, I liked this, but I didn't just love it.  And I had just one tiny tube of these little Trinity goodies, so I cut Squiggle Berry apart and played again. Result, being, Big Top Bracelet.


I thought the shiny color-shifting Pyramid Beads, would be nice with the Matte Lava Trinities.  It reminded me of the "When I grow old, I shall wear purple..." poem.  Would this not be great with a red hat??


I took a few pictures as a started, but got bored with it, as soon as I made a mistake and had to rip it all back and start over, so I didn't finish.  But the pix I took would let you see the construction, so here they are.  But remember, I MADE A MISTAKE!  Don't make the same one yourself.  Oh, and I happen to really like working with two needles and this complicates everything visually.  But still, I think the images are valuable, and would help me remember what I did, so here goes, with brief instructive words to accompany them. I put on my clasp first.


I turned it over and put 11/0 seeds and O-bead washers on each needle, and then a Pyramid.   Distracted by taking pictures, I forgot to put O-bead washer on the far side as I set up the first Trinity, using two bottom holes.  Do not make my mistake.  :)  (Enlarged the photo an noted the mistake)


I put a picot of O-bead, 15/0 seed, 11/0 seed, 15/0 seed, big drop (3.4mm I think), 15/0, 11/0/ 15/0. and an O-bead on my near side needle and a second Trinity on the far side.


I put the near needle through the far side, and went all the way back to the clasp.  Then I clamped that thread, and tucked the needle into the far left corner of my mat, saving it there for later.


I ran the far needle through the near picot, ran back into the clasp, and came back out on the far side, and through the pyramid.


I ran the far thread up to the O-bead and stepped out, adding a picot, sans the first O-bead washer.  That thread then went through the far side second hole in the second Trinity.


Then to proceed with each additional component, add a Trinity, the O-bead bracketed picot above, and another Trinity, not on my needle, sadly. you can put the needle in any hole of the Trinity beads on this step, but when you draw them up, you must align them correctly.


Finally, string and stitch the far picot, and string the next building side. O-bead, Trinity, O-bead bracketed picot series, and another Trinity.  That series, is the basis of the first necklace, and in Big Top, it is interrupted by Pyramid beads every four Trinities.  And the second needle?  It sneaks back into the fray and creates the upper picot series, just like the lower one, but with the smaller drop beads. Not a tutorial, by any means, but hopefully you get the general idea!  :)


So here is the backside of Big Top, with the structure very visible. You have my permission to play with my idea if you like. Each time I add a Pyramid, I must compensate for the diagonal placement of the Trinity Beads. as I do at the beginning to set up the first one.


I took this one apart too.  I have this tunic with the red of these Trinities in it, and I wanted to make something fun to wear with it.  Could have been Big Top, but the tunic also has olive green, and no blue,  so snip snip!! Another challenge I gave myself was to use each and every Trinity bead in my work.  Just because.   Here is the result.  I call it Tribal.  Or maybe TriBal.


In order to use ALL the beads, I had to make a pair of earrings.  Handy that there were four Trinities left over!  Here's a picture that really illustrates the flexibility of this weave, plus shows you the variation of the structure that I employed.


In this weave, I alternate the Trinity beads, instead of using them diagonally.  It feels very snakey, and I love it.  It also employs some mini super duos, which you can see on the back side in these images.


I shot some of these images on the tunic itself, to let you see the color in it.


This structure reminds me of a conveyor belt, or maybe escalator treads.  SO supple!


Still two layers of structure in the work, and still, picots as a means to get from one place to another.  I really wanted to fill ALL the holes with my work too!


Happy with the earrings too!   I have a necklace plan, but it may have to wait a few weeks until I am back from a little trip to Seattle to accompany our baby as he drives across country to his first job at Amazon.  See you all later, 'gators!!
***

Ha!  As it turned out, I beaded that necklace instead of packing!!!  I told you I designed the Tribal set for a specific tunic top, which is from Art of Cloth, an addictive designer I love.  I try to buy one item, ON SALE, from each season.  This was last fall.


And here is the necklace.


Which features Triangle beads, (like O-beads, but unsurprisingly, triangular) and mini duos.  Plus some funky spikes I bought at my LBS.


Plus Swarovski Pearls, Miyuki 24k Green Gold delicas, 24k gold seeds, and a black onyx cab.


OK, this last bit was posted from the road on some pretty decent hotel wifi!  Hugs to all!