Search This Blog

Showing posts with label Christmas beadwork design. Show all posts

Friday, January 11, 2019

An Early Start on the Holidays!


You might think that publishing a new holiday project in January is poor timing on my part.

For the last few years I have been beading ornaments for my son.  This year, I created something I thought might be tutorial and kit worthy.  And I have learned that I rarely return to an idea with as much gusto and joy as I have when it is fresh.  SO I have seized the idea, and written, and kitted, and here is Holly Bauble.  You might choose to think of it as an early start on next year's decorating and gift making.

Because as usual, there are many beads in the project, I have created a set of kits for three different colorways. Each has a white background that helps the bauble stay visible against the green holiday tree and in low light, although each white is different.  The bauble is an upside-down pyramid shape, with a double layer fringe tassel.  If you are not a fringe fan, there are some tips in the tutorial that make working with the long strands a bit easier.

The original tradition Christmas red and green version, I am naming for my own location in Minnesota.  It features a vibrant Christmas red Swarovski round bead (Light Siam) for its berries and two of the greens actually have forest in their name.  The white is a clean snow with a lovely luster.


The second colorway features Indian Pink Swarovski berries, and it feels tropical to me.  The pink calls to mind both coral and flamingos, hence its name.  I like the pastel softness, and all the beads in this version have a rainbow finish.  It has a lovely shimmer, almost like a heat wave.


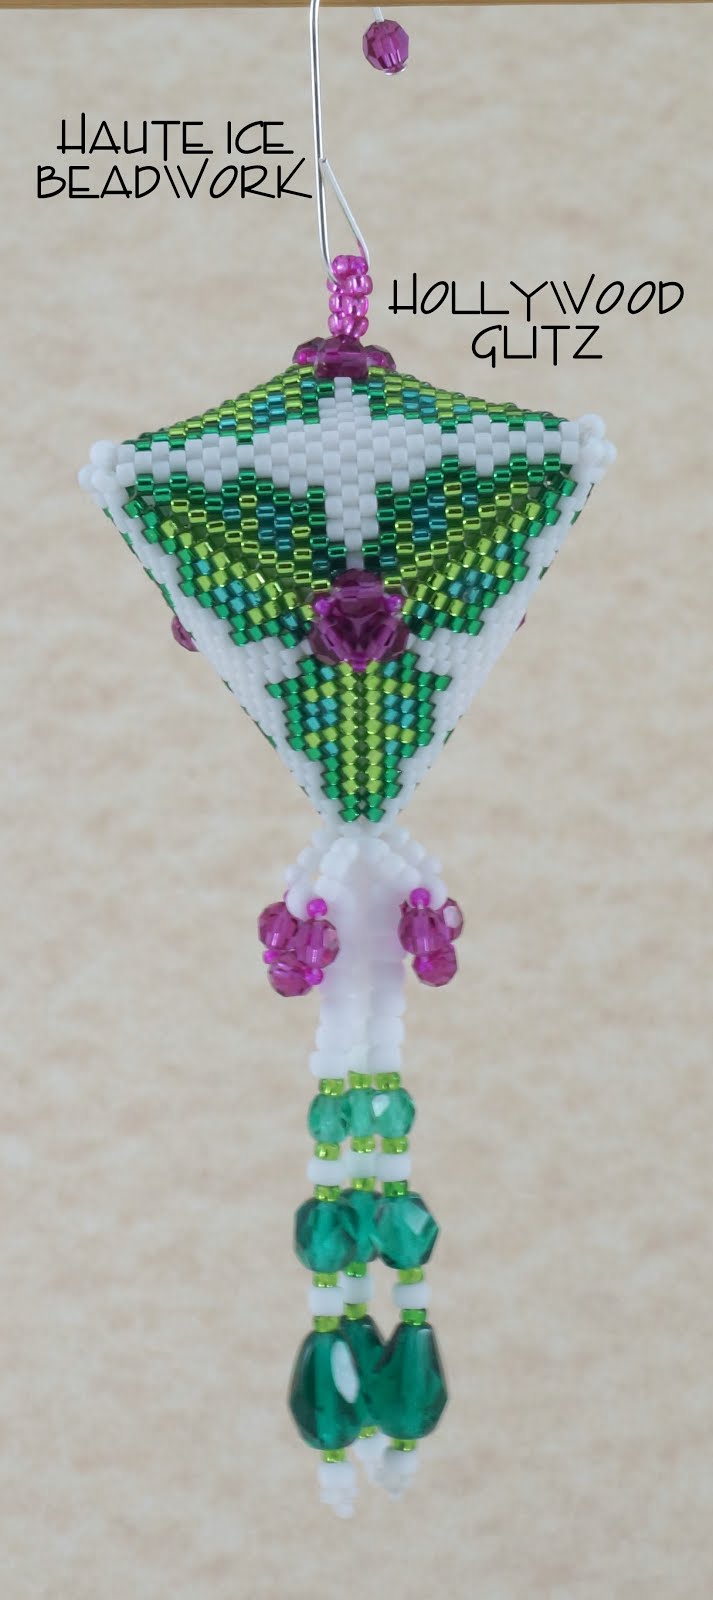
The final colorway available is done with matte white beads to make the luminous, silver-lined holly graphics pop off the surface.  It has a very contemporary vibe, and seems dramatic to me, so hails from Hollywood. The Swarovski Fuchsia berries and cool emerald greens lift it out of the ordinary.


The tutorial is 11 pages, includes the usual row-by-row, step-by-step illustrations, with photo support and text that moves bead by bead, and also offers layout charts. The weaving is Peyote, with Herringbone corners and an intermediate level project.  If you have made triangles before, the start is a little different, but not terribly challenging.

I have made several kits in each colorway, and will launch these kits on Saturday the 12th of January, 10am, CST, along with the tutorial.  I'll add a link when they go live.

I plan to re-visit this design and try some different graphics, hopefully a poinsettia version and maybe a snowflake too.  But I won't do that until late fall.

Please do not worry, I am still working on the pearl icicle necklace, but sourcing has slowed me down a bit.  It is coming.  I promise.  I personally want one, while winter is still in full swing!

Hoping your holidays were happy, and that the new year brings you all peace, joy, and plentiful opportunities to bead.


Sunday, October 30, 2016

The Rose Hip Saga... it went on forever!!!


I have worked out several ways to make this project easier and tutorial-worthy, and am hoping for a release date just after Thanksgiving!  Never say never, I guess.

This idea came from a shrub rose cluster near my home.  I had taken pictures of it a year ago, in the fall, when it was colored, and had a few hips still dangling and I fell in love with the extraordinary look of the thing! Sadly, I could not find that image, but this exceptional one has the feel of the thing beautifully.


Staggering, right?  Yep, someday I'll have a go with the fall colors, because OMG!  But what I loved most was the little hip.  BUT, I have just played with fall color and leaves and I thought it might be time to move on.  So I did more looking about at my world.  The beautiful rose patch had changed.  It's been cut back to allow it to thicken for next year and just a few little leaves had begun to sprout.  But they still had that great TEXTURE.


I did a little more research with my BFF Google Images.  I believe in working from life (lol) as much as possible when I try to do botanical imagery, so I hunted for pictures of rose hips.  What I found showed me that they came in two different shapes, both oval, and like the rondelle shape I had seen.


So first I set out to create some leaves, with the cool, quilted texture and vein-y-ness of the shrub roses.  I had to remember how to make Russian Leaves first, and then I began playing with the texture, which I ultimately got with both a combination of cylinders and rounds, and also with finish, using a matte cylinder and a shiny round, and vice-versa.  I had to stop and draw bits of leaves to figure out how to get that all to happen.


After much color experimentation, (much of which I ripped out before finishing a leaf) I finally had leaves and colors I liked.  I thought I would do a less shiny, casual version first, and then explore using silver-lined beads too, for a dressier look.  But I never got past the casual version, and I think it's plenty dressy.

I also thought I might want to use thorns. Because, WOW!  Thorny!!!


Then I went on a hip and thorn hunt.  One of my local bead shops (J-Ring Glass) is closing.  I am sad about this, because I liked their semi-precious collection especially.  I found loads of possible dressy and casual hips there (both coral and glass) and some amazing red/gold daggers at Bobby Bead and brought them all home.  I added the actual thorn beads I had been hoarding.


And then, I played a bit with the funky ends of the hips, the part that would have been the base for the rose flower, before the petals fell off and the fruit matured.  Actually, I got completely obsessed with these.


OK, meanwhile, back at the ranch, I had my leaves assembled on a piece of Stren, the same magic that supports my lilacs.  I had a rope with the red dagger thorns, and I wove them together, and tried out the hips.  I hated the results. Clunky, awkward, the daggers were stealing the thunder from the leaves and hips, and I had imagined a cascade of hips, but they were fighting with the leaves. EGAD.
I rather wanted to quit.  You cannot imagine the difficulty of weaving this uncontrolled, catchy sprig of leaves into this insane thorny rope.  I gave it a couple days, and ripped the leaves out of the rope.  I did like the bright red berries against the dark forest-y green leaves, so thank goodness, all was not lost.


Then I made MORE leaves and attached them in a triangular shape, which thank heaven, I liked. But the darn hip-tip thingies (of which I finally had made ones I just loved) were totally wrong, and masked the berries. And I thought the fat rondelle berries were awfully heavy for the sleek leaves, so they were wrong too.  OF COURSE.  I think this was just that kind of project.  Although, I often do things so many times it makes me dizzy, so maybe because (like childbirth) while it's fresh, you remember all the agony, and then later on, you think... maybe another baby would be nice.  Anyhow...


Also, I thought the placement of the hips was just too perfect and inorganic.  I removed the hip tips, and put in more hips with just a tiny Czech rondelle and a gold picot, and did it as randomly as I could, although they arrange themselves despite my efforts to be organic.

So, finally, I like the dang thing!


And a back view, for structure.


Did you make it through all the angst?  I don't blame you if you didn't, because I nearly gave up several times.  But I am glad I didn't.  Happy beady trails to you!