Search This Blog

Friday, April 24, 2015

Briar Rose

I am proud to present my 2015 Bead Dreams entry, "Briar Rose" and happy to edit my post to announce that it placed first in Ms. Maddie's Fabulous Florals.  This category honors Merle Berelowitz, and is generously sponsored by her family and CJS Sales, specialists in vintage jewelry supplies in NYC.

I did not know Merle Berelowitz, but I believe I share a love of all things floral with her.  I hope her family finds the amazing collection of works presented in her memorial category pleasing.

My entry was the result of several ideas. First, I planted a new succulent ground cover in my garden last summer and the sweet, prickly little thing was happy enough in its new spot to bloom. The flower had a flat brown face, and five pointy golden petals that curled away.  I loved it!


The basic shape of my rose components, and the idea of thorns came from this adorable plant.  I started with three 35mm cathedral jewels, which appealed because of the Pantone color of the year for 2015, Marsala.


Then I fiddled with various petals.


And finally created some I liked, and tested colors and application.


Then, I played with leaves, thinking spike-y, and rose-like.


Which were created from long oval Swarovski jewels and diagonal peyote.


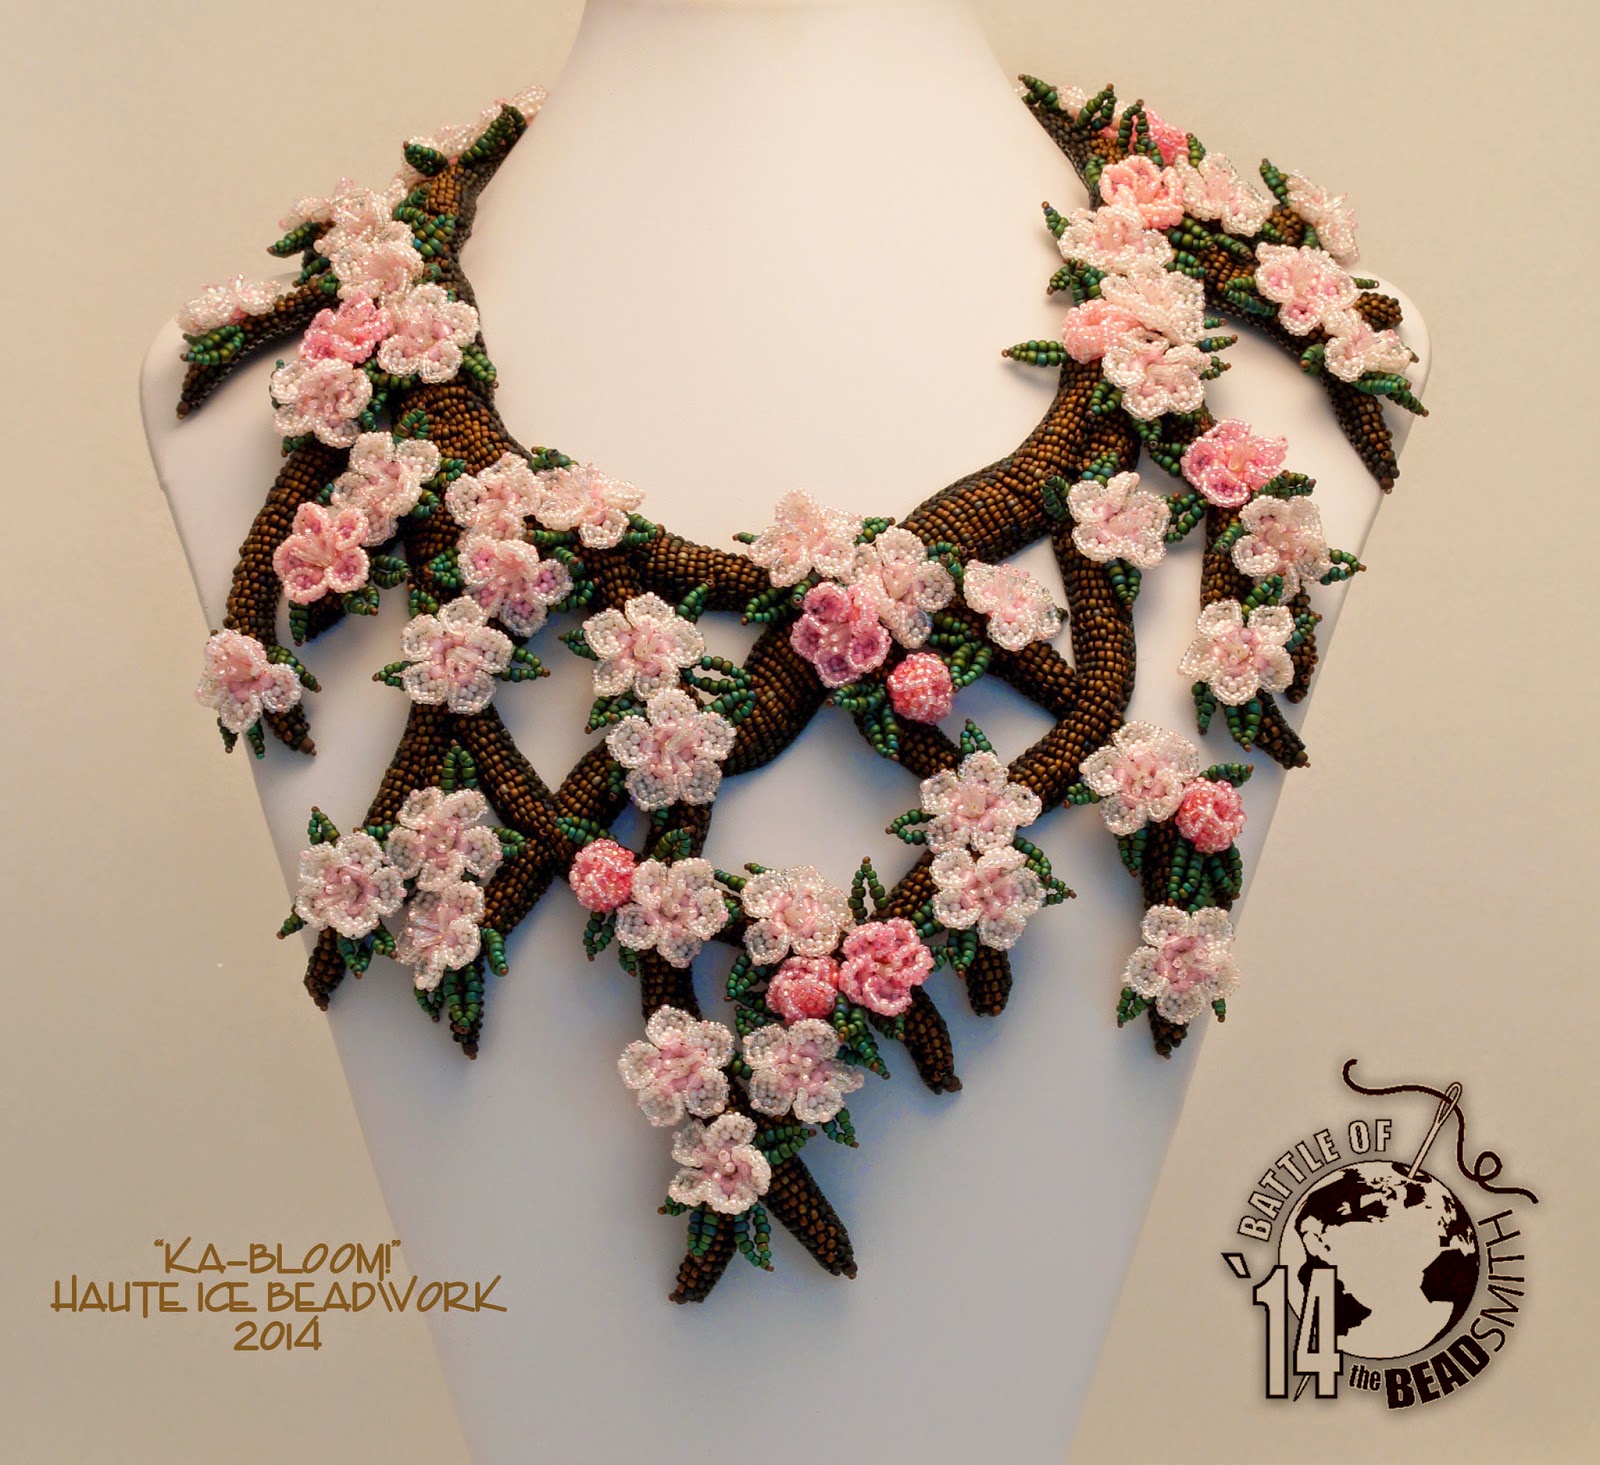
Once I had leaves and flowers, I wanted to further pursue the bas relief branch technique I created last year for "Ka-Bloom", which involved couching satin cord to bead backing and beading over it.


But this time, I wanted to make thorny vines.  I sketched, trying to create a sort of dangerous looking growth of rose vines, that might have served as protection for "Briar Rose" herself, (aka Sleeping Beauty) as she lay sleeping in her castle, awaiting her true loves kiss.


I carefully plotted leaf and thorn placement, and then, began beading away... 


But I struggled with color, and made THREE versions before I could decide which I preferred.  Jeez. For what this is worth, I don't find using color challenging.  I have a pretty good idea of what I want.  It's getting the combination of beads, thread and backing that will produce that result that is hard!

 Reject #1
Reject #2
Until finally... I found a combination I liked!


Pretty happy with my little clasp too.

Surprisingly, it seems I took no picture of the backside, always a point of pride for me.

But I quietly begin to wonder.  Why do I work so hard at this?  Particularly when what I make seems somehow not to belong to me, but instead to those who would show it, if they choose?  Or to those who would see it, but only when they are ready, and on their terms.  Some little thing in my heart is broken, and I hope I can mend it.  I think my competition days might be drawing to a close.

I wrote the above paragraph on a difficult day.  I leave it here because I imagine I will need to be reminded of how I felt on some other day, when I am doubting myself and others.  I participate in competitive beading because I find it pushes me to reach for MORE in every way.  It's not easy.  And it can be emotionally draining, but it can also be a very good thing, and I hope that I can remember to keep that GOOD at the top of my heart and mind going forward.

Thank you Kinga for the photo!

Friday, March 13, 2015

I Made a Neck Form (with help from my carpenter husband)

Before I finished my Bead Dreams piece, I knew that a normal neck form was not going to flatter the work.  I needed wider shoulders and a broader chest, and after an exhaustive hunt, I knew what I wanted was just not out there.

I have never really been very satisfied with the forms I purchase, and one of them was so crooked in the neck area that I had never been able to use it.  I thought I could perhaps take it apart to see how it had been made, and make my own custom-shaped one.  So, I ripped off the cover, and took a look.


Were you expecting something different? I was.  :)  It had 1/2 inch foam padding, which I removed, and then sized up the components.


It had a base, a support with a curve, a piece of what looked like masonite to me, stapled to the curve, and a funky little neck thingy, hot glued in place.  This one was 1/2 inch off center, and that probably explains why my work always looked lop-sided on this particular form.


So before I was even finished with my piece, I asked my husband Carl, (aka The Best Man Ever) if he could make me a base, support piece, and differently shaped face for a custom form.  He built a new wood shop addition onto the garage last fall, and seems to enjoy the place.  He has been busy making new furniture and storage for it and installing machinery.


He said he would help me, so I designed a shape I thought would suit my work.


Here is how it differed from the original form. I wanted a wider shoulder and broader chest.


I made a pattern of the curved support for Carl, and we discussed materials.  He suggested aspen, for the curved support and base, which he would finish for me, so I would not have to cover it.


I thought the curved face could be masonite, but he said it would be better to use special curve-friendly plywood and create exactly the curve I wanted by laminating layers together over a form, which he made, and used to create the face.


I didn't take a picture of the laminating process.  :( But this was in his shop when I sneaked in there... something else being laminated into a curve, like he described the process for the face of my form.


Here is a pic of the finished curved face in my workspace, attached to the base and support Carl made, before it got its little neck thingy. I thought it looked like a shield.


Next, came the cover.  Here's the one I removed from the old form.


I shopped for materials and found three possibilities.  Two were light weight vinyls, and one, some sort of actual leather, bonded to a stretch interfacing, similar to what the original cover material looked like. 


I also found a place in NYC, that made "custom forms" and sold their leatherette material by the yard. But I decided to use the white vinyl for a first try and made a pattern.  Maybe because of the broader shoulders, or the heavier vinyl, I needed to create a dart to help make the neck shape.  


Here's the vinyl cover, cut out and assembled.


I still could not imagine how I was going to get the vinyl to wrap flat around the back of the curved edges of the form. So I paid a visit to the local Tandy Leather and got a great lesson on the use of leather adhesives from an adorable leather geek.  He suggested water based contact cement, and assured me it would be sufficiently strong for the task at hand.  He also said I would get one chance to get it positioned correctly, because once the two tacky surfaces touched, the bond was final.  YIKES!  He suggested I pin the cover in place first, apply the adhesive, and then wrap.  I was REALLY NERVOUS about this.  But I took his advice.  I glued on the 1/2" foam (from the fabric store), and pulled the vinyl into shape.


I was really glad to have the thickness of the bonded plywood to pin into at this point. Crunch time came, and I painted the vinyl and the back of the plywood with adhesive, and let it get tacky.


Here are the tools I used, recommended by the adorable Tandy Leather geek.  I wrapped one of the spreaders I purchased (which was great for spreading E-6000, btw) with a 1" strip of foam, and that was the right size to apply the strip of adhesive that I needed, and the foam held the watery glue nicely, with very little dripping or mess.


I let it dry overnight, and actually got up around 3am to see if it was still ok!  The next step was to prep that back for the paper cover.


Carl let me steal some of his gorgeous drawing paper for the back.


I told myself from the beginning of this adventure, that what we made would have to look neat, clean, and professional or I simply could not use it.  I am really happy with the results!


And I think mine actually looks better from the back, than the commercial one.


Finally, the button bit is glued on to the top, and I am ready to shoot pictures tomorrow.  Carl cut me a masonite disc to cover, but the original was cardboard, and that would have allowed me to adhere the center as well as the edges.  Next time!

And now,  Carl thinks my piece needs its very own fancy pants wooden box.  I am one very, VERY lucky girl. Whatever that shop addition cost, it was worth it!  

Do you think I have to give him co-design credit?

Sunday, February 15, 2015

About Time to be Ka-Blooming!


I write my blog partly for you who read it, but partly for myself as well.  I put information here that I refer back to, when I am trying to remember how I did something, or why I made a particular choice.

Yesterday, I struggled with a technique I did last year, and when I woke up this morning, I thought, "Go read what you wrote about this last time!"

But I didn't write!  So...


The things unique and worthy about this piece are the little flower components, and the bas relief branchy construction that supports them. They are both inventions specifically for this work, and the most interesting art of it.     Ha!      "Art" instead of "part" was a typo, but it has real meaning.  For me the most exciting and interesting part of bead art is mastering the part I do not know how to do!

The piece was meant to be a representation of a little plum tree my son picked out for our yard as a young child.  That tree went through a lot, and even had to be moved from it's original planting spot to protect it from hungry deer, who love fruit trees.  But every year, despite cold and hardship, it bursts into bloom and I want to remember it forever, particularly for the perserverence it embodies.

When I started the work, there were no flowering trees in bloom, so my BFF Google provided some images for me to consider.  And below those images are some of my flower bit efforts.


I liked things about each of these images, but my favorites were the lower right and lower left.  In the lower right, I loved how the color in the buds was deep and dark, and as the flower opened, it paled and softened.  I decided to try to create a blossom that would collapse into a bud, and work it in a range of colors that would replicate that color change.  I think I bought every pink seed bead available in the Twin Cities to try to meet that end.  Color is always a struggle, since you can't just mix it like a painter.  You can influence the color of any bead with the thread you use, and the ground you put it on, but it has to be close to begin with.

Here's my collapsible flower component, in several different stages of opening and color selections, all exactly the same stitches, just a different finish, to either hold it together or allow it to relax open.


I have already written about the flower in my post "A Little Flower for You" and you may make the component for yourself if you like.  It is free to you, and my only request is that if you use it, you show me what you have done.  I do not explain how I collapse and control it there,  but the images above would help you, if you wanted to do that.  I used the tightest and darkest of buds as a clasp!


In the image above of my inspiration collection, the lower left side photo was how I wanted the branching to look.  


I loved that the flowers appeared before any leaves, and that some branch was visible.  This project had a two month work time (for Battle of the Beadsmith) so the density of flowers in the lower right image was out of the question.  But I was interested in the branching idea, and I wanted it to have the quality of bas relief, partly for the challenge of it, and partly because I though it would be more comfortable to wear with a flat back.

So here is how that process went.  First I drew the branching I wanted.  I had to create the branches in two pieces, since the largest piece of Nicole's Bead Backing is 9x12, and the whole image did not fit on one piece.  I made one branch for each side of the work...


...colored each side separately and cut each out to make my pattern, and then traced it onto the NBB...


...then I stitched inside the line, to stabilize the edges and cut out each piece, marking the overlapping points carefully, so I could align and stitch them together, and carefully cut each piece, and...


...then, I couched satin cord onto the assembled backing, to provide dimension, and began covering it with seed beads...


...the right side is beaded, and the left side still shows the cord couched on.  I had to consider how the overlaps would appear, as though branches were actually crossed and some would be in front and some behind.  I also had to curve the work as I added the cord, to make sure it would flex easily over the shoulder area and that no points would stick up away from the skin.  I used lighter and darker beads to help with the three dimensional illusion.  It is hard to see in a flat photo, but here is a side view.  I know the flowers are overexposed, but I wanted to show you the dimension of the branch.


This is an easier to read view, but the dimension is not as readily apparent.


So, remember, I thought I would NOT have leaves??  Well, As soon as I finished the branching, I thought I might be in trouble.  The thing had a "creepiness."  Now I let that be OK in my mind.  I told myself that it was a good representation of winter's bare earthiness and, that once I got the flowers on, I told myself it would be both the naked spareness of Winter and the abundance of Spring.  Right.   


But at some point, the truth was pretty clear to me.  Maybe around the time real fruit trees began to bloom and I got to see them in person for myself.  I think I got the branch color wrong.  Because they appear in the shadow in photos, those branches look pretty dark.  But when you look at the actual color,  it's a pale silvery grey/taupe.  And that works pretty well (nature is so smart!) with the pale pinks.  But the browns I chose were not a good ground for my little flowers.  The components were at war with each other.  And there was not much to be done at that point, as I already had my backing on, and there was just no time to rip and redo, or start completely over.  That backing was a real challenge!!!  See how the work curls toward the body?  I am super proud of that!


So I added some leaves, after the fact, hoping to mitigate the severe contrast,  And they helped, but not really enough.  Sadly, "close enough" really isn't.


And because I never wrote this post... I just about made that SAME MISTAKE AGAIN.  Or at least, that is my story, and where I choose to place the blame, and I am sticking to it!!

I am using this same bas relief technique in my Bead Dreams piece for this year, and I had a shocking combination of poor choices going yesterday.  And I nearly went ahead, because time is running out. But I simply refuse to trash any piece ever again for a deadline.  SO...

I have ordered, beads, reconfigured my vines, and changed the color of my ground.  And with any luck, the snow on the East Coast (those POOR people!) will not delay the right beads too long, and my new ground color will be an exactly what my other components need to set them off perfectly.

Bead Dreams?  I hope I can still do it.  But my friend Mel ran out of time to accomplish her goals last year, and if it comes to that, I will learn from her choice, and wait until there is time to do the thing justice, rather than compromise my results.  


It's not awful.  I like it.   But I could have loved it.  Never again.  I will stay calm like the athletes I admire, in the face of pressure, and make the right choices, instead of feeling the pressure and making ones that will get the deadline met.


Wednesday, February 11, 2015

Swarovski 2016 Spring/Summer Launch Presentation

Boy was that ever fun, and inspiring!

I was invited to a Swarovski launch presentation this morning at my favorite sparkle wholesaler, Rhinestones Unlimited.  I have purchased most of the flatback crystals I use in my dance wear from them for many years, as well as a some things I have used in my beadwork, and they are great to work with!  They write a blog too, and here is a link to their post about new flat back colors available any day now.

The presentation by the knowledgeable Swarovski Rep Debbi Simon (a fine artist who was a Bead & Button employee for a time... you might know her book about crystals and adhesives called Crystal Chic) included an introduction to a tool that some of you might find very useful.  It is an iPad app that is essentially an interactive catalog of all available Swarovski beads, pearls, fancy stones, sew-on jewels... all of the over 16,000 items in their current inventory.  I downloaded it (free from the app store) and plan to play with it further this evening. It has several functions.  Fair warning, it took about 30 minutes to download it completely.

The app includes tutorials which help you understand how to use the catalog, filter products, find product details, and search a filter.  Then it also teaches you how to use the selections feature to choose products, group them to look at colors and finishes together, and even copy and arrange them as you see fit, maybe into the necklace or garment embellishment of your dreams. A very powerful design tool.  Pretty cool!  And once you have your selections made, it will make you an ordering list. Yikes.  It could be dangerous to the wallet, methinks!

In addition to learning about this cool app, we got to see and touch a wonderful inspiration look book, and receive a print version of the book, as well as the entire print catalog of available Swarovski products, featuring the new shapes, colors and finishes.  We were also given back issues of Sand, a Swarovski magazine of sorts, full of inspiring designs and designer profiles from past releases.


I really liked the pastel powder finished crystal pearls and matching jewels, which reminded me of E.H. Ashley Ultra Color finishes.  Plus of course, samples!  So I can show you what I saw.  Here's the sexy box...


And the cool products inside!  I love the pastel pearls, matching chatons, and Metallic Sunshine!  I have to say Blush Rose is not my favorite, but then it would be fair to say I am not very subtle most of the time. I like color purity and vibrancy, but it's nice there are pretties for every taste.


Rhinestones Unlimited host and owner Angela Peery and her staff provided tasty treats, and we all got a goody bag, which included...


...yummy checkerboard jewels and beads, plus a lovely new crystal pendant called Lotus, (top) which to me is an elegant sand dollar, and gorgeous!  PLUS...


...A bead mat with a measuring calibration of the left side.  Astonishing to me, as I mark all my mats in inches across the bottom with a permanent marker.  Apparently I am not the only one who likes this idea.  AND, the Rhinestones Unlimited version of the crystal katana, but without the blister-producing inset stone, and a narrower profile which suits my small hands better.

The best part of the day for me was the very inspiring imagery I got to feast on.  New ideas are floating happily in my brain.  I almost wanted to skip the Bead Dreams work for today and go try out some of them.  But that will have to wait.  Loved it!  Thanks for the invitation Angela, and for the great presentation, Debbi!

Thursday, January 29, 2015

Marching (Ambling?)Toward my Dream

I have arrived at the point in my Bead Dreams process where the meditation is nearly over and the magic must begin.  I generally create parts, and then engineer a whole.  The parts assembly is meditative and pleasant.  I can do some of it (once I have finished with making samples and know what to make) while relaxing on the couch.

But this moment between the methodical assembly and the aesthetic decisions and engineering is sometimes daunting.  It is the part where time to think and evaluate is most beneficial.

I'd like to show you, but I just can't.

For me, if I have a conflict with someone else, I am most successful if I work it out with them and them alone.  Anytime I try to tell another person my troubles, a kind of dishonesty begins.  And I find that not only do I needlessly burden a friend, I also cripple my floundering relationship.  For me, this is the perfect analogy.

Making a big piece is like resolving a conflict.  And in order to be honest with it, I have to work it out with the components, and my own heart and hands.

So yet another image free post.  but I look forward to being able to share!

Are you at work on a Dream?