Search This Blog

Wednesday, May 17, 2017

How to Put a Leather Backing on a Swarovski Jewel

Many of my tutorials call for the application of leather to the back of a Swarovski "Fancy Stone".

These stones have pointy backs with an anodized coating that reflects light back out of the glass to yummy effect.  I cover the backs with leather for several reasons.

First, the backs can be nicked or chipped if dropped, or sometimes just through repeated use, the backing shows wear.  Vintage stones are especially susceptible to damage, and the most recent ones are the sturdiest. So one purpose of my leather backing is protection.

The second purpose is aesthetic.  I think the exposed silver backing does not merge nicely with the beadwork that is not silver itself.  I use lots of color in my designs, so I want to have a matching backside for the work, like this one below.


I also think sometimes necklaces can be made reversible, affording a more casual result and turning a very sparkly stone into just a beautiful shape to work around, like in my Pineapple Blossom necklace.

Finally, I think there is a comfort factor.  I like the feel of the soft leather against my skin, more than the cold, pointy anodized backing.

Lots of things are hard to learn from just hearing how they are done, but much easier to understand when seen.  Honestly, I could not imagine how Peyote stitch was done, despite looking at a diagram, until I took my first beading class.

SO, here, to add to the text and photo instruction I have provided in my tutorials, is a little video for you.  It's my first try, and my cameraman husband did not know I was planning to get the job done in one go, so he speaks up, which is added entertainment for you.  I know, I know, I really must learn to edit and create lovely films, but I think the need here is immediate, so without further ado...


The jewel used in the demo is Iridescent Green, which means it has a factory coating on its surface. As you saw I was able to rub off a glue mistake with my thumb at the edge, and you will be able to do that on the surface as well, even with color coated finishes like AB, but this is safest with modern stones,  Be very gentle with vintage finishes. Be sure to let the adhesive dry before you try to rub it off.

My rice bed is immense because I do a dozen jewels at a time.  Yours can be much smaller. Something with a lid is a good idea, to avoid spills.  I use an ancient margarine container, when I am gluing just one stone at a time.  :)


My press cloth is light grey polyester organza.  Protects my iron and the leather, keeps them from sticking to each other, and easy to see through to what you are doing.  Any pastel or white works, but the grey is the most invisible.

I mention Poly Pellets, which are essentially Beanie Baby guts.  I buy mine at the local craft store, but you can find them here, at Joann Fabrics.  Rice beds are traditional in complex gluing projects.  I learned the trick from my model-making son.

And these are the trimming scissors I adore from Gingher.

The pen is a roller ball, which works really well on leather and suede.

The adhesive I use here is E-6000, and a pointy applicator tip is not your friend for this project. A tube with a flat opening allows you to wipe on the adhesive thinly and evenly and the little ones are easiest to manipulate. Please be careful with this glue.  The fumes (as the adhesive cures) are carcinogenic, which is why I recommend that you cure it for at least 6 hours, (and 24 is better) in a closed bathroom with the exhaust fan turned on.  I just read about a new, reduced smell, non-carcinogenic adhesive from the same manufacturer, and I will test it in the coming weeks and report back here on it's usefulness for this purpose. NOTE!  I have done all my more recent backing with Gem Tac from Beacon.  It avoids the chemical connection entirely as it is a water-based adhesive.  It has been working great for me, and no clients have complained. 

Please forgive the primitive nature of this video.  I think, you have to start where you are, and I have already learned a great deal in creating this very simple little bit of film.  Hang in there with me, and my efforts will improve with time.

Now go make yourself some pretty, leather backed Swarovski Fancy Stones!

Thursday, May 11, 2017

Five Lessons Learned by Failure

Well, it has taken me a while to fully process my first attempt at teaching.  It was interesting, and VERY educational.  I do not know if I want to further pursue this or not at this point.  But I am going to write down what I learned, so I can remember it for myself, and so maybe you too can learn from my mistakes.  I made a healthy bunch of them, but maybe had a little success too.

The Upper Midwest Bead Society hosts a "Demo and Do" event every spring.  This event is an opportunity to learn from other members in the society.  Some members are wonderful, experienced teachers, teaching their own designs, like Diane Fitzgerald (Beautiful Beads), Doris Coghill (Beads by Dee), Maggie Thompson (Maggie T Designs, who sells her beautifully designed portable Kumihimo stand), and Barb Knoche, who taught the first class I took ten years ago, a wonderful Peyote bracelet of cube beads.  And then there are other members who demonstrate techniques in which they are proficient, or the designs of others.

I had never attended the event, but it's a friendly, kind group of beaders, and I thought I might be able to test the teaching waters in a low-stress environment.  Here's a link to information about the event. Each class was 50 minutes long, and cost $5 for members, which I expect paid for the rental of the space at the Textile Center.

I took two classes in the morning, which was a very good thing.  The first was a Netted Pearl technique, and I had fun playing with the stitch.  I tried 4 drop, 3 drop, and 2 drop, which I thought was a little thready for my 4mm round.  Then I did a little Chenille break in the netting.  Very fun!

My second class was a Micro Macrame class.  We were told to learn some knots in preparation for the class, but I was CRAZY busy last week prepping my tutorial and kits, so I watched a video, but did not actually try the knots.  I thought I would manage, because I usually catch on pretty quickly.  BOY WAS I WRONG.

I charged off to what I thought was a great start with my cord in neat little knots, until I was told I was not doing the knot correctly.  The right knot was demonstrated, but I had the other thing in my head, and it would not leave.  I foundered for the rest of the 50 minutes.  I never got the first knot.

So here was LESSON #1.  SOME CLASSES HAVE PRE-REQUISITES.

I know if I took the time to go back and look at the online video of the the great guy with the gigantic cord demonstrating what I was supposed to have done, I COULD do it, and I probably would enjoy it.  BUT, again, too little time, and too many pressing obligations in my life.  I didn't mind not catching on in the time I spent.  It was a good introduction to something I might like to pursue later on.

Then I had a free period before teaching my class, the last session of the day.  I sat at a table for half an hour, and wove about 3" of what I planned to teach, using Chenille stitch in a pattern to create a spiral.

OK then, time to teach.

But nothing went quite the way I expected it to go.  I did anticipate that I would probably be nervous. I thought my hands might tremble, but that didn't happen.  What DID happen was, I could not control my thread.  It tangled repeatedly.  I untangled it repeatedly. That is really rare for me. Two lessons here.

LESSON #2. EXPECT THE UNEXPECTED.
AND
LESSON #3.  FINGERS WORK DIFFERENTLY WHEN BEING WATCHED.  

I think this is why at the shoe repair place there is a sign that says "Price triple if you want to watch."

Despite the difficultly with my uncooperative hands, I did manage to get the stitch demonstrated. But flustered as I was, I did not explain the techniques I use to manage my beading mat and rotating the cord around which I bead, because my mind was much too busy making up for the sausages standing in for my well-behaved fingers.

So my six students set off to try doing the stitch, and I realized immediately that Lesson #1 from my earlier class was in play too.  If you have never done Chenille stitch, it multiplies the difficulty of working it in a pattern by a factor of a gazillion.  SO, for the ladies who had never done the stitch, I demonstrated how to do Chenille with just two colors, so seeing how the stitch works is easier. Fortunately, they all got that, I think.

And one very clever friend of mine, quietly understood the pattern,  Although she had never done Chenille, she was able to get an inch of the pattern done by herself in really good colors she chose.


LESSON #4. EACH STUDENT WILL HAVE DIFFERENT ABILITIES AND NEEDS.

Just like when I taught dancing for Arthur Murray studios, and when I taught Costume Design and Stage Makeup at Purdue University, everyone comes at learning from their own place, and in their own style. Some people have innate ability, and some people work really hard at comprehension, and everyone has a different frustration thresh-hold. Good teachers can adapt.

I really want to believe that for a first timer, I managed to  help everyone get SOMETHING out of the class.  I felt badly about those who did not get their Chenille to spiral on the first try, until I remembered my own inability to tie a knot earlier in the day.  I got something out of that experience, even though it was not a bracelet.  And there was one more lesson too.

LESSON #5. TIME FLIES WHEN THERE ARE 6 STUDENTS AND 50 MINUTES. 

Will I try that again?  I don't know.  I am still processing the experience.  I am almost 64, and I have SO little time, and SO much I want to do and try.  I feel like I am still new to illustrating and writing tutorials.  I just don't know.  BUT it was a great learning experience, and for that opportunity alone I am very thankful.

If you happen to have been one of the 6, thank you for hanging in there with me.  Thank you for your patience and kindness.  I felt some of you actually supporting and calming me, and I will be forever grateful for that.


Monday, May 8, 2017

Pineapple Blossom Necklace


This project is a combination of two stitches (Peyote and Chenille), and two different bead finishes (shiny dark rainbow, and matte pastel rainbow). The 29 page Intermediate-Advanced level tutorial is available here in my Etsy shop.

Sadly there are way more than two different beads in the project, but whenever gradation figures into a design, it's a safe bet that MANY different sizes of any bead used will be necessary.

I appreciate that buying $3 worth of beads to get three of them does not always fit into everyone's budget.  I have had a great time playing with colors, and have three colorways available as kits in my Etsy shop.  The kits actually cost less than buying all the beads you need separately, and save you time.  But if you want to create your own version in your favorite colors, there is a handy chart on pages 3 and 4, that show your which beads need to be dark and which light, and what needs to contrast with what.  I struggled with that myself, and wanted to make it EASY for you to do!


First, there is a warm, soft golden green, which reminds me of new leaves, paired with a metallic olivine rainbow effect. I love the flashes of purple in that dark bead!  I called it FROND, and that kit is available here.  I think you can see in this photo the texture of the bezel, which very much reminds me of a ripe pineapple, hence the name.

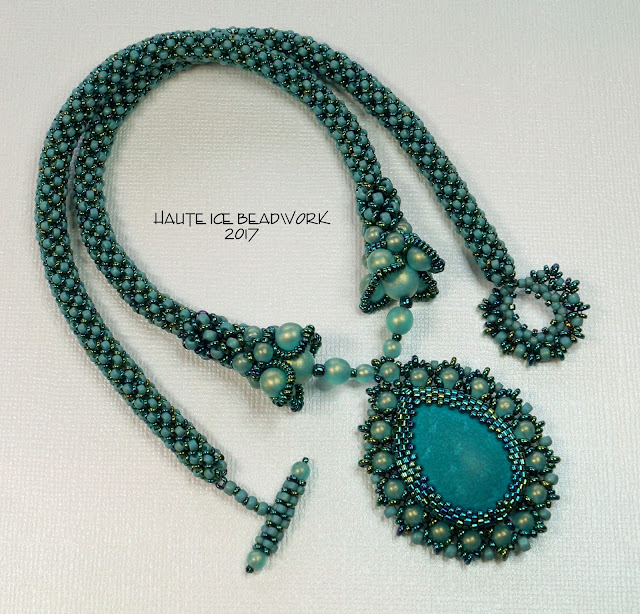
Since the pineapple name evokes Hawaii for me, I thought there should also be a SURF color, which is soft matte pale turquoise, accented with deep teal metallic rainbow finish.


This image shows the back, and another important part of this project.  Before it is bezeled, the 20x30 Swarovski jewel is backed with soft leather, in this particular case Tandy "Super Softy Pigsuede" but Lambskin works really well too.  A soft, flexible piece serves well, and the process is described with photos in the tutorial.  I plan to try a making a video of that process over the next weekend, to help those of you who want to do it for yourselves.  If you don't, it's already been done for you on the jewels in the kits.  Surf is available here, although currently sold out.  But I will be re-stocking ASAP!


One more thing about the SURF kit.  The 15/0 beads at the center edge of the bezel are a tight fit, and one of mine (center bottom) sat a bit cooked.  I hate things like that.  BUT I think if I had not pointed it out to you, you would never have noticed.  SO, cull the tiniest of these beads and save them for the center of the bottom of the bezel.  It's interesting to me that each bead, even from the same manufacturer, has its own character.

Now, to the final colorway, the Orchid MIST kit, available here.  Had to have a flower for the Hawaiian theme, yes?  And orchid is a good description of the lighter color, with deep purple and navy metallic rainbow accents.


 I have to tell you, I have really struggled with photographing this color to get it to look like the real thing, and I think the above shot shows the color most accurately. There are two things I want to point out to you.

First, the bezel edge bead is transparent.  I wish it had a little more presence than it does when worn, especially against a darker color.  SO, I have given you a second, tiny bag of those edge beads (J), inside the bag containing the ones I used in my sample.  The beads in the little bag are opaque and have a bit of moderate shine. You can test for yourself and see which you prefer.  I also put in some of the same beads in the smaller size in the H bag, for the center of the bezel if you prefer them.  Your choice: neither is a mistake, just a slightly different result.


The second thing I want to discuss with you is the N bead in this first Orchid colorway, that peeks out of the bell-shaped cones at the bottom of the ropes.  I did not find what I thought was the PERFECT bead for that spot, until my second set of kits.  So first generation Orchid kit buyers have three choices.  Two sets of them have a gold finish on them, and if you look at the first photo, you can see I used the lighter one in the sample I made.  It's OK, but a little golden, for the rest of the beads.  I think the other gold finished bead looks a little taupe-y, and not my favorite. Marie, who tested this project for me, used the purple bead, and I think it blends in better with the rest of the colors.  BUT you get to make your own choice.  Remember that it sits almost entirely hidden in wearing, and is seen only in shadow.  Make the choice your prefer.  None of them is a bad choice.  Please yourself!

I had a wonderful release of this tutorial and set of kits, (the photo below is the result of the first 12 hours, and barely fit into my very large mailbox) and I want to thank you all again, for your appreciation of my pattern, and your purchases.  If there are ever questions you have about a process or step, please contact me, and I will do my very best to help you.


 May your mat be full of beauty, and your heart full of joy!

Wednesday, May 3, 2017

The TOHO Challenge - Winter Garden of Discontent


Over the last couple years I have begun to get to know the nice folks at Bobby Bead, a local bead shop in Uptown Minneapolis.  And as a result of that, I was invited to be one of the featured designers in The TOHO Challenge.

Here's how it works.  Toho chooses a collection of beads, and each featured designer world wide gets the same box. Everyone beads, and then, there is a big reveal at the Bead and Button Show, where all the designer's work is featured in showcases neighboring the Bead Dreams entries.  Here are the 2016 featured designer's pieces.  Each year there are some fantastic pieces, and I always find it really interesting to see many varied designers working with the same collection of beads.  I encourage you to check out the show, just outside the shopping area in the Wisconsin Center.

At the show, interested beaders may stop at the TOHO booth and pick up their own mini kit of challenge beads, and submit an entry themselves.  Here are last year's public entries.


All work is kept secret until the big reveal, BUT LUCKY ME, I get to show my work early, because it was chosen to serve as the TOHO advertisement in the current edition of Beadwork Magazine.

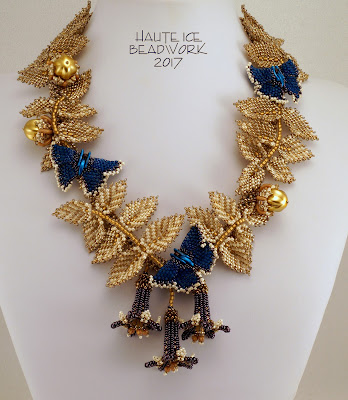
To tell you the truth, I personally found the colors challenging to work with. My beads arrived on Christmas Eve.  I opened the box, and was flummoxed.  Most of my work is nature inspired, and there was nary a leafy green bead in sight.  In fact, at first glance, not much color-wise from the natural world at all. But, thankfully, I am a gold-over-silver girl. I read somewhere recently that the colors were taken from the Hall of Mirrors at Versailles, which now makes good sense to me.

 I took a walk in the park at the end of my street in the late afternoon, and saw golden leaves, still clinging to sleeping branches, with a hint of sunset glow making ice crystals sparkle.  I thought, "here it is!" and decided to create a winter garden piece.  I found myself saddened by the political climate in my country, and the ideas in Richard III's "Now is the winter of our discontent..." soliloquy were in my mind.  I would make a stark, wintry vignette, and then infuse it with hints of hope and joy.  Because I simply refuse to be a saddened by circumstances beyond my control.


SO, "Winter Garden of Discontent" was born, and developed over the icy month of January.  It was nice making little golden leaves in the cold and darkness.  (For those who have asked, they are the same leaves in my Rose Hips tutorial, available on Etsy.) I saw a beautiful image posted by a friend on her fB page of dangling Brugmansia flowers.  They bloom only at night  and I loved that, believing it fit neatly with my theme, so I created a trio of them.


I have since been playing with this flower shape, and am REALLY looking forward to this Friday, when 50 new colors of Demi beads will appear at Bobby Bead.  I have two variations of these flowers ready to be illustrated and written up as components in a new piece I am envisioning.  And these new colors?  YUM!  Can't wait!  Here is a sneak peek of my variations.


I LOVE those new DEMI BEADS!!  Great structural potential, and unique accents too. 


The little butterfly may be involved too.  At first I thought it would be a blue bird of happiness, but the crescents and demi beads wanted to be butterflies instead.  The butterflies are an amalgamation of the blue Morpho and the little blue Skippers that flitted through my childhood on Mount Helena.


And the acorns?  I believe they will re-appear in a project for the fall.  I have ordered those beautiful Czech Melon beads in a a myriad of autumnal colors, and I can't wait to have time to play with them.


Thanks TOHO, for choosing me as a featured designer, and thank you also for the great introduction to Demi beads and Czech Crescents and Melons.  They are a delight!