Search This Blog

Thursday, August 30, 2018

Vintage Jasper - Verdigris

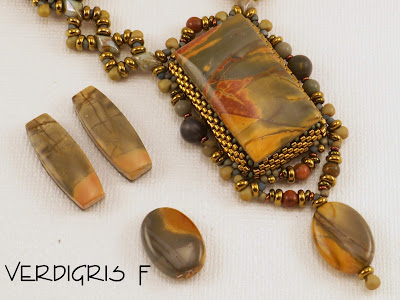
Verdigris is a patina that forms on copper exposed to the elements.  It is usually bluish-green. Me trying to explain the chemistry of it would have to be pure plagiarism, but I did read somewhere that it was originally a French term, vert de Gris, which means " the green of Greece".  I love that idea! Since I am going for a vintage quality in this project, it seemed the perfect name for this set of cabochons, and their supporting beads. I hope you'll enjoy the GemDuos especially.  Without further ado...


And here is a photo of my sample for this colorway.


Now, I'm off to start writing listings and making sure I get them all right.  
Releasing Saturday, September 1st, noon, central time.


Wednesday, August 29, 2018

Vintage Jasper - Copper Patina Cabochon Sets

There are only 6 of these sets.  The setting is dark, and allows the drama of the stones to be featured.  Each has some green patina markings.  I do not see landscapes in this set as much as pattern and contrast. I will let them speak for themselves.  At the end of the post is my own copper necklace, which I made with the set of dark green cabs that I used initially to test this idea and work out my pattern.  I think any of these cabs is better suited to the colorway, because of the mostly monochromatic nature of it.  It features pattern well, but is a little mundane with simplicity.


So, remember, I said I thought my sample necklace for the Copper colorway was a little mundane?  This colorway is really suited to the patterns in the cab sets I chose for it.  It's simple, although it includes some of my all time favorite beads and colors. Matte Copper finish on the GemDuo beads.  Miyuki #462 Metallic Gold Iris for the drops and some edgings, with little flashes of purple and teal.  Toho #329 Dark Hyacinth Gold Luster in the bezel.  They make a great supporting cast framework in this case, not a starring character.  I tried using colors in my original mockup, but they were a little parti-colored, and while nice with my simple dark green cabs, they overwhelmed the patterns in the stones. As the saying goes "Sue me." 

But I wanted to save the best of the new cab sets for YOU!


Tomorrow, Verdigris!

Tuesday, August 28, 2018

Vintage Jasper - Antique Bronze Cabochon Sets

In this set of Antique Bronze cabochon set photos, I have placed the rectangle cabochon on top of my sample necklace, and the barrels and oval at the side for your viewing purposes.  Releasing Saturday, September 1st at noon CST.  Sorry, to be fair to all, I just cannot reserve sets for anyone.

A looks like a desert sunset scene to me.

B and C are almost twins, probably cut at the same time, surely from the same slab.  
There were no matching twin barrel sets though, so they are 
distinguished from each other by the company they keep.  
Do you have a best friend, or sister, and need a gift to share?  


D and E are Halloween Scene sets in my mind.  D is a lone tree on a path lit by the golden glow of a street lamp at dusk.  It might be a little foggy out, eh?  I can almost hear footsteps.

And E has a Van Gogh quality.  That might be a dark moon in the swirly sky, and the tree is maybe bending in the wind... or moving without any wind at all.  Delightfully creepy!


F has landscape-esque markings and colors as well. 
And I love the contrasting clarity of the simple barrels.  

And this one!  I made a choice to use some of these sets with a particular bezel colorway. 
But G stood up and clearly said, "I will be framed in bronze."  For those who love golden tones.

Also, an FYI, the tutorial text corrections I mentioned in the previous post involve Row 5 of the large cabochon bezel, the Double Link Connection, thread length for the Toggle, and some miscellaneous spelling and grammar.  As usual, the diagrams are correct.  I really struggle with text editing, sorry about that!  There seems to be a current problem with Etsy downloading new additions to digital files, and if you want the current version of the tutorial with the text corrected and the new colorway,  Convo me from your purchase invoice, and I will e-mail you the corrected document.  

Monday, August 27, 2018

Vintage Jasper - Heirloom Silver Cabochon Sets

Just a quick bit of business first.  There were a couple of text errors in the first edition of the Vintage Jasper tutorial.  I have published a new edition, and you can go back to Etsy/You/ Purchases, scroll to your tutorial invoice, and "Download Files" the corrected version, which also includes the new colorways. (Just to be clear, the text error corrections involve Row 5 of the large cabochon, the Double Link connection, thread length for the toggle, and some miscellaneous misspelling and grammar. As usual, the diagrams are all correct.)

On to the fun part!!

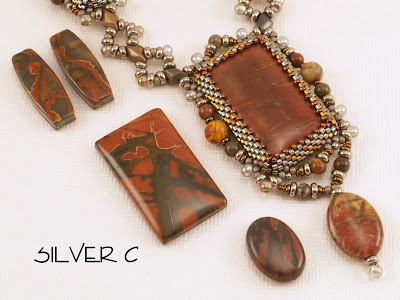
The last materials arrived today and I have the Heirloom Silver kits ready for release on Saturday, September 1st, at noon CST.  So I'll show you what there is to choose from. That's my sample on the right side, and cab sets on the left. The first four have deep rich color,  and nice markings in dark grey and greens.  They remind me of elegant leather furniture in an exclusive club.

Just a little lightning in the markings.


I like the diagonal movement in these hatchmarks.

Very dramatic markings here!

This one has this "jungle cat" vibe I really like.  :)


"The Pink Ladies"
The last four I have been calling "The Pink Ladies" because of their yummy salmon color.  It does not show well (despite my best lighting efforts) in the photos, but it was so inspiring to me I gave them their own C beads.  Instead of the matte silver, I've used a matte rainbow sunset bead.  It's subtle, but  really fun!

 E is the darkest of the pink bunch, but still subtly rich salmon pink, especially the barrels.
See the hints of pink in the rope sample?   I mocked up one barrel bezel too, 
and loved the matte sunset beads in it!

F is very pink indeed, with really pretty sunset markings.

G has beautiful pink salmon spots in a burgundy background.

And H is almost raspberry!  So I gave it a warmer, deeper rainbow matte bead.  

Tomorrow I am going to the fair, but I will get up early, finish the Antique Bronze kits, and post some more mug shots for you when I get home tomorrow evening!  

Friday, August 10, 2018

How to Make Fall Flame Rope Longer in Beautiful Proportion


If you own my Fall Flame Rope tutorial, I have a little gift for you.  A client asked for help with how to make her rope 22" long and some hours later...


The easiest approach to adding length to the Fall Flame Necklace would be to use extender chain. The rope core in the kit comes with a short chain, but you can add a longer chain, or add chain to each side of the rope, before re-applying the lobster claw clasp.  I find that I can add about 5-6" total length to a necklace with extender chain, without it being visible from the front.  And that is where the "Beader's Handshake" (when beautiful jewelry is eyed and complimented) takes place, right??  You could easily get 24” total length, counting the clasp, without changing the way the rope is made.

Second easiest would be to use the chart given for balance marking the necklace as it was written, and simply add more of the first color between the clasp and the first balance mark. Much of that color is behind the neck, and probably as the neck size increases, more of it would be hidden behind you anyway. But for this option, you have to create your own cord around which the beading would be done.  See below for how you might do that.  You really do want a cord beneath the beads.  Without it, the color shift is not so lovely.  Trust me on this.

But if you want to proportionately add to each section, 
here is the best way to do that.  

Note: A chart showing the balance marks to use on the rope core for each size, (instead of the instructions given on Page 28 in your tutorial) follows my text.

Make sure the core you use is 3.5 - 4mm in diameter to keep the gauge consistent. It could be leather, paracord, or any supple core. You’ll need to devise your own clasp.

Below are the increases for a 19, 20, 21 and 22 inch rope.

19” Rope
On the first side of the rope - Repeat Rows 15 and 16 in the First, Second, Third, and
Fourth Gradations.
On the second side of the rope - Repeat Rows 19 and 20 in the Fifth, Sixth, Seventh and
Eighth Gradations.
This adds 1/8” to each of the four gradations on each side. and 1” total length.

20” Rope
On the first side of the rope - Repeat Rows 15 and 16 and Rows 31 and 32 in the First,
Second, Third, and Fourth Gradations.
On the second side of the rope - Repeat Rows 1 and 2 and 19 and 20 in the Fifth, Sixth,
Seventh and Eighth Gradations.
This adds 1/4” to each of the four gradations on each side, and 2” total length.

21” Rope
On the first side of the rope - Repeat Rows 7 and 8, Rows 15 and 16, and Rows 23 and 24,
in the First, Second, Third, and Fourth Gradations.
On the second side of the rope - Repeat Rows 11 and 12, Rows 19 and 20 , and Rows 27
and 28, in the Fifth, Sixth, Seventh and Eighth Gradations.
This adds 3/8” to each of the four gradations on each side, and 3” total length.

22” Rope
On the first side of the rope - Repeat Rows 7 and 8, Rows 15 and 16, Rows 23 and 24, and
Rows 31 and 32, in the First, Second, Third, and Fourth Gradations.
On the second side of the rope - Repeat Rows 1 and 2, Rows 11 an 12, Rows 19 and 20 ,
and Rows 27 and 28, in the Fifth, Sixth, Seventh and Eighth Gradations.
This adds 1/2” to each of the four gradations on each side, and 4” total length.

And here are the balance mark charts.  


Although it may SEEM that this will not expand the center section and the first and last sections, it does.  The gradations on either side of those sections are expanding, and therefore, the center and ends expand as well. 

Further expansion can be done with an extender chain if desired.  Keep in mind that although the rope length is given, the finished necklace will include the length of a clasp.

This information has also been added to the available downloads for both the complete tutorial and the rope only tutorial.  You should be able to download if from your purchase receipt, but if you want this, and can't get it via download, I can help.  Contact me through Etsy Convo, preferably from your purchase receipt and give me you e-mail address and I will send it along.

The math was excruciating, although very logical once complete, lol.  


Vintage Jasper

Well, I still have work to do, but tomorrow at noon CST, I will release the kits for my new project, Vintage Jasper.  I want to use this post to just quickly introduce you to the two colorways, and the 14 available cabochon sets.  You get to choose your own.  You might want time to think about it.


Here is a quick peek at the two colorways.  You will also notice that it is possible to put either one or two links between the large cabochon and the smaller ones.  If you are taller and plan to make a longer necklace (the kit accommodates up to 22") you might prefer two links, and if you are shorter like me, one link might be your choice.  Both are given in the tutorial, and a chart for number of links needed for sizes 17" -  22" are given.  FYI, I have to double check all my numbers and calculations, but I think these kits will be $75. Actually... $73.  Here's a link. 

So without further ado, here are the yummy Red Creek Jasper cabochon sets for your perusal!  You'll notice I used a GemDuo with color variation and hints of warmth in the Heirloom Silver group, with a link to those here. And the bezel is my favorite of all the Aiko colors.  It's called Oceanic Metallic, and is a mix of silvers, with bits of gold and dots of copper.  Here's a closeup for reference. The bezel embellishment really adds color and merges the cabs with the GemDuos.


I did the same with the GemDuos in the Antique Bronze group, and some are almost coppery.  Again, for reference, here is a closeup.  The bezel is simple Bronze Metallic, because most of these cabs have dramatic patterning and I did not want to distract.  Here's a link for the kits.


Enjoy!