Search This Blog

Showing posts with label Etsy Beadweavers Team. Show all posts

Friday, March 14, 2014

Waiting for Spring


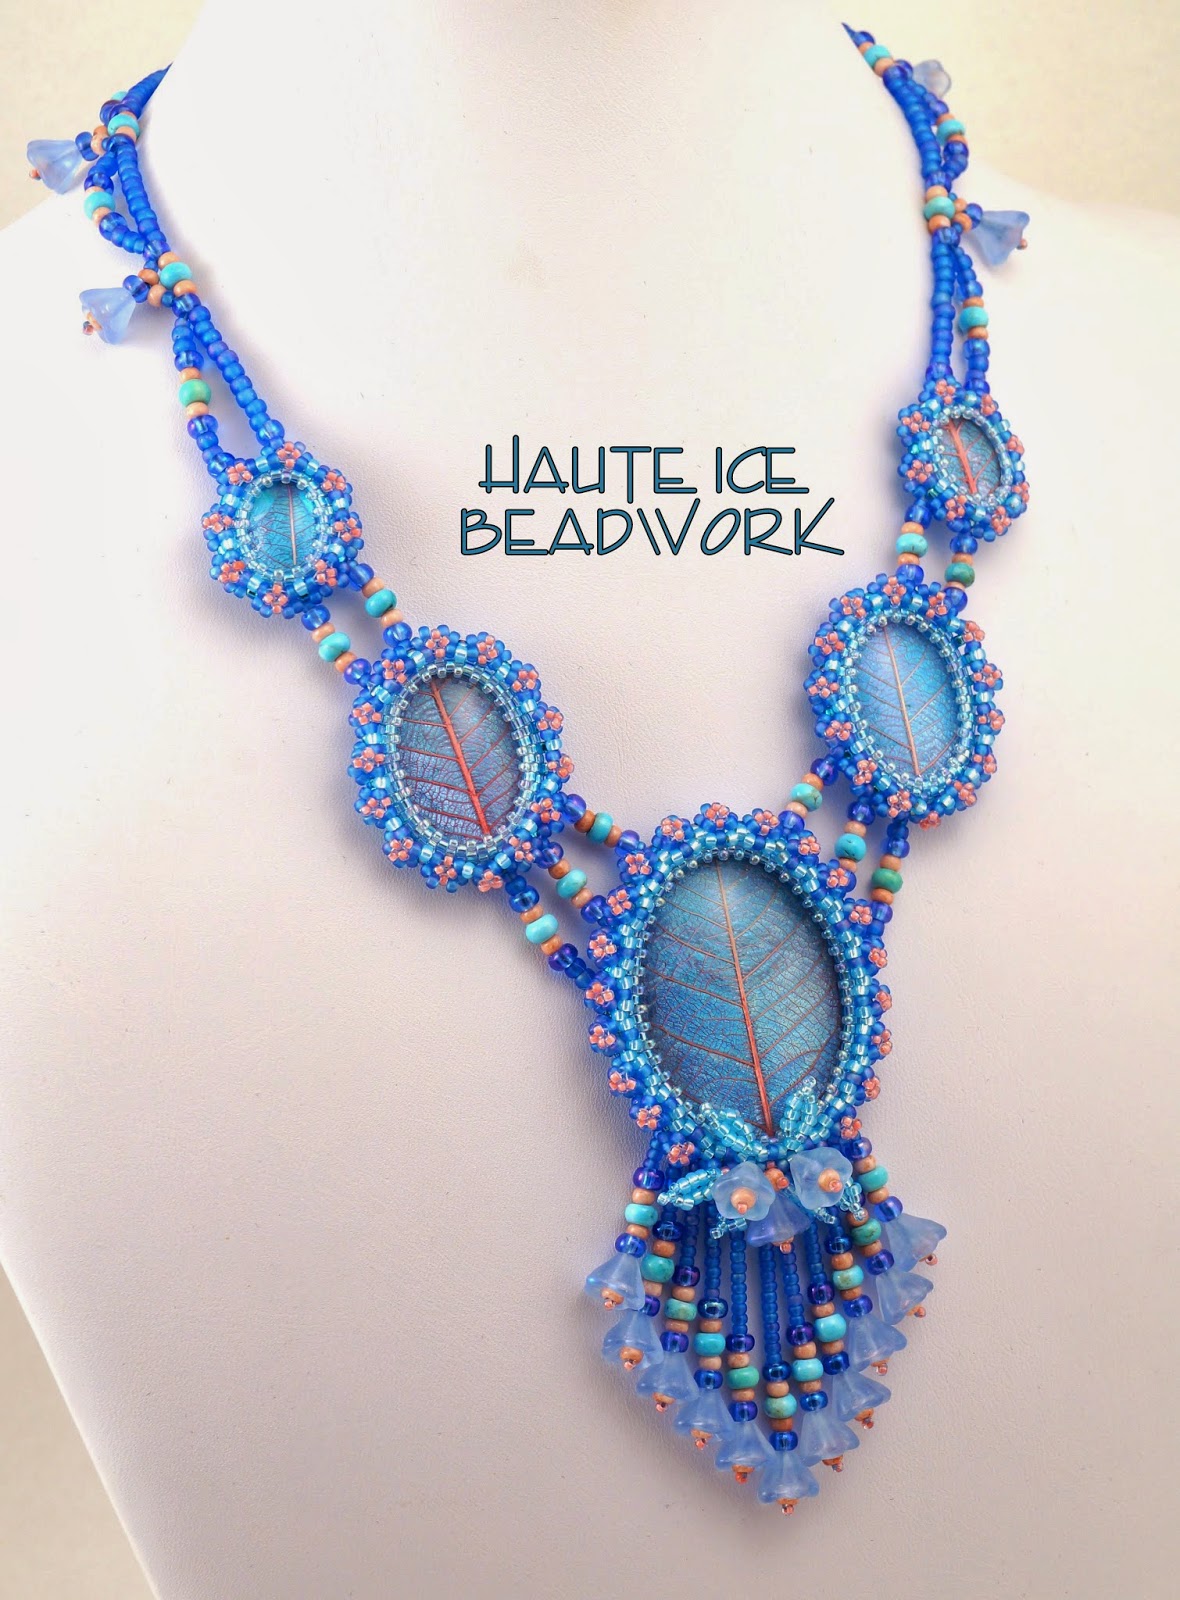
Maybe this post does not need many words.  The March Etsy Beadweavers challenge was titled "Are You Blue?  The answer for me was "YES!"  I am so thankful for the slightest warming outside, and the drip of snow melting off the roof.  We have such a long way to go to see the grass again, but every little bit is such a blessing, and goes a long way toward chasing away the blues of this very long, very icy cold, winter.

I had beautiful cabochons purchased from Kinga Nichols of crimsonfrog; blue leaves, captured in icy glass domes, and they were a perfect starting point.  The assignment was to use any or all of three shades of blue, represented by Aquamarine, Turquoise, and Tanzanite.  The leaves looked like Aquamarine to me.


I chose the deeper purply blue seed beads to represent Tanzanite, and Turquoise found it's way into the necklace in person.  One of the inspiration images provided on the blog of Raven Penna of tatooedraven, (the team member who chose our theme-you can read the entire challenge here as well) was a leafless tree, covered with pink spring blossoms, against a blue sky, and I found that very inspiring.

So, since the cabochons had a lovely peachy pink already on board, I amplified and embellished!


I am always a fan of the neat and cleanly finished back, to add value, beauty, and aesthetic appeal to my work.  I always like detail on the yoke of my work as well.


And fringe?  It is one of the reasons I so love beadweaving!! So I am Waiting for Spring!  How about you?  Please, visit our team blog at www.etsy-beadweavers.blogspot.com, and choose your favorite entry.  I have to admit, if I had the cash to spare, I would buy this one, from Karin Houben of gypsyeyesjewelry.  Totally awesome!


 Hugs to my beady buddies.  I have to get back to finishing my Bead Dreams entry for 2014.  Ten and a half days until the due date and counting...


Tuesday, February 11, 2014

Blame it on Marcia DeCoster


It really IS her fault!  In the fall of 2012, Marcia DeCoster, internationally famous beader, jewelry designer, teacher, and author of many fantastic beading books, contacted me to ask if I would be a part of her book "Marcia DeCoster Presents."  If you read my blog, or know me at all, you can imagine my surprise and my concerns. (Did you mean ME?  I am just a hobby beader you know...) But I was so honored and thrilled to be asked that I said "YES!  PLEASE!".  This was, for me, a substantial undertaking, including photography classes, a fancy lens for my camera, and trying to write responses to her fantastic interview questions that came from my heart.  Once all the work was done, I didn't give it much thought until the book appeared in my mailbox last month. It is awesome, and I highly recommend it!  I am ashamed to admit that the first thing I did was to find my own pages and ogle the pictures and read my words.  The pictures were OK!  And the words rang true...

But my words raised a question.  I wrote "My day job is designing costumes, but I try to keep my beadwork separate from that.  Using fabric would be logical, but my desire for separation keeps my beadwork fiber-free..."  This struck me as an outdated idea.  Originally, I kept the two worlds separate because I didn't want to be tempted by the beadwork that I love to do, when there is WORK to be done.  But in my many years of beading, I have always managed to do my work first, and bead second.  So maybe it was time ro re-examine that separation!

The Etsy Beadweavers 2014 February challenge theme is "Warmth."  Early on, Chris Boyer Maj produced a piece of beadwork inspired by crazy quilting, and I found it very thought-provolking and inspiring.  I love quilting and combining quilting techniques with clothing.  Here's a little reversible vest I made in college, which my sister returned to me when I was cleaning out my mother's house after her death.
.
Although the fabric itself is pre-quilted, and a print that represents crazy quilting, I created the details: the reversability, the welt and patch pockets that work together from both sides, the corded velvet edge, the cross-stitch detailing... and so forth.  I began to think how I might apply this to beadwork.  I wanted to make something that would actually be warm, inspired by warm handmade quilts, and the random fun of crazy quilting, which uses whatever you happen to have in your scrap box and lots of embellishment with bits of lace, and embroidery stitches.  I resolved (in the spirit of the thing) to go through my scrap boxes and purchase nothing I did not already own to create my collar.  I found lots of good stuff, patterned a snug warm collar and made a start, somewhere around January 20th.

Now, I really had very little time, and I was playing loose and fast, so I did NO planning. I know this the modus operandi of many bead embroidery buffs, but I never do my best work without at least a little forethought.  I had purchased a piece of shibori dyed ribbon I had planned to use with some Crystal Astral Pink sew-on jewels I had left over from a costume project, so they were added to the pile.  I cut out a simple collar shape with a snug neck (warm being a proirity!) and started basting on ribbon and lace bits.  Before I even had it all on, I started beading the lace.  I regret my haste now, as the bit of embroidery I am least pleased with ended up front and center and my favorites do not play starring roles, but I will write this up to research and development for future projects.

One thing I absolutely love is beading into lace.  I have done so in the past, and this time I really let myself see what the potential of a piece of lace might be, depending on what is revealed and what is hidden.  In the past, I have entirely hidden the lace, but this time I decided, fiber is my friend, and I let it shine.  Here are two examples of what I mean.
The above flower is made from the same bit of lace as the one below...

...just embellished differently with different parts covered and revealed, and surrounded by different bits of other supporting lace.  Loved this!!  I really love trapunto, which is a sort of quilting that is stuffed, and the lace provides great stuffing and dimension for the beadwork.  I also used trapunto technique with my shibori ribbon, stitching it down, stuffing it, and then, quilting into it with drop beads, which I also loved!


I created rivers of the ribbon, that coursed through the work, sometimes bridged with lace and beadwork, and sometimes, almost laying over edges of the beadwork. Finally, I quilted my silk base fabric with beads.

And there are the sew-on jewels I mentioned!

This photo also features the ONLY thing I went out to buy.  I didn't have an elastic cord the right size to fill the corded gold edge, and I do not count that as cheating, since it is not visible.  You may if you like!


I had hoped to create some sort of fancy button loop or bound hole, but I just ran out of time, and finished the piece with hidden snap closures.

I gave it a test wearing.  EVERY DAY this winter has been SO FREAKING COLD that I didn't have to be choosy about the day.  My collar was toasty and comfy and I cannot wait to try again.  This time with several technical improvements in mind, and a less crazy mood for the work.  Yummy!  Thanks so much Marcia DeCoster... because it really is your fault, you know.

In a late afternoon sun beam, in the kitchen... warmth indeed!

Tuesday, December 10, 2013

Meeting Challenges

I have been an Etsy Beadweaver for almost four years.  During those years I have learned a lot about beading, photography, competition, the nature of people, (especially in groups) and about myself.  Most of the work in my Etsy shop was created for monthly challenges sponsored by the team.  The challenges have stretched me, encouraged me to step away from my comfort zone, and use materials, colors, techniques, and inspiration I would not otherwise have used. I have tried to win, and I have tried NOT to win, but I believe that just participating as often as I am able is beneficial in many ways. Like any endeavor, you get out what you put in, no matter what your goal.

There is a challenge underway currently, and I thought I would not have time to participate.  But as I looked as my teammates answers to the challenge, I decided I wanted to play along, and I took one weekend and stepped "Out of This World" with my beads, to create a piece I call Klingon Courtship Necklace.

 
 I do not think this is a brilliant piece of design work.  It's good, although I think it lacks clarity and focus.  I like it, and have given it a couple test wearings, and people who see it, like it too, and comment on it. It is certainly possible to knock out a little piece like this in a day or two, in between the laundry and Christmas cards.  If it was the sort of thing I did all the time, I might even be able to produce a really good bit of design work in that time. I love to bead and to design with beads, but for me, beading is a hobby.  To do a good job with design, I have to do the two-steps-forward-one-step-back dance of exploration and discovery.  And that requires time to think, and experiment. Klingon Courtship has garnered a couple votes from my teammates, which I always take as high honor.  Whoever you are, thank you so much for your votes of confidence!


I made a simple pair of earrings to go with it, because I like to wear earrings with a necklace, and I didn't have a pair that looked right.  So they will be sold with the necklace... a little bonus!

There are some interesting and wonderful pieces in this challenge and you can see them all and vote for your particular favorite at our team blog.  Please do!  Sometimes the breadth of ideas our team has really delights me.  I usually like the work that best meets the specific requirements of the challenge. The work that makes me feel something, and illustrates the theme in beads.  You might like that too, or the prettiest work, or the one done in your favorite color.  It's all good.   :)

I also participated in the November challenge, and learned to make Russian leaves, which is essentially increasing and decreasing peyote stitch at the end of each row.  I can see wonderful potential for this technique and look forward to trying out some ideas I had while making enough leaves to cement the process in my head and hands.

I got to write this challenge, as reward for winning the September challenge.  The idea was to use a picture postcard as a color palette, trying to get the hue, value, intensity and proportion of the color in the postcard to appear in the beadwork, which could be anything except a copy of the card.  I did assignments similar to this in a weaving class, and was reminded of those assignments in gift shops on my vacation.  I thought it might make good challenge.

I think the color and proportion is reasonably accurate, although I found I did not want to put in the aqua blue of the little river.  I finally did it with dew-like drop beads, but there many not be enough of them to really represent that color proportionately well.


The shape is a little mundane, but again, I like it well enough, and in test-wearing it, I found it was liked by others as well.  I really enjoy people noticing my beadwoven jewelry, especially those who have not seen beadwork before.  Their reactions please me, and I hope they are inspired to give the technique a try themselves.

I have not been the best blogger this year.  I am finding that trying to maintain two websites, two blogs, and keep up with the constant ebb and flow of beadwork, my clients, and friends on facebook to be a time consuming adventure, on top of my business.  I enjoy it all, but it is hard to always be entirely up to date.  So this post catches up with my work in the last two Etsy Beadweaver's challenges.

Our team will have a new leader in 2014, and see some changes in the next year. I hope challenges will always be a part of the team activity.  Do you belong to a team, or teams?  Do you benefit from membership?  What makes you join a group?

Monday, September 9, 2013

"Pink Cadillac"

 
The Etsy Beadweavers September 2013 theme is "My Favorite Song" and I had some gorgeous pieces of Rhodocrosite that reminded me of  an awesome two-tone pink Chevrolet my parents drove when I was a little girl.  It was Champagne and Dusty Rose and I thought it was SO COOL!   I wanted to use those cabs, and somehow the song "Pink Cadillac" popped into my mind. 
  

I had a chat with my BFF Google Images, and found several juicy places to start. I went first to a caddy of my own vintage, 1953, but that was not recognizable.  I must have been too young.  :) But when when I got to the later 50's, I found things I remembered!  I felt that using vintage cars could help me avoid the Mary Kay association, which I wanted to avoid.  I find I am at my best when I am working with ideas that have meaning in my own life.  The vintage cars just felt right to me. 

I tried to think, what about a car is worthy of jewelry.  The whole front end seemed to be full of great ideas.  I loved the grille, so started with that.


I absolutely ADORED the bumpers.  They were shaped like bullets, or maybe bombs, and I made a couple tries at them.  They looked like breasts to me, or my own first circle-stitched bras, and this made me laugh, but they were not quite the right image!

 
According to wikipedia, the song (as written) is not really about a car.  And the lyrics bear testiment to that.  Bruce Springstein meant it as a metaphor for sexual activity.  I didn't really want to go there!  I loved the Natalie Cole version, which was a chart topping cha cha at the time I worked as a professional ballroom dancer.  She WAS talking about a car...  So out with "the boss's" breast images, and in with the ones that looked more like lipsitck to me.  Those are cherry quartz. 
 
 
 Then I thought the license place had a pendant quality.  SO time for the Rhodocrosite cabochon.  And I remembered fuzzy dice, and I think that figured into the fringe I created!
 
 
 And there there were those funky hooded headlights, which I thought were pretty amazing too!
 
 
 But these, I just could not use.  When I put them in place, the whole thing took on a disturbing doofy face identity, and that was NOT what I wanted.  It is one of my personal pet peeves in jewelry, in fact.  So instead, I created a hood ornament/logo component, with the underlining V shape and the cadillac crown image, loosely defined.
 
 
This was such a fun journey!  I hope you enjoyed it too, and I also hope you will visit our Etsy Beadweavers team blog between the 9th and 15th of September and choose your Favorite Song entry!  My team rocks, and there are many heartfelt and clever beadwoven beauties to look at.
  

Wednesday, August 14, 2013

Oceanaire, Magic Numbers, and Square Bezels


I am never very successful when I set out to create something that I imagine other people might like to make.  All around me, my beady friends are creating tutorials for their designs and selling them.  I am torn by this.  I have very little time available to spend with beads, given I have a demanding full time job.  I really enjoy the design and engineering aspects of beadweaving.  I want to maximize my time with those things.  But I also feel selfish for not sharing my ideas.  So every so often, I take a little stab at designing something that I think might be a decent tutorial.

Usually, I ask myself, what do I do that I see others either NOT doing, or struggling with.  I am a very competent bezeler.  And I can manage any shape, scale, and proportion with relative ease.  So I decided I would bezel a popular and recent cab, a lunasoft, in a shape that people seem to struggle with, and create something from it. 

I owned some of these, purchased from my friend Doris Coghill, in a lovely ocean blue and since the Etsy Beadweavers theme for August was "Ocean Adventures" is seemed a good fit.

As I worked out the bezel bead counts and decreases I took pictures.  I thought that the tutorial might include general informaton about how to create bezels for geometrtic shapes as well as this particular one.  So... generally, NUMBERS MATTER,  when creating bezels.  Your base row must be an even number.  And some numbers are just better than others, like any number with multiple even divisiors, like for example, 24 (12, 6, 3)  is better than any even number that can only be evenly divided once, before an odd number appears, like 30 (15).  This is because bezels look best if they are balanced side to side.  On a round bezel, this is less important, and ovals can be cheated as well, but to get to the point, geometric shapes demand even base row numbers that are divisible by the number of sides of the shape.  So my choices for base row numbers for any square must be divisible by four.   

I strung delicas until I had about the right number of delica beads to encircle my lunasoft cab.  In this particular case, I wanted to create a color shift in my bezel, so I alternated a dark (1285) and lighter blue (0863) bead.  Then, I hunted for the perfect number.  The number of beads has to be divisible by 4, and the ring of beads cannot be loose on the cab.  Your base row can be a little too tight, or a little too loose.  For me, the perfect number in this case was 64.  It divided SO nicely!  64, 32, 16, 8, 4, 2.  64 is one of the magical numbers in bezel beading!   And it was just a tiny bit too tight, when pulled up snugly, to fit entirely around my cabochon.  Lucky me!  My Lunasoft cab is 20x20mm, so this magic number 64 would work beautifully for any cab that size as a base row. I will later enlarge it at the corners enough to fit.

When I bezel, I start differently, depending on my purpose.  In this case, I wanted the front of the bezel to create a white cap effect, so I worked the front of the cab first. I strung my beads on a 60" length of fireline, waxed my thread to help with the first row tension, and stitched through the first bead again. Then I clamped the thread about an inch past the ring of beads. Holding the beads flat on my fingers, and in place with my thumb, I began to peyote stitch the first row on the outside of the ring, with the dark blue.

I keep the clamp under my hand, out of the way of the thread, like this.  The weight of the clamp, and my fingers held together keep my tension snug on the first row of peyote, but this works best of you have waxed with either beeswax, or microcrystaline wax, to improve grip.  I think of shaping the beads as I go, in to the shape I am trying to create, so when I was done with this step, I had a rough, rounded looking square.

Then I stepped up into the middle row, and again into the center of the rounded square of beads.  Notice I am in the middle of a side here.  I think that is much easier than starting at a corner.

Since I have 4 sides, and my magical 64 beads divide by 4 into four sides of 16 base row beads, I know that I would have eight delica beads on each side of my square.  But now it is time to begin shaping my square more precisely.  So instead of stitching 8 delicas on each side, I will only stitch seven, and skip a bead at each corner, pulling the corner into a neat right angle.

I stitched three light blue delicas, added a lighter blue satin delica and then took a stitch without adding a bead when I got to my intended corner.  In this picture, I have put my satin bead on and taken a stitch and then taken a second stitch, without a bead.  Could have been a clearer picture had I done each step separately.  :)  I did the color switch in the interest of my white caps, but if you are just wanting the nice square bezel, no need to change colors.  Snug up your corner before proceeding.

Then for my next side, I stitched one satin delica, five light blue delicas, one more satin delica, The seven beads for the side, and skipped adding a bead on the 8th stitch again. I repeated this until I got back to my starting point, and my square was complete.  Each side has 7 delicas, one satin, 5 light blue, and one satin, and a stitch without a bead.


So here is the finished square, wiht my needle demonstrating the step up into the next row of peyote bezel.

In my next row, I stitched two light blue satin delicas, one pearl white delica, and a 15/0 white pearl rocaille at the corner. As you continue around the bezel, each row in this round will have a white pearl delica, four satin delicas, a white pearl delica, and a 15/0 pearl rocaille in the corner.  This could be a stopping point for a nice square bezel, and you might also be able to use 15/0 rocailles in each stitch, but keep your tension relaxed if you do not want your bezel to tighten excessively.


In my particular bezel, in the next row, we will decrease again, and we will also begin adding our white seafoam droplets.  So we will peyote stitch two satin delicas, one white pearl delica, and at the corner, stitch in a small white pearl drop bead.  Each repeating row in this round will have a white pearl delica, three light blue satin delicas, a white pearl delica and a small drop at the corner.


The next row is a little trickier, because it includes a step down into the previous row at the corners.  Begin by stepping up into the new row, and stitching one white pearl delica, and one small pearl drop.  Then step down into the previous row and move into the next side through the corner pearl drop, and step back up into the new row.  Each row in this round will contain the step up you just did, a small white pearl drop, two white pearl delicas, a small white pearl drop and the step down into the previous row to pass the corner. 

With the last side of this round finished, your bezel looks like this:


Now for the final row, which also includes a corner step down, this time through two rows.  Step up into the white delica, and add a three 15/0 pearl bead picot, which you should push out, over the finished portion of the bezel.  Step down two rows and pass the corner through the first small pearl drop again, and step back up two rows and add another picot, pushed out, and a large pearl drop, laying in over the top of the bezel, followed by another pushed out picot, and a step down, the process repeating to finish the final row of the bezel.  Here you see me stepping down to the outside edge of the bezel, and most of the picots and drops are sitting where they should be, but you must align them correctly when you are done.  There is only room for them to sit where they should, but you have to show them where that is.  I have not correctly oriented the last side of the last row in this picture. As you step past the original thread tail, make sure it stays on the outside of the beadwork, so you can stitch it back in and trim it off at your convenience.

At the outside row, I added a final dark blue row of delicas, with an 8/0 bead at each corner to create an easy place to attach my components together and drape through them. These 8/0's also enlarge the frame enough to fit the cabochon easily.

After stitching this row, I popped in my cabochon, after painting the back of it with clear nail polish to protect it from wear, and allowing it to completely dry. 


Then I turned the thread so I could keep stitching counter-clockwise, as I am right handed and that is my strong preference.  I peyote stitched a row of delicas, with 15/0 rocailles at the corners to begin the tightening process and stitched an additional row of delicas to secure the cab.  You could continue with additional rows if you liked, but the cab is secure with this row. 

I did stitch one final row of 15/0 on one bezel, and two on the other two, which you can see in the image of the finished back of the work.


Now, since this little necklace has been poorly received, I will not continue with the rest of the necklace, and probably, if anyone actually uses this bezel advice, they will stop at the square frame work many steps ago.  But the best information is the numeric info, and perhaps, I will show other shapes more simply in future posts. 


I personally like this piece, and I think it looks great with denim.  I really enjoyed embellishing the bezel centers in my Artichoke! piece, and wanted to explore that idea further here.  I think the intense matte blue color is off-putting to some, perhaps. I liked the absence of shine because it made it feel deep to me, like an ocean. And without any metal beads, beadwork looks less like legitimate jewelry.  I think my own feelings about the ocean might be off-putting as well.  I purposefully threw the squares into tumbling action, because I have terrible motion sickness, and just looking at the ocean makes me feel disoriented and dizzy.  I wanted the work to have a horizon line that would shift in wearing, rarely being perfectly horizontal, and it does that really well. :) I liked the fringy tassel for the same reason, and the curved drapes reminded me of waves. 

For me, a happy result.  For others, not so much, but the great thing about what I do with beads is, in my day job, where there is always a client to be interpreted, flattered, made beautiful, and pleased.

 At my beading bench, there is only me.


Friday, December 14, 2012

Emotional Roller Coaster


Please check out the Etsy Beadweavers Team blog.  I chose the theme for this month's entries in our monthly challenge promotion, and there are some gems!  The blog poll closes on December 15th, tomorrow, so don't delay!

The theme is "Emotional Roller Coaster" and the challenge is a variation on something I did in college as an assignment in a graduate Sceneograhy seminar.  Set Designers, Lighting Designers, Costume and Makeup Designers and even a Sound Designer had to interpret five emotions, Love, Anger, Sadness, Happiness and Peace, each week, using a different design element.  So one week, we would convey each of the five emotions with a line, and the next week, a texture, color, shape and form, light, or space .  It was a great way to learn to use the basic elements of design and understand how to manipulate each one, and the class discussions of our work were always stimulating and illuminating.

In my version of the assignment for the challenge, members were to choose an emotion, and interpret it in beads, using any design elements they chose.  Some of them were very successful and you can guess easily the emotion they were representing in their weaving.

I chose the title for the theme, thinking that if everyone did a good job of interpreting their chosen emotion, looking at the mosaic would be like riding an Emotional Roller Coaster, moving rapidly from one feeling to another, as you viewed the images.  I hope you'll enjoy the ride!

I really struggled with my own entry.  At first I thought I'd do serenity.  But it turns our, serenity is just not very dynamic or visually exciting.  Plus, I challenged myself to make a bracelet, which I rarely do, and to use some Czech tile beads I had purchased.  My lack of experience always means making MANY tries before I succeed.  So, knowing that, here was my first finished version of "Serenity."


It was certainly serene, but I wanted a better solution to the challenge as a bracelet.  There is really nothing WRONG with this.  I just don't love it.  Plus, I didn't like how it moved, and that was another kettle of fish altogether.

So I tried a few other ideas.


Actually the first one on the left was my very first try, and similar to the neckstrap for my Amur Maple necklace.  I didn't think Serenity should be shiny, so the first try was out. Then I made the one from above, but fell asleep looking at it.   I liked the doubled up version second from the left, but I didn't think Serenity could possibly have bumpy edges.  Visually, that is just not very... well, Serene! But it was certainly more interesting.   So I decided if I was going to make a bracelet I thought was interesting, I'd best change emotions.  I thought maybe Euphoria was a good idea.  It might have an interesting edge and texture.  The third bracelet was the first try at that emotion, and I felt pretty good about it, but didn't quite like my color choices for my chosen emotion.  Then when I picked up my bottle of Calvin Klein "Euphoria" the next morning, eureka, I realized I had the the perfect color palette in my hand.


But the bracelet still seemed  not quite emotionally correct to me.  It was too repetitive and rigid, almost Victorian in feeling.  I thought Euphoria should be more unpredictable and varied, so I brought in an additional smaller component, to add dynamic interest to the shape.   I also learned that the suppleness I was after in the wearing of the bracelet was inhibited by any thread that ran the length of the bracelet, so I came up with a way to weave the thing that is the essence of RAW.  There are no straight lines through the bracelet, but rather multiple continuous loops, and for each component, the thread path reversed from clockwise to counter clockwise, again like RAW.  Pretty cool, huh.  I think thread path is everything in bead weaving, and here's another bit of proof.


I decided I wanted a touch of Euphoria near the face as well, since I apply perfume to both neck and wrists, so I made a pair of earrings to match, and there you have it.

Please go and take a look at the work of our talented members who found time in the busiest month of the year to participate, and cast your vote for the one whose emotional content seems the clearest to you.  I have three personal favorites and none of them is my own.  I'd love to know which one spoke to you!  And,  THANKS FOR SUPPORTING OUR TEAM!