Search This Blog

Showing posts with label beadwork. Show all posts

Saturday, April 15, 2023

Bermuda Dragon Kits Re-stocked

I had a request for a Bermuda Dragon kit, and making just one is just insane, so I made 10.  Then I put them in my Etsy shop today and now there are 4 left.  Yikes!  Just when I was thinking it was time to fully retire.

I imagine it might be nice in the summer.  I have always imagine it breathes frost, or at the very least a cool breeze, so I suppose it might be a good portable AC unit, lol!

I used the last of these cobalt blue crystal rondelles, so had to substitute a 6mm X'waro round for the last couple kits, but I think the result will be equally lovely.  I also think the charm painting was some of my best this time around.


It's a pretty kit, with a yummy result, and it's going fast.  I thought I was past needing to post a a pre-notified time, but if you want to snag one of these, best move fast.  

Here's a link:  https://www.etsy.com/listing/1357803903/kit-only-for-bermuda-dragon-necklace

OH!!!  And I put the tutorial on sale, 50% off through next Sunday the 23rd, 2023, so if you don't already own it, grab it this week.  https://www.etsy.com/listing/555566974/tutorial-only-for-dreamscape-bermuda-and

Hugs and happy Springtime, wherever you are in the world.  

Saturday, March 11, 2023

Fall Colors for Caramel's Claws Necklace in Cinnamon


I was asked for kits in both the Sage and Cinnamon colorways, and have been out of them for ages.  It's really hard to find viable focals, but I have a set of each colorway now, and I am happy with the choices I have gathered together.  Here's a quick rundown in a larger scale than I can show you on Etsy.  These will go live in my ETsy shop tomorrow, Sunday, March 12th,  at noon CST.

Some deep jade greens, with cinnamon swirled throughout.  Deep and mysterious.

The most old-school Red Creek Jasper in the group.  Spectacular, and the last of its kind that I can find.

Also quite a classic collection of Red Creek markings and colors.  
Predominately cinnamon, with golds, greens, and deep, dark veining.

Nut brown with jagged deep green veining, and just a few hints of gold.

Various shades of brown and copper with a quartzy lightning strike.


The simplest of the group, in deep rich chocolate.  
This focal would feature the pretty curves and details in the bezel.

Some interesting dark inclusions in this focal bead, with creamy highlights.

The dark tones in this focal are almost purple, maybe best described as midnight.  
It has a petrified wood quality.  Unique and unusual.

For this week, I will leave these kits priced as they are at $52.  A kind of sale, because as I calculate my kit cost each time, it seems to go up, just like the cost of housing and groceries.  Then, on the 18th, they will go up to $55, so if you are interested, grab your favorite by St. Patrick's Day, to take advantage of the old pricing.  Caramel's ancestors demand to be fed, and the cost of peanuts has gone up...


Monday, March 8, 2021

Dressmaking for my Beadwork

I really am kinda retired.  So I feel free to follow my interests as they appear.  I have been cleaning out my studio, and keep finding things that could be finished.  And some things that could be started!


This piece of fabric was purchased many years ago, and I pitched it to several of my ballroom clients, but no one took the bait.  I may not have pitched with great conviction, as I LOVED this print.  I may have (on many levels) wanted to keep it for myself.  Kinda wish I had laid it out flat for you to see, but this was after I calculated a place where I thought my necklace might fit and chopped a hole in the middle of the fabric to have a look.  It's a poly single knit, and runs in one direction, so I knew I needed minimal seaming. I decided on dolman sleeves, and shaping from side seams only.

Here's the necklace.

Sooo...  A couple days later...

I pleated the right side to provide a more interesting fit and bit of movement.
The necklace fits the space, and without being too matchy-matchy, feels OK to me with the print.
Pleating detail.  I am an inch larger than the form at the waist and at the hip.  I fill it out a bit better!
And here is the back detail.

I am having a lot of fun sewing in my studio recently.  Beading is feeling very sedentary to me, and I want to be more mobile.  But it's still nice to wear all that beadwork, especially in a new context!

And then, of course, there is THIS!  Let's hope it does not become a permanent wardrobe feature!

Stay safe and healthy!


Sunday, December 1, 2019

Final Rose Hips Kits


You bought me out twice, so I have pulled together one last set of 10 kits for Rose Hips Necklace. 

I am NOT complaining about sales!  But I believe I may have purchased all of the Czech drop beads in the neck strap that exist.  So, this is likely the last chance, if you want the kit.  

I have considered replacing the hips with buds and an opening rose flower for a springtime version...  but my next year is a little in limbo just now.  More on that later.  But if you are one of the many who have the tutorial in their shipping cart, and were waiting for kits, here they are!  

I will be vending at the Upper Midwest Bead Society tomorrow, December 2nd, in the evening and hope I might see some of you there.  

Happy holidays to all!

Wednesday, November 13, 2019

Rose Hips Redux


Bead & Button contacted me a couple months ago to ask if they might publish my Rose Hips necklace in their "Your Work" section.  I explained it was a few years old, but they were still interested, since it has not been seen in their magazine.  


The big up-side for me has proved to be an interest in kit and tutorial sales. :)  I really do love this necklace.  And re-kitting it proved not to be too challenging, since almost every bead was still in my stock. Some of them were discontinued, and so I had stocked up the last time I made the kits. Sadly, I can no longer get the pretty coral beads I used originally, but I have found a nice red Czech rice bead of the same size that works well in the project.  The gradation in the leaf beads means that there were many colors to keep track of, but thanks to decent storage, they were where they were supposed to be,  Yippee!

So if you are interested, here is a link to the tutorial.   It's a big, juicy, advanced 50 page tutorial, and I promise you will do things you have not done before, and learn about how to use a new structural material in beading. You will also have patterns for these little leaves (derived from Russian Leaf techniques)  in many sizes, and understand how to make them larger and smaller.


And then, here's the bead list.


It really is cheaper to buy the kit than to buy the beads individually.  I did a whole blog post on that, if you want to check it out.  The kit is a great deal at $65, with free shipping.  There are still a few left, but don't wait too long.  Here's a link to the kits.

If you decide you want to use your own beads and colors, you will still need to purchase the structural Stren fishing line in 50# test.  Also available in my Etsy shop at this link.  If you have done my White Lilac necklace, you will already know the material, but this is a new structural use.  I hope it opens doors in your creative process and thinking.  

The necklace is challenging, and you have to read the instructions to be able to do it.  But I wear mine frequently, both casually and for dressy occasions.  I hope you will too!

Sunday, June 23, 2019

Summer Fruit in the Haute Ice Beadwork Etsy Shop


This project has been a monumental one.  I had no idea how much time and energy it would take to write a tutorial that could create five different variations using the same components.  And then how hard it would be to assemble the unique and beautiful beads needed for them.


My dad worked on Ellis Island during WW2, in supply chain logistics.  If soldiers did not have tents, or food, or ammunition, where and when they needed them, he was responsible.  He was super smart.


In the ordinary world, things just do not always arrive when planned.  I HATE to disappoint, but one of the beads I needed to complete this set of kits did not arrive yesterday, despite my paying an arm, leg, and newborn squirrel to have them speedily delivered.


So I have just 10 kits, five of each color, to sell today. And thanks to Rochelle Jay, INCREDIBLE SAVER OF BEAD DESIGNER BACKSIDES who works at the fantastic Bobby Bead, more supplies are on the way that will allow me to add three more of each color before next weekend.


And then, if there is still interest, I will kit up another 25, so please do not fret!  If you want one, I will do my best to make it available to you, but immediate gratification is not an option.  You may have to wait a week or two.  But I promise, I will get you what you want while it is still summer and the perfect time to wear these beauties.


I do want to explain that I have created each kit to allow the making of ANY of the five different variations.  You may have to do a little tweaking, and use a 6mm instead of an 8mm in some cases, because the exact same colored accent beads are just not available in every color I used.  So I found the best choices possible, and gave you plenty to work with.  I hope you'll enjoy that play and planning.  You may also have enough beads leftover to make earrings or even a bracelet.  Watch my blog for a sample of that in the next week or two.

The tutorial and limited kits will go up in my shop at noon, Central Standard Time today, Sunday the 23rd.  Thanks so much for your patience!


Tuesday, May 21, 2019

Summer Fruit -The Raspberry Variation

This time, beading first, and the health stuff after.

Important information up front!


In "Raspberry" I liked framing the collarbone with the upper folded link set.  Those are pretty bones that deserve a spotlight every so often.  I also rotated the focal piece, and framed it with three folded open warped squares, to elaborate on the Y aspect of the form.

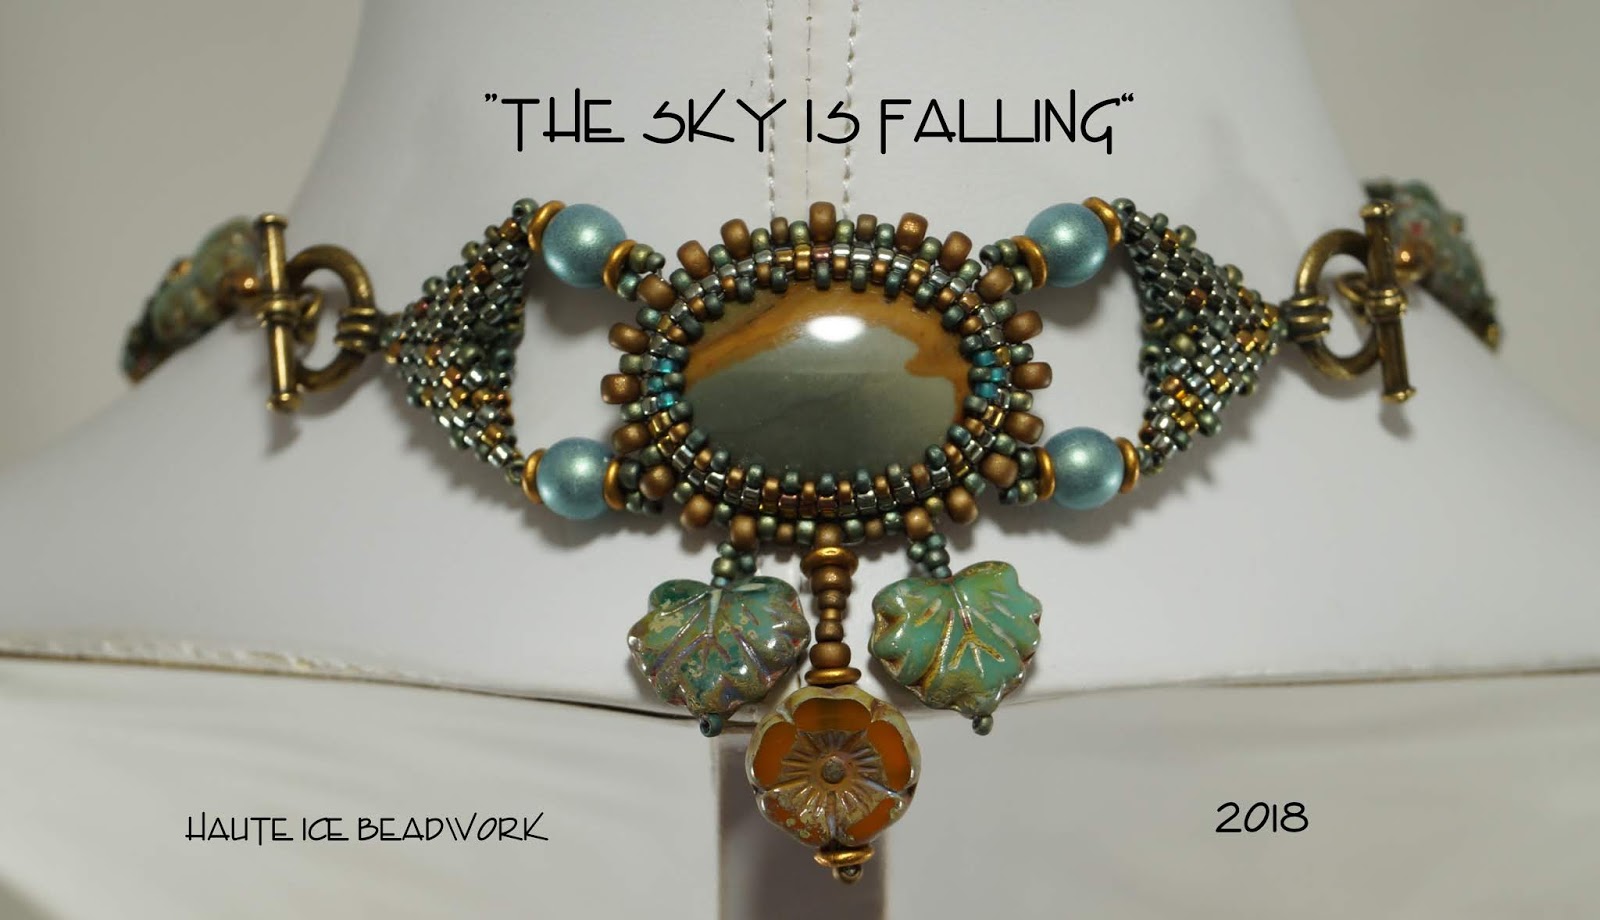
This variation is based on "The Sky is Falling" from last fall.  Here's a quick reminder.  It was the oval focal frame that looked so floral (alliteration unintended, lol) that I most appreciated about this work, and I wanted to write a tut for it.  I got carried away by the myriad possibilities!  I loved the Y-shape of "Sky" and it seems pretty trendy too.  Plus I like the variety of tassels I can include in this series.  I've always liked some movement in my work, but suddenly, it seems even more important.


SO... still planning the release of this tutorial, and set of kits, for around the Summer Solstice, June 21st.  Provided nothing too big gets in the way.  I have adjusted my priorities in my retirement.

Now on to the health stuff. 

I write this blog as much for myself as for you, dear readers. I want to remember the decisions I made here and I find writing helps me to understand how my choices and actions work out for me.  If you find it interesting, forge on. We left off near the end of January, with the purchase of my Apple Watch, in the interest of my osteoporosis prevention and reversal.  

In all fitness heart-monitor type gear, there are rings that visually display activity.  I went with Apple because I my electronic environment is all i... iPhone, iPad, Mac Book Pro, and I like how beautifully they all talk to each other.

Here's an image I find really telling. The 23rd was the day my phone was charged in the Apple Store, ready for sale on the next day.  I bought it in the late afternoon on the 24th.  Every single important thing in my life happens on a 24th, but I did not think about it at the time.

On the 25th, I just wore it, in the interest of a baseline.  For those of you who do not know, the Blue Ring in the center tracks sitting time.  If I am moving for at least a minute during any hour, I fill 1 1/12th of the ring. The watch will prompt movement at ten minutes to the hour, so this was the easiest of the rings to fill, but as you can see, I was not perfect right away. It's pretty easy for me to sit for hours beading or illustrating.  Nothing else in my life is quite that sedentary. I started trying to get that ring filled daily.

The Green Ring tracks exercise.  Apple defines that as my heart beat moving into the target exercise range for my age and staying there for at least a minute.  I can report various kinds of exercise, but if my heart does not confirm it, it does not register.  I can also park at the back of the lot and walk to the grocery store briskly and a minute of exercise records without my reporting it to the watch.  It just knows what I did by my heart rate, and the built in GPS.

My watch wanted me to exercise at least 30 minutes a day in my target range.  Sheesh.  SO on the 27th, I put on my coat, hat, mittens, thermal underwear, and boots, and walked at a pace that got my heart rate up, until I filled the exercise ring.  At that point, I realized I needed a better place to walk, preferably with no ice.  But jeepers.  It seemed like a big time commitment, to drive somewhere, in addition to the time spent walking...

So I started hunting for indoor places to walk that were close to me.  I tried a local HUGE BOX hardware store on the 30th, walking up and down aisles as fast as I could without being annoying.  I filled the ring, but still needed a better place.

Next, I became a mall walker.  Ridgedale Mall is quite close to me, but there is nowhere to remove a coat or change shoes.  So I drove to the mall, left my coat, hat, etc. in the car, and dashed through the cold to the nearest door, and walked.  I began to develop some consistency, but still put work deadlines and personal issues ahead of exercise.  Better, but no perfection, although there was the one week...  Here's a peek at my February.


With the next Summer Fruit variation, I'll explain my March, in which the Red Ring is a factor,  I find my gym, re-discover old injuries, and meet Adonis and Weight Training.


Thursday, May 16, 2019

HEY, WHAT'S THE HOLDUP???


"WHY THERE HAS BEEN NO NEW TUTORIAL SINCE FEBRUARY?"

I am working on one, which I absolutely will release by the summer solstice.  

To answer the question.  It’s a l-o-n-g story, and mostly about my health.  I’ll tell it for those who are interested or might benefit from it. If you just don't care, skip to the bottom of the post for the first peek at one of the versions of the new project.

Late last summer, my really great doc reminded me that I have osteoporosis, and a high fracture risk.  I have had this diagnosis since my early 50’s, and the last two year progression showed a new 6% loss.  We women all lose about 1% of our bone density each year after menopause, but mine is extraordinarily speedy.   I have all the risk factors.  I have a teensy bone structure to begin with, with a wrist measurement of only 5 3/8”.  My mother fractured her hip and finally her pelvis, from which she was never able to recover. And I have had digestive issues for over 25 years, which means the nutrients I eat do not process correctly to be available for bone repair.  I was not aware of that last bit.  But I knew my bones were not in good shape. 

My doc gave me a referral to an Endocrinologist, to discuss having bone fortifying medication injected, since my Reflux Disease digestive issues prevented my taking the most common of the bisphosphonate bone repair drugs, like Fosamax.  But I had a busy fall.  You know, there were tutorials to write, and gowns to finish, and holidays to prepare for, so I put the Endocrinologist visit on hold.  Right after the first of the year, I decided I needed to educate myself to enable intelligent decision making about this drug.  I thought I'd read a book before I went to the Endo Doc.

So I bought “Dr. Lani’s No-Nonsense Bone Health Guide” and began reading.  I learned about bone biology.  I know osteoclasts from osteoblasts and what they do. And I learned how density drugs affect these processes.  I learned about the development of the density testing machines and how the drug companies who wanted to sell their density improvement drugs made them available to physicians, and how many if not most of the early machine operators were trained by the drug company reps.  If you watch The Big Bang Theory, imagine Penny doing densiometry training.  Fortunately that is generally a much improved situation now, but not flawless.

I learned that the density medications all have risks, some substantial, and about how the risks might be weighed.   I learned about myriad alternative therapies and their mostly false claims.  I learned how hormone changes with my late onset menses and early menopause provided me with yet another risk factor.  

And THEN, I learned how my wonky gut health and the drugs Nexium and Prilosec which I took non-stop for 26 years under various doctors advice (the manufacturer says not to take the drug for more than 3 consecutive weeks) contributed to my Osteoporosis. In my case, as I weaned myself off the drug, (with help from another good book, “The Acid Reflux Solution”) I also realized that it was probably also one of the primary contributing factors in my reflux disease itself. 

That is probably more about my health than you want or need to know, but I will stop for now at the end of the month of January, and the purchase of my Apple Watch.  The last sections of my Osteoporosis book were about fighting fractures with food, and exercise for better bones.  I bought the watch to help me begin an exercise program.  Boy Howdy, did it work!  

I will probably share a few more details from my journey, but for right now, I'll show and tell a bit about the upcoming tutorial.

Here's a sneak peek.  The tutorial uses a number of components, folded open warped squares, an oval bezel with some fold back edge increases, tassels, and dynamic strung gradation sections in the process of creating a variety of necklaces, (and MAYBE a bracelet) plus several pairs of earrings.  I have four necklaces and four earrings so far, and am working either on a final necklace or bracelet.  

This is the simplest configuration of the bunch.  I'm calling the set "Summer Fruit" and this one is Kiwi.

  
My plan is to create kits in 5 colors that would allow you to make any version of the necklace, plus a pair of earrings.  You would also have some freedom in how you orient and yoke the finished focal.  I promise a new post next week to show you version #2.  Thanks for your patience, folks!  I am busy with daily bone work, and have made it a priority, but I know I will always bead.  I don't know if I will always write tutorials, because it involves a HUGE amount of sitting.  My spine requires action.  I am off to give it a bit!  

Friday, November 16, 2018

Designing Jewelry with Clothing in Mind

Since my background is costume design, I often think about how the jewelry I design will be worn.  Sometimes, when I afford myself the luxury of working with something special from my stash, I design in a way specific to the clothing to be worn with the piece.  I just spent a week of evenings, making myself something to wear for Thanksgiving.

I had 4 pieces of Owyhee Jasper from my favorite lapidary; a gigantic square, and three oval cabochons.  Owyhee is sometimes called Picture Jasper and often has landscape imagery.  I thought mine had warped imagery. like something you might see through a fisheye lens.  The phrase "The Sky is Falling" kept running through my mind as I bezeled it in one of my favorite Toho colors, #721, Oceanic Metallic. It has a cool blue silver, plus some earthy bronze and copper beads, and the mix seemed perfect for the stones. It was a monster bezel, with a base row of 124 beads, 31 Aikos on each side. Those of you familiar with my post on square bezels might appreciate that info! You might even check the math.  As usual with bezels, I worked the back first and then set in the stone and wrapped the sides, with reasonable ease, given the size.


As I worked on the bezels, I decided a long gray sweater dress (a gift from The Best Man Ever last Christmas) would be the perfect thing on which to display the stones, and got out a dress form and the sweater to start working on layout.  The sweater had some interrupted X cables, and I turned the large square sideways and added folded warped squares to each end to emulate the cable shapes.


I planned to create interruptions between X shapes in the jewelry, and hunted through my stash for some likely candidates for creating the breaks.  I also liked the long vertical line of cables at the center front of the sweater, so decided the featured part of the necklace would be a long fall, that included the largest cabochon.  I liked the gentle shock of the soft turquoise green Czech rounds to help with the break illusion, and placed the smallest oval at the bottom of the fall, also vertically arranged.  I put the largest oval at the top of the fall, and arranged it horizontally.


I always think that the best necklaces are sympathetic in shape to the garments they are worn with, and given the oval soft curve of the neckline, I wanted to emulate that curve in the yoke.  Using the largest oval as a junction between the long fall and the soft oval curve, I created what I think is the best part of the necklace,  I love the negative space in the conglomeration of connections there, and I am pleased that the beautiful shape is revealed against my skin.  I plan to work that idea further and use it for a Spring project tutorial.  It seems very floral in character, like three petals to me.


I liked the square cab at the edge of the sweater, half on and half off my skin.  I had only one medium sized oval left, and needed another couple to carry my idea of interrupted X shapes forward, so found two smaller oval Jasper beads and bezeled them.  You see those at either side of the base of the neck.  And since there was a landscape idea in the Owyhee, and the flowery central connection, I used some flower and leaf beads to create the interruptions in the yoke. I also added them as a triangular drop component at the bottom.  I may remove this bit.  It's not bad, but I am not in love with it either.  I do like the proportion it gives to the length of the drop. I am super pleased with the sympathy between the shape of the neck edge and the necklace yoke.

Finally, I used the last of the ovals as the center back element, with a dual clasp structure.


I do like the drop component here at the back, but I might flip the bezel the other end up, so the landscape is supported by the orientation.


So lucky me, I've got new jewelry to wear for the holiday!  And a good idea for a Spring project to boot!

When I was first making jewelry, and opened my Etsy shop, I spent some time trying to "make things I thought people would like to buy".  I quickly found that a better strategy was to make something I wanted to wear.  The sales followed.  I find the same thing to be true with designing for tutorials.  I find my best ideas in making things for myself, not in trying to create something I think someone else might like to make.  So sometimes, playing with beads specifically for my own use, produces the best design ideas.

As soon as all the leftovers are put away, I will get back to work with my stick pearls, and still plan to release that new project for you in either late December or January.

I hope you have lots to be thankful for while you eat your turkey next week, and good friends to share with.  Happy Thanksgiving to you!

Oh!  Did you notice my photos look different?  I have a new set of little studio lights and am learning to use them.  They are brighter and cooler than what I am used to, and I know my white balance is not what I want it to be yet.  I have a warm bias that is not quite satisfied.  Plus, I still have some shadows to soften, but I like the new setup.


Thursday, October 11, 2018

Blue Sage Caramel's Claws

When I was at Dakota Stones shopping for focals, the Red Creek Jasper had a very different look than previously, with very little copper, ochre or olive, but I did find some nice pieces that work well with the Sage colorway.  I am sharing those focals here, because I can provide larger, clearer images than in my Etsy listings.

These particular stone beads are mostly usable on both sides and some are completely different on each side, a bonus for you.  You can choose your preference, based on your own wardrobe needs, or just fall in love with one side or the other.  I show you both sides of each piece below!  There are just 8 of these kits.

Here goes:

A lighter side (with a few silvery clouds in the sky) and a darker side!


In this case, both sides are very similar.
The first side mostly dark (nice bezel contrast), with a second side that has interesting landscape color and markings.
These two sides are totally different.  The first is similar in color to my sample, kind of khaki,
and the second side is deep teal and midnight dark.

Both sides have a little patterning, the first more, and the second a little less, It has a small, flat spot on the upper right edge at the back side, but im my experience, it would not affect the bezel shape.

Both sides have a little fiery patterning, and remind me of the sky above a forest fire at night.

Beautiful patterning on both sides of this bead, the first bold and the second more soft.

This final focal bead is soft and pale, very sky-like to me.  An almost perfect match for the bezel beads.
I really like the range of options here.  Choosing a dark or contrasting focal means the bezel is a featured bit in your composition. Selecting a lighter bead means the piece becomes more an organic whole.  Both can be lovely!

Available in my Etsy Shop on Saturday, October 13th, around noon CST.