Search This Blog

Showing posts with label Beadsmith. Show all posts

Tuesday, August 4, 2015

Playing with Trinity Beads

When I visited Steven Weiss and his Beadsmith booth  at the Bead & Button Show, he handed me a few samples of new beads. I admit, I am a traditionalist, and have not messed with many of the new shapes.  But, I finally had time to play with some of them over the last couple weeks.  I have three bracelets to show you, the results of that play.

First, here's the Trinity Bead.  It is a sleek meld of three beads, about equivalent to size 6/0, laid flat, side by side.  I understand there is an infinity bead that is just two lobes, similarly positioned.  And I have a mini version of the Trinity, that looks like an 8/0 size to me.  I have plans for that too, but not enough time yet.


I felt the trick to working with these beads would be in keeping them from becoming rigid when stitching them together. What could be more rigid, strong, inflexible, and structurally stable than a triangle? I fiddled with my needle and thread for a while, and found a happy combination that was very flexible and created my Squiggle Berry Bracelet first.


I used the beads diagonally.  Here's a picture of the back of the work. See the layout?  Reminds me of a bicycle chain a bit.  I LOVED the O-beads with Trinities, and used them in each of my projects.


I was really pleased with the flexibility of my weaving, both in terms of wrapping around a wrist comfortably, like little hinges...


...and in terms of flexing side to side in movement.  I could even curl it into a circle.


I have been toying with the idea of writing tutorials for real, and of course, this is the first thing I try to imagine illustrating.  Holy freaking cow! Anyhow, I liked this, but I didn't just love it.  And I had just one tiny tube of these little Trinity goodies, so I cut Squiggle Berry apart and played again. Result, being, Big Top Bracelet.


I thought the shiny color-shifting Pyramid Beads, would be nice with the Matte Lava Trinities.  It reminded me of the "When I grow old, I shall wear purple..." poem.  Would this not be great with a red hat??


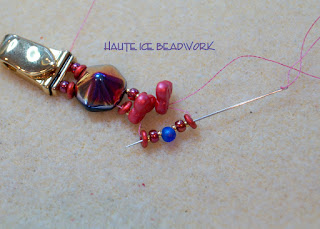
I took a few pictures as a started, but got bored with it, as soon as I made a mistake and had to rip it all back and start over, so I didn't finish.  But the pix I took would let you see the construction, so here they are.  But remember, I MADE A MISTAKE!  Don't make the same one yourself.  Oh, and I happen to really like working with two needles and this complicates everything visually.  But still, I think the images are valuable, and would help me remember what I did, so here goes, with brief instructive words to accompany them. I put on my clasp first.


I turned it over and put 11/0 seeds and O-bead washers on each needle, and then a Pyramid.   Distracted by taking pictures, I forgot to put O-bead washer on the far side as I set up the first Trinity, using two bottom holes.  Do not make my mistake.  :)  (Enlarged the photo an noted the mistake)


I put a picot of O-bead, 15/0 seed, 11/0 seed, 15/0 seed, big drop (3.4mm I think), 15/0, 11/0/ 15/0. and an O-bead on my near side needle and a second Trinity on the far side.


I put the near needle through the far side, and went all the way back to the clasp.  Then I clamped that thread, and tucked the needle into the far left corner of my mat, saving it there for later.


I ran the far needle through the near picot, ran back into the clasp, and came back out on the far side, and through the pyramid.


I ran the far thread up to the O-bead and stepped out, adding a picot, sans the first O-bead washer.  That thread then went through the far side second hole in the second Trinity.


Then to proceed with each additional component, add a Trinity, the O-bead bracketed picot above, and another Trinity, not on my needle, sadly. you can put the needle in any hole of the Trinity beads on this step, but when you draw them up, you must align them correctly.


Finally, string and stitch the far picot, and string the next building side. O-bead, Trinity, O-bead bracketed picot series, and another Trinity.  That series, is the basis of the first necklace, and in Big Top, it is interrupted by Pyramid beads every four Trinities.  And the second needle?  It sneaks back into the fray and creates the upper picot series, just like the lower one, but with the smaller drop beads. Not a tutorial, by any means, but hopefully you get the general idea!  :)


So here is the backside of Big Top, with the structure very visible. You have my permission to play with my idea if you like. Each time I add a Pyramid, I must compensate for the diagonal placement of the Trinity Beads. as I do at the beginning to set up the first one.


I took this one apart too.  I have this tunic with the red of these Trinities in it, and I wanted to make something fun to wear with it.  Could have been Big Top, but the tunic also has olive green, and no blue,  so snip snip!! Another challenge I gave myself was to use each and every Trinity bead in my work.  Just because.   Here is the result.  I call it Tribal.  Or maybe TriBal.


In order to use ALL the beads, I had to make a pair of earrings.  Handy that there were four Trinities left over!  Here's a picture that really illustrates the flexibility of this weave, plus shows you the variation of the structure that I employed.


In this weave, I alternate the Trinity beads, instead of using them diagonally.  It feels very snakey, and I love it.  It also employs some mini super duos, which you can see on the back side in these images.


I shot some of these images on the tunic itself, to let you see the color in it.


This structure reminds me of a conveyor belt, or maybe escalator treads.  SO supple!


Still two layers of structure in the work, and still, picots as a means to get from one place to another.  I really wanted to fill ALL the holes with my work too!


Happy with the earrings too!   I have a necklace plan, but it may have to wait a few weeks until I am back from a little trip to Seattle to accompany our baby as he drives across country to his first job at Amazon.  See you all later, 'gators!!
***

Ha!  As it turned out, I beaded that necklace instead of packing!!!  I told you I designed the Tribal set for a specific tunic top, which is from Art of Cloth, an addictive designer I love.  I try to buy one item, ON SALE, from each season.  This was last fall.


And here is the necklace.


Which features Triangle beads, (like O-beads, but unsurprisingly, triangular) and mini duos.  Plus some funky spikes I bought at my LBS.


Plus Swarovski Pearls, Miyuki 24k Green Gold delicas, 24k gold seeds, and a black onyx cab.


OK, this last bit was posted from the road on some pretty decent hotel wifi!  Hugs to all!

Tuesday, May 21, 2013

Artichoke!


Steven Weiss of Beadsmith invited me to create using the new Miyuki Baroque beads and a beautiful Golem Cabochon.  I really enjoyed working with both, and am happy with my results!  There is an entire fB page devoted to this awesome Golem/Miyuki combination. and I invite you to view all the beatuiful design work here!


I loved the Golem cabochon, by Vladislav Ivanov, and (thanks to percise calibration on his part) I was able to begin with a most magical number in my bezel base row, 96, that divides evenly FOUR times and is also divide-able by 3, 4, 6 and 12.  I was in 7th heaven.  (Wonder why heaven is seventh?  Primes are abysmal beady numbers!)  So because it was possible to do so, I got totally carried away with that bezel, allowing the cab imagery to dictate my progress.  I think the result kinda blends with the cab to the point of visual question about where one ends and the other begins.  After I had played for a few rounds, I decided I would cover the through hole, and just feature the beadweaving and the gorgeous Golem graphics.


Then I created my strap, using a base of my favorite stitch triangle weave and embellishing with square stitch, and variations thereof.  I was happy to add a few super duo beads to the mix and  was really pleased with the Miyuki Baroque beads.  The texture is almost that of a Baroque pearl, and somehow makes it possible for the result to have both a relaxed and an elegant feel.  Pearls themselves are really hard to dress down, so what a great finish!

 
After working the strap, I wanted to add some of the drop components to the bezel, but didn't really want the focal piece to get bigger.  In playing with the embellishment, I discovered a way to make the drop components curl back over the cab, and the result looked like an artichoke to me, hence the name for the work!
 
 
I also loved the Golem maker's mark, and wanted to be sure it was visible in my end result, so here it is for you to see.  Now I need to go and shopping and find the perfect thing to wear with this for the Bead and Button show!  I think my little olive accent beads should inform that purchase! 

Thursday, August 16, 2012

Foto Skilz


Photography is such an important part of (for want of a better term) Competitive Art!  I like applying to shows and sending images to be considered for publication.  I like competitive events for beaders.  It pushes me to produce my best work.  To dig a little deeper to find a solution to a design problem.  To meet a deadline.  To place my work in the world for others to see.  To see the work of other artists, and to be elevated and inspired by that work.  But none of this is possible, if all you have is your art; in my case, beadwork.  You need a means to send it out to be looked at.  And that means, photography.  Something I fake my way through.  This must stop.  So I have made a committment to buying a new camera, with more than the 4.1 megapixel capability of my obsolete Kodak.  And taking a class (or maybe many classes) to learn how to use it.

But despite my photographic inadequacies, I LOVED working with a skilled model, Jana Merten, to try to capture the essence of "Missing."


I like evocative art.  I want my visual art to take me somewhere.  I want to feel something when I look at it.  I want to be transformed somehow, but I have this idea that my photographic choices are not necessarily the best communicatively, with respect to conveying the beadwork. But maybe creating the right mood and character is equally important.  Hope so!


The series of photos I am showing you, takes me exactly where I want "Missing" to take a viewer. Somewhere "in-between" worlds. Somewhere wistful. Somewhere, lost in a forest. Somewhere not quite precisely here, or exactly there. Somewhere quiet and peaceful, but just a little nebulous. So when we  out shooting at the park, and I spied a patch of dappled sunlight, I thought, THERE! And Jana was willing to wade into the weeds and shrubby growth and make it look amazing.


I realize there are shadows that a professional photographer could and would light differently.  But I like those shadows.  And I like the image above with Jana's face entirely in shadow, because for me, it points to the piece instead of the gorgeous model, while she supports the jewelry magnificently.


 I love this one and the next, below, because "Missing" is actually visible on Jana's face.  Above, there is a reflection on her chin from the Swarovski crystals, and below, on her upper lip.
 

But. enough with this dappled light mania of mine.  I shot first in direct sunlight, which was awful.  There were dark shadows beneath Jana's chin, and stress on her face from the ridiculously bright light.  SO... we went to the shade, and there was still plenty of sunshine to light both model and "Missing" clearly.  But for me, it was TOO clear, and maybe even a little obvious.  And "Missing" is not obvious.  Most people need to understand the title to understand the work, but hopefully, even for those who do not know the full story, it has a an unmistakable quality of emptiness, maybe a little sadness and perhaps, some mystery.


Let me backup a bit.  This piece is my entry in a facebook event, (brainchild of Steven Weiss) Battle of the Beadsmith. It is a single elimination tournament, with 80 beaders from around the world. Please like us on facebook and watch us battle here!  There are just 20 of us left, and the third round of battle is getting underway as I write this. Each round requires a new photo of the work.  Eek! Thankfully, Jana volunteered to help me. In addition to being a client and a friend, Jana is a pro. Her large and perfect features, great body, hair and makeup skills, and modeling experience were a godsend.  She knows many shots at subtly different angles and with tiny changes of expression are needed to arrive a a few good results.
After shooting in the dappled sun, I wanted to try a more casual look for "Missing," with a print dress, and a more relaxed setting at my fire pit.  Again, Jana indulged me, and I'm pleased with the result.  IF I should be fortunate enough to survive the cut from 20 artists to 10, then maybe, one of these is the next photo, but that's a bridge I will cross only when and if I get to it. 


And then, Jana wanted to see the work on bare skin.  She was right, it's pretty splendid that way too!  But I devised a feather boa cover up for her bareness, and I don't love that.  For me, it's too...  well, feathery!  Maybe a little, Old West Dance Hall Girl.  I experimented with Picasa effect tools to try to play down the presence of the feathers, but...  they are still...  feathers.  Feels entirely wrong to me.  How funny that my print should happen to suggest feathers as well.


Whatever the outcome of the Battle, this blog post is meant both to share with you Jana's amazing work, and to thank her for her time, her patience, her flexibility, and her great kindness to me.  I so appreciate it!  Find Jana's website here, and check out her dancing and makeup tutorial YouTube videos here.

Sunday, February 12, 2012

Tweed Bracelet


"When I am an old woman, I shall wear purple
With a red hat which doesn't go, and doesn't suit me."


 We all have things we gravitate towards as designers, and things we avoid.  I am not a silver girl.  I wear a gold wedding ring, and the silver bin in my bead storage is the emptiest of all the bins. 


Beadsmith's wonderful Steven Weiss sent me a clasp he chose for me, as a part of the Elegant Elements project.  It's a lovely thing, a pretty shape, with a subtle and unusual color combination.  But working with it really made me stretch my boundaries.  And for this I am thankful.  Every time we make safe choices, we close our lives off a little from possibilities.  A silver, mauve and siam bracelet was a big reach for me.  But I did it, and I have learned and stretched and grown.  And I have to add this.  These Elegant Elements clasps are made with Swarovski components.  So if you use Swarovski crystals, or their crystal pearls in your work, a beautiful and organic match with your work is guaranteed. 


And that is enough said. Except for one thing.  In the corner of this private group forum, it says,

"A very intimidating group...  you've been warned :o)"

But the support and kindness there is what makes it possible to reach outside your personal comfort zone and try something entirely different with which you do not have experience, technical expertise or the even the ability to be securely successful.  


Now I am aching for emerald and gold.  Off to clean my table, and follow my heart.

Wednesday, December 28, 2011

Components as Inspiration

I was super excited to be contacted by Steven Weiss at Beadsmith.  They have a new line of clasps, Elegant Elements, and he asked if I might like to design using these clasps. Then, my work (and that of other designers) would be featured as a sales strategy for the new clasp line.  The product line was GORGEOUS!  And I said "Yes!"  Although I quickly discovered many of the other participants are my beading heroes, and I hoped I would find myself adequate to the task.

I have only just met Steven Weiss "electronically," but I am going to go out on a limb here and say the guy is a public relations and advertising genius.  This was a really brilliant way to collect great photos of the clasp line in action and I suspect most of us are really happy to be involved in the project.  A win-win situation if ever there was one!

I chose two beauties from the wide range of Elegant Elements clasps.  The first one I wanted to work with was a three-strand, golden nest box clasp, with snowy white pearl eggs.  I thought this piece could serve double duty, since the February Etsy Beadweavers theme is "NEST."  My first thought was to create a similar beaded nest for pearls to rest in, but after a couple samples, I found my work didn't really allow the clasp to shine.  The clasp is a soft, pale gold and although it has beautiful leaf texture, it's very subtle and super organized.  My samples were VERY textural, and one was a little disorganized, and neither suited the clasp.
I decided I needed to let the clasp lead the way for me, as I often do when I find other components I want to work with, so I analyzed it's basic design.  It sits neatly flat, and the pearls sit up off the delicate, flat, highly organized nest to be featured in their little bezels. So I began a search for flat, golden, subtly-textured components that might allow me to provide contrast to big egg-shaped pearls.  I bought some golden shadow rivolis, and those were lovely, but I really wanted something metallic to go with them.  Then one night in a parking garage in South Minneapolis, the answer jingled out of the payment station in the form of a gold one dollar coin.  I had just read an article about the reducing of production of these beauties, because they are not highly circulated, and considered to be an expense our government can eliminate.  But I just loved it.  And lo and behold, it was flat, pale gold, and delicately textured.  Just what I had been looking for.  But coins in jewelry?  And then the idea of a "nest egg" occurred to me, and it seemed perfect design concept for both of the tasks at hand.

I bezeled the coin and dashed off to the bank for more.  Turns out several different presidents are featured, as well as Sacajawea, but I liked the lady liberty backs, so I chose the ones with the best looking "tails" and got to work.  With several coins and rivolis ready I played with placement, and found a way to organize a triad of each (half dozen packaging, just like the clasp) to allow for a place for some of my big freshwater pearl drops to sit, and joined them together.  I played with several edge details, including tiny leaf shapes, but they still felt overwhelming and out of scale with the clasp, so I just netted in some bicones and found that to be appropriately scaled and detailed.

 I broke the edge detail to allow some of the pearl eggs to drip out of the nest as fringe, and to allow for a soft three strand pearl neckstrap, which joined both the focal and the clasp with big pearls again, to help keep the clasp focused as a major player in the design.

Although I frequently let components speak to me in my design process, I had never before considered the possibility of allowing a clasp to dictate a design. This line is more than worthy of  that kind of attention and I am really looking forward to working with my second clasp.