Search This Blog

Tuesday, August 4, 2015

Playing with Trinity Beads

When I visited Steven Weiss and his Beadsmith booth  at the Bead & Button Show, he handed me a few samples of new beads. I admit, I am a traditionalist, and have not messed with many of the new shapes.  But, I finally had time to play with some of them over the last couple weeks.  I have three bracelets to show you, the results of that play.

First, here's the Trinity Bead.  It is a sleek meld of three beads, about equivalent to size 6/0, laid flat, side by side.  I understand there is an infinity bead that is just two lobes, similarly positioned.  And I have a mini version of the Trinity, that looks like an 8/0 size to me.  I have plans for that too, but not enough time yet.


I felt the trick to working with these beads would be in keeping them from becoming rigid when stitching them together. What could be more rigid, strong, inflexible, and structurally stable than a triangle? I fiddled with my needle and thread for a while, and found a happy combination that was very flexible and created my Squiggle Berry Bracelet first.


I used the beads diagonally.  Here's a picture of the back of the work. See the layout?  Reminds me of a bicycle chain a bit.  I LOVED the O-beads with Trinities, and used them in each of my projects.


I was really pleased with the flexibility of my weaving, both in terms of wrapping around a wrist comfortably, like little hinges...


...and in terms of flexing side to side in movement.  I could even curl it into a circle.


I have been toying with the idea of writing tutorials for real, and of course, this is the first thing I try to imagine illustrating.  Holy freaking cow! Anyhow, I liked this, but I didn't just love it.  And I had just one tiny tube of these little Trinity goodies, so I cut Squiggle Berry apart and played again. Result, being, Big Top Bracelet.


I thought the shiny color-shifting Pyramid Beads, would be nice with the Matte Lava Trinities.  It reminded me of the "When I grow old, I shall wear purple..." poem.  Would this not be great with a red hat??


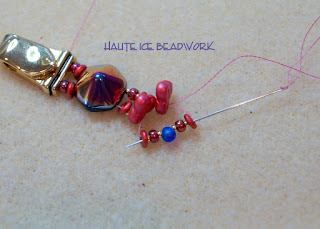
I took a few pictures as a started, but got bored with it, as soon as I made a mistake and had to rip it all back and start over, so I didn't finish.  But the pix I took would let you see the construction, so here they are.  But remember, I MADE A MISTAKE!  Don't make the same one yourself.  Oh, and I happen to really like working with two needles and this complicates everything visually.  But still, I think the images are valuable, and would help me remember what I did, so here goes, with brief instructive words to accompany them. I put on my clasp first.


I turned it over and put 11/0 seeds and O-bead washers on each needle, and then a Pyramid.   Distracted by taking pictures, I forgot to put O-bead washer on the far side as I set up the first Trinity, using two bottom holes.  Do not make my mistake.  :)  (Enlarged the photo an noted the mistake)


I put a picot of O-bead, 15/0 seed, 11/0 seed, 15/0 seed, big drop (3.4mm I think), 15/0, 11/0/ 15/0. and an O-bead on my near side needle and a second Trinity on the far side.


I put the near needle through the far side, and went all the way back to the clasp.  Then I clamped that thread, and tucked the needle into the far left corner of my mat, saving it there for later.


I ran the far needle through the near picot, ran back into the clasp, and came back out on the far side, and through the pyramid.


I ran the far thread up to the O-bead and stepped out, adding a picot, sans the first O-bead washer.  That thread then went through the far side second hole in the second Trinity.


Then to proceed with each additional component, add a Trinity, the O-bead bracketed picot above, and another Trinity, not on my needle, sadly. you can put the needle in any hole of the Trinity beads on this step, but when you draw them up, you must align them correctly.


Finally, string and stitch the far picot, and string the next building side. O-bead, Trinity, O-bead bracketed picot series, and another Trinity.  That series, is the basis of the first necklace, and in Big Top, it is interrupted by Pyramid beads every four Trinities.  And the second needle?  It sneaks back into the fray and creates the upper picot series, just like the lower one, but with the smaller drop beads. Not a tutorial, by any means, but hopefully you get the general idea!  :)


So here is the backside of Big Top, with the structure very visible. You have my permission to play with my idea if you like. Each time I add a Pyramid, I must compensate for the diagonal placement of the Trinity Beads. as I do at the beginning to set up the first one.


I took this one apart too.  I have this tunic with the red of these Trinities in it, and I wanted to make something fun to wear with it.  Could have been Big Top, but the tunic also has olive green, and no blue,  so snip snip!! Another challenge I gave myself was to use each and every Trinity bead in my work.  Just because.   Here is the result.  I call it Tribal.  Or maybe TriBal.


In order to use ALL the beads, I had to make a pair of earrings.  Handy that there were four Trinities left over!  Here's a picture that really illustrates the flexibility of this weave, plus shows you the variation of the structure that I employed.


In this weave, I alternate the Trinity beads, instead of using them diagonally.  It feels very snakey, and I love it.  It also employs some mini super duos, which you can see on the back side in these images.


I shot some of these images on the tunic itself, to let you see the color in it.


This structure reminds me of a conveyor belt, or maybe escalator treads.  SO supple!


Still two layers of structure in the work, and still, picots as a means to get from one place to another.  I really wanted to fill ALL the holes with my work too!


Happy with the earrings too!   I have a necklace plan, but it may have to wait a few weeks until I am back from a little trip to Seattle to accompany our baby as he drives across country to his first job at Amazon.  See you all later, 'gators!!
***

Ha!  As it turned out, I beaded that necklace instead of packing!!!  I told you I designed the Tribal set for a specific tunic top, which is from Art of Cloth, an addictive designer I love.  I try to buy one item, ON SALE, from each season.  This was last fall.


And here is the necklace.


Which features Triangle beads, (like O-beads, but unsurprisingly, triangular) and mini duos.  Plus some funky spikes I bought at my LBS.


Plus Swarovski Pearls, Miyuki 24k Green Gold delicas, 24k gold seeds, and a black onyx cab.


OK, this last bit was posted from the road on some pretty decent hotel wifi!  Hugs to all!

Thursday, July 23, 2015

WHAT?

I think I should explain a few things.  Visual things. And I have one picture to help with that.


Actually, my 3rd round picture is a collage of two images, so I am going to use both of those images separately for discussion purposes.


What are you seeing here?  Do you notice a freaky similarity between the garment under the coat and the beadwork design on the coat?  Very similar, but not precisely the same?

The process I have been exploring for my dense bead embroidery on fabric involves stabilizing the area I want to bead.  Usually, bead embroidery is done on stiff interfacing, like Lacy's Stiff Stuff, Nicole's Bead Backing, or simple Pellon. But I want my clothing to be supple and comfortable, so I really don't want to wear pellon. Bead embroidery can also be done on leather, but I don't really want to make (or wear) leather clothing either. And yet, I need to keep the garment fabric from puckering, bagging, and sagging from my thread tension and the weight of the beads.

My solution to the problem is to applique fabric to the garment where I want to bead embroider.  This stiffens the fabric to be embroidered in three ways.  First, I adhere the applique fabric to fusible web. The web has a little stiffness, and keeps the cut edges from unraveling.  Second I fuse the applique fabric to my garment, and the applied layer of fabric adds another layer of stiffness.  Then I machine stitch all the applique edges, adding one final bit of structure and support.

SO... what you are seeing in this image, is a small piece of the print Lycra I used as applique, made into a swimsuit, next to the final beadwork.  As you might also be able to see, I have adapted the print to my purposes.  I have scaled down the imagery to work on my coat, by cutting the design apart and re-assembling it in the size I need to suit my lapels.  I have eliminated the gold and black from the print, in the interest of it NOT looking like gaudy swimwear, and to create believability as casual and formal wear. I have softened the vibrant colors through bead choices, and with my permanent magic markers, keeping the essence of the fabric colors intact, but adapting hues and values to my own purposes.  Plus I have used only some of the imagery in the fabric, and selected out other parts.  I kept some components almost exactly as they were, particularly the philodendron leaves, but scaled them all down at their edges, as the beadwork "gains weight" when I bead the outline.

Then, there is the other image.  Which I think will be left small.


Sadly, that is me.  Not my beautiful model/photographer.  I suppose there is something to be said for truth.  Two truths are, I unexpectedly ran out of photography funding, and I have a 62 year old body. Not exactly an image my aesthetic might have dictated, but such is life, and truth is a good thing.

Fortunately, my next image, should I miraculously advance to round 4, does not involve a model. I could not bring myself to have stitched together that bathing suit for naught tho...  And I do think the jacket might make a good Minnesotan beach coverup, even worn over thighs you might prefer to see only in shadow.

I want to offer a huge thank you to my photographer friend Pam who both took these photos and who let me use her beautiful pool! Sometimes, you just have to smile, and march down the path, wherever your own Safari takes you.

Thursday, June 18, 2015

...and it was FUN!

Battle of the Beadsmith 2015 is underway! And I have done something completely different this year.  Below are my efforts in 2012, 2013, and 2014... Ghosts of Battles Past.


But this year... I made something unusual.  Meet my Urban Safari Coat!


When I started beading, I consciously tried to keep my beadwork out of my costume design studio.  Because, I beading is fun for me, and I didn't want it to distract me from my work.

And then I thought, "Why?" I have some self discipline.  So I began experimenting.  Maybe some other day, I'll show you the progression of garments that followed.  But for now...

This coat was fun, even under the pressure of a time deadline for the Battle of the Beadsmith. Maybe a little exhausting on the tails of Bead Dreams... And while it is not perfect, I don't think the flaws are in the beadwork. It's a challenge to get dense bead embroidery on fabric to lie perfectly flat and not pucker the material around it.  But I feel like I got that part right.  I didn't put much effort into the garment design and layout, and could have done more.   But even so, the project was fun, and soothing in the hypnotic, meditative way of bead embroidery!


I asked Jana Rose if I could hire her to help me with my photography, and she said yes.  I got to hold her huge camera and open the shutter.  And even THAT was FUN! Although my arms knew for sure, after a couple hours, that the camera was really big.  So... BIG fun!  :)


It was fun in the shade of city buildings... and fun in the setting sun at the park.


AND it was sneaky fun by a mud puddle!


 You have seen it on the hunt in a city street, and on a walk in the park.  I hope to have an opportunity to share all the things I think this coat can be with you... a cocktail party accessory, an evening jacket over a formal gown, a bathing suit coverup on the beach, a blazer worn with a briefcase on an office executive with panache, maybe an Asian look (it has a kimono quality, I think), and maybe even as a robe or bed jacket.  

Tantalizing fun for me!  I plan to do more for sure.  

Friday, April 24, 2015

Briar Rose

I am proud to present my 2015 Bead Dreams entry, "Briar Rose" and happy to edit my post to announce that it placed first in Ms. Maddie's Fabulous Florals.  This category honors Merle Berelowitz, and is generously sponsored by her family and CJS Sales, specialists in vintage jewelry supplies in NYC.

I did not know Merle Berelowitz, but I believe I share a love of all things floral with her.  I hope her family finds the amazing collection of works presented in her memorial category pleasing.

My entry was the result of several ideas. First, I planted a new succulent ground cover in my garden last summer and the sweet, prickly little thing was happy enough in its new spot to bloom. The flower had a flat brown face, and five pointy golden petals that curled away.  I loved it!


The basic shape of my rose components, and the idea of thorns came from this adorable plant.  I started with three 35mm cathedral jewels, which appealed because of the Pantone color of the year for 2015, Marsala.


Then I fiddled with various petals.


And finally created some I liked, and tested colors and application.


Then, I played with leaves, thinking spike-y, and rose-like.


Which were created from long oval Swarovski jewels and diagonal peyote.


Once I had leaves and flowers, I wanted to further pursue the bas relief branch technique I created last year for "Ka-Bloom", which involved couching satin cord to bead backing and beading over it.


But this time, I wanted to make thorny vines.  I sketched, trying to create a sort of dangerous looking growth of rose vines, that might have served as protection for "Briar Rose" herself, (aka Sleeping Beauty) as she lay sleeping in her castle, awaiting her true loves kiss.


I carefully plotted leaf and thorn placement, and then, began beading away... 


But I struggled with color, and made THREE versions before I could decide which I preferred.  Jeez. For what this is worth, I don't find using color challenging.  I have a pretty good idea of what I want.  It's getting the combination of beads, thread and backing that will produce that result that is hard!

 Reject #1
Reject #2
Until finally... I found a combination I liked!


Pretty happy with my little clasp too.

Surprisingly, it seems I took no picture of the backside, always a point of pride for me.

But I quietly begin to wonder.  Why do I work so hard at this?  Particularly when what I make seems somehow not to belong to me, but instead to those who would show it, if they choose?  Or to those who would see it, but only when they are ready, and on their terms.  Some little thing in my heart is broken, and I hope I can mend it.  I think my competition days might be drawing to a close.

I wrote the above paragraph on a difficult day.  I leave it here because I imagine I will need to be reminded of how I felt on some other day, when I am doubting myself and others.  I participate in competitive beading because I find it pushes me to reach for MORE in every way.  It's not easy.  And it can be emotionally draining, but it can also be a very good thing, and I hope that I can remember to keep that GOOD at the top of my heart and mind going forward.

Thank you Kinga for the photo!

Friday, March 13, 2015

I Made a Neck Form (with help from my carpenter husband)

Before I finished my Bead Dreams piece, I knew that a normal neck form was not going to flatter the work.  I needed wider shoulders and a broader chest, and after an exhaustive hunt, I knew what I wanted was just not out there.

I have never really been very satisfied with the forms I purchase, and one of them was so crooked in the neck area that I had never been able to use it.  I thought I could perhaps take it apart to see how it had been made, and make my own custom-shaped one.  So, I ripped off the cover, and took a look.


Were you expecting something different? I was.  :)  It had 1/2 inch foam padding, which I removed, and then sized up the components.


It had a base, a support with a curve, a piece of what looked like masonite to me, stapled to the curve, and a funky little neck thingy, hot glued in place.  This one was 1/2 inch off center, and that probably explains why my work always looked lop-sided on this particular form.


So before I was even finished with my piece, I asked my husband Carl, (aka The Best Man Ever) if he could make me a base, support piece, and differently shaped face for a custom form.  He built a new wood shop addition onto the garage last fall, and seems to enjoy the place.  He has been busy making new furniture and storage for it and installing machinery.


He said he would help me, so I designed a shape I thought would suit my work.


Here is how it differed from the original form. I wanted a wider shoulder and broader chest.


I made a pattern of the curved support for Carl, and we discussed materials.  He suggested aspen, for the curved support and base, which he would finish for me, so I would not have to cover it.


I thought the curved face could be masonite, but he said it would be better to use special curve-friendly plywood and create exactly the curve I wanted by laminating layers together over a form, which he made, and used to create the face.


I didn't take a picture of the laminating process.  :( But this was in his shop when I sneaked in there... something else being laminated into a curve, like he described the process for the face of my form.


Here is a pic of the finished curved face in my workspace, attached to the base and support Carl made, before it got its little neck thingy. I thought it looked like a shield.


Next, came the cover.  Here's the one I removed from the old form.


I shopped for materials and found three possibilities.  Two were light weight vinyls, and one, some sort of actual leather, bonded to a stretch interfacing, similar to what the original cover material looked like. 


I also found a place in NYC, that made "custom forms" and sold their leatherette material by the yard. But I decided to use the white vinyl for a first try and made a pattern.  Maybe because of the broader shoulders, or the heavier vinyl, I needed to create a dart to help make the neck shape.  


Here's the vinyl cover, cut out and assembled.


I still could not imagine how I was going to get the vinyl to wrap flat around the back of the curved edges of the form. So I paid a visit to the local Tandy Leather and got a great lesson on the use of leather adhesives from an adorable leather geek.  He suggested water based contact cement, and assured me it would be sufficiently strong for the task at hand.  He also said I would get one chance to get it positioned correctly, because once the two tacky surfaces touched, the bond was final.  YIKES!  He suggested I pin the cover in place first, apply the adhesive, and then wrap.  I was REALLY NERVOUS about this.  But I took his advice.  I glued on the 1/2" foam (from the fabric store), and pulled the vinyl into shape.


I was really glad to have the thickness of the bonded plywood to pin into at this point. Crunch time came, and I painted the vinyl and the back of the plywood with adhesive, and let it get tacky.


Here are the tools I used, recommended by the adorable Tandy Leather geek.  I wrapped one of the spreaders I purchased (which was great for spreading E-6000, btw) with a 1" strip of foam, and that was the right size to apply the strip of adhesive that I needed, and the foam held the watery glue nicely, with very little dripping or mess.


I let it dry overnight, and actually got up around 3am to see if it was still ok!  The next step was to prep that back for the paper cover.


Carl let me steal some of his gorgeous drawing paper for the back.


I told myself from the beginning of this adventure, that what we made would have to look neat, clean, and professional or I simply could not use it.  I am really happy with the results!


And I think mine actually looks better from the back, than the commercial one.


Finally, the button bit is glued on to the top, and I am ready to shoot pictures tomorrow.  Carl cut me a masonite disc to cover, but the original was cardboard, and that would have allowed me to adhere the center as well as the edges.  Next time!

And now,  Carl thinks my piece needs its very own fancy pants wooden box.  I am one very, VERY lucky girl. Whatever that shop addition cost, it was worth it!  

Do you think I have to give him co-design credit?