Search This Blog

Showing posts with label beading tutorials. Show all posts

Monday, August 31, 2020

12mm Pearl Acorn Earrings

EDITED TO SAY:  Kits are re-stocked in all four colors!

I am pleased to say that I have a tutorial in the FINAL Bead and Button magazine.  I made up a few kits and re-vamped my 12mm tutorial in honor of the event.  It's on sale half price (normally $5, now $2.50) for the rest of the holiday weekend.  I should have written this post on Friday!!!

The tutorial is very similar to the one I did for the Peach Caramel's Claws necklace, and if you own that version, there is no real need to buy the new one.  Except of course that I believe I improved the illustrations and layout just a bit.  But I am just like that. And it includes all the bead lists for the new colorways.  But I'll just give you that here. Not the best quality image, but the best I can do right now.

They are pretty, simple, and I like the scale with my smaller face and bones.  Here are the glamor shots.


I am also working on re-kitting my Fall Flame leaves.  Some are done and in my shop, and the rest, plus one new colorway should be ready this week.

I have done no beading this summer.  I have spent my time in my garden, community parks, and on our many lakes in my Covid kayak.  I have always wanted one, but have never before had the muscle to move one around on my own.  It's a wonderfully peaceful thing, and good for my soul.

I think about many of my repeat clients often, and hope that you are all weathering this year of challenges well.  I do have a couple new projects in mind, and maybe with the cooler weather, I will stay off the water and put some of them together for you.  Till then, a virtual, socially distanced hug to you all!


Tuesday, July 23, 2019

A One Day Only Birthday Celebration Sale

July 24th is my 66th birthday.  Yesterday, I went in for my every-two-year Bone Density Scan to find all my T-scores no worse than 2 years ago, and my lumbar spine density improved!  In my almost 20 years of scans, this is exceptionally good news.  I believe I can credit my exercise and weight lifting program, begun in January.

SO in celebration of my birthday, and improved health, I am offering 15% off everything in my shop, and free shipping on all orders over $35, in a real way, not in the I'll-just-mark-up-the-prices-to-cover-shipping way.  I do not have anything to new to offer, but there are many things in carts, and if one of them belongs to you, take this opportunity to help me celebrate and get yourself a little deal on what you want!

Find me at Haute Ice Beadwork, and thank you for all your support and purchases in the past!  You all mean so much to me.

Sale begins my time at midnight and runs 24 hours only.  

Friday, July 12, 2019

Summer Fruit Accessories

Have you begun your Summer Fruit?  Have you realized that assembling kits that allow you to make any version of the necklace you want leaves you with some leftover beads?  Here are some suggestions as to what to do with those extra beads.

Make Accessories!

I put photos of a few pairs of earrings in the tutorial, and because you are clever advanced beaders, I even included fishhooks and headpins for simple earrings, because I know you know how to use the information you have to create what I showed you.

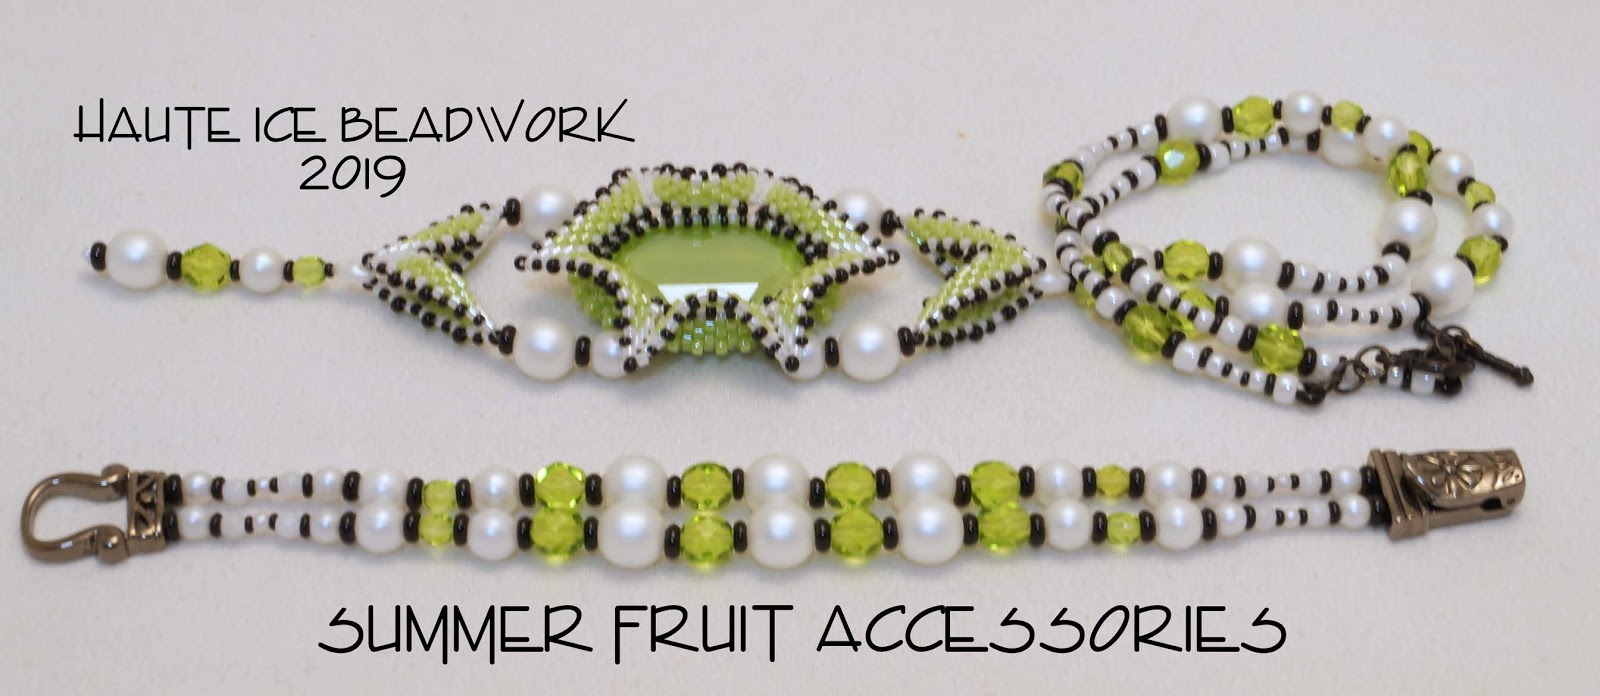
This week I am putting together a final set of kits and have knocked together three bracelets that offer ideas as to how you might use up some of those extra beads, if you have them.  It all depends on how long you made your necklace, and which variation you weave, but even these examples have possible variations.


This first bracelet is a simple combination of two sets of Curled Squares.  But if you do not have the beads for two sets of squares, one set would also be nice.  You could join them tip to tip, or end to end and string either a single or double strand, depending on your join.


I do love that the internal 6mm rounds are visible because of the tight circle around your wrist and the pretty curled edges come into view.


Next, I have a simple strung bracelet, that echos the yoke stringing on the necklace.


You may not have as many 8mm rounds as I used, but feel free to use any and all of the accent beads, and any and all remaining rounds of any size. Or ANY of the leftovers, although I am not a big fan of strung cylinders, but hey, it's YOUR bracelet!  I liked the double strand, but it could just as easily be single, thereby stretching the available beads.


 And here is a reminder that the earring could contain a Curled Square, facing either downward, as shown below, or upward, as shown above with the Pineapple set.


One final possibility involves buying an extra focal bead.  


 My hubby is an Antiques Roadshow junkie and I recently sat with him for an episode taped in California and featuring lots of very expensive jewelry.  I was shocked to hear the expert state clearly that although one lovely item was certainly a Van Cleef and Arpels antique, it had been "Messed With" when a bracelet was created from a pendant and "Ruined" when the focal was placed the "Wrong Way".  By that he meant that the oval focal was placed with its length running around the wrist, instead of lengthwise up and down the arm. Humph!  Let me assure you, the right way is the way you prefer to align the focal.  The way your wrist and hand look great, and are comfortable when the bracelet is worn.  I let the nice man get in my head, and aligned it the "right way" (elongated extension, running up and down the arm) just for him, I guess.  But believe me when I tell you that you may use your focal with either bezel extension, and you may align it whatever way you prefer.


I also chose to make up two Curled Squares to bracket the focal.  Notice that I made my connection to the connector row in the bezel, instead of the tips of the extension.  I preferred how it felt a bit less floppy on my wrist when supported from the base near my skin, but this is again, a decision for you to make, and you may certainly do whatever floats your personal boat.  I have teensy wrists, and rarely wear or enjoy bracelets, but this one feels nice to me.


If you want to make this version of the bracelet, I suggest shopping for your focal at either Fusion Beads https://www.fusionbeads.com/30mm-crystal-lime-swarovski-crystal-oval-fancy-stone-4127 or Art Beads https://www.artbeads.com/search/?keyword=swarovski%204127 .  At this point, neither has all the colors available, but each has some.  

If you REALLY want me to buy it for you and leather back it, my price per stone would be $15.  You can send me a convo asking for exactly what you need and I will assemble it for you.  Obviously, you can spend much less on the Swarovski Fancy Stone if you do it yourself, but you must also consider the cost of shipping, plus the leather and adhesive you will need for the backing.  I am just offering.  

I also have some extras of every bead, and if you want more than what you have, I will help you figure out what you need and sell it to you by the gram or half gram, or for the larger beads, by the piece.  I'll do a bit of calculating and be prepared to give you a price before you buy, but you would need to convo me for a quote and private listing.

I do not expect the rush of the last two releases, so I am just going to post this final set of kits today, Friday noonish, July 12th.  

I am not sure where I will go from here, beading wise.  I know I need a break. I know that I am prioritizing a more active life than is allowed by bead illustrating and tutorial writing.  But I also really enjoy it.  So... we shall see.  Whatever happens, thank you all for your kind support of my design work, tutorials and kits.  

My birthday arrives soon, and I am planning a one day birthday sale.  Details posted here in a week or so!  


Wednesday, October 11, 2017

Caramel's Claws Necklace

It started when I looked at a big, rectangular Chrysocolla cabochon, and thought, "That is just too pretty to cover up with a bezel."  Old prong set bezels flitted through my mind, and collided with Czech Crescent beads. This resulted, and Caramel's Claws Necklace was born.  I make that sound pretty simple, although it took a little testing, ripping, and finagling.

I think it is an idea adaptable to many shapes and sizes.   For that reason I created two listings for the tutorial,  If you just want to try the bezel technique, purchase just the bezel tutorial, available here in my Etsy shop.  If you want to make the necklace as shown, and do not already own the Acorn tutorial, purchase both in this listing.


Many cabochons are cut with sensitivity to the stone, and can vary dramatically in size and thickness.  As a maker of tutorials and kits, I recognize that I need to design for readily available focals. Plus, I wanted others to be able to use my pattern with something they could buy at their local bead shop or at the very least, online.  So I chose 30x40mm stone beads, sourced, cut, and sold wholesale only a couple miles from me, by Dakota Stones.

I used two different stones.  I did my first sample with Red Creek Jasper, and I just loved it.  But it's green, and in my experience, my worship of all colors from nature does not always apply to the masses, in particular my personal favorite green golds.  Sigh.  So I did not make this kit.


But I played with a warmer stone from the Red Creek strand, and on my second try was pleased.  I know the Bronze acorn earrings were the best seller, so here is a link to this listing...


The Patina Acorn earrings also sold really fast, so I visited Dakota with that in mind, and selected some Sunset Mookite. Patina is such a gorgeous Melon bead, with hints of gold, pink, and bronze in the finish.  I pushed the necklace a little into the rose, lavender, mauve and honey gold with supporting beads, and here is a link for what I call "Honey and Berries".


And finally, I got back to the cooler colors in the Red Creek strand, and supported the minty green with turquoise and silver with just a hint of bronze.  The Light Sage kits are at this link.


I did a second version of this kit with metallic teal prongs for the darker stones in the bunch, and a deeper Verawood bead.  Dark Sage kits are at this link.  I never made a sample, because each focal I use is one less for you to buy.


I released my first set of 32 kits last weekend, and I think there are 4 left at this point.

You know, it's a challenge as a designer, trying to decide how much money to invest in a design until testing the interest in it.  And the investment is not only in the materials involved.  It's in the time spent making and then rejecting samples, trying a slightly different bead color or finish, finding a "perfect" bead and discovering it has been discontinued or is back-ordered at the factory...  the list goes on and on.

But!  Apparently, you like this design!  So I will make more.  I may re-do some of these existing kits, but I have other ideas.  And while I think this design is timeless and durable,  the first set of kits has an Autumnal feeling to me.  And I have Winter ideas.  AND Spring ideas!

In the mean time, I have been asked for earrings to match the kits done to date.  So I am at work on those, and will release them as I finish them.  Two sets (Cinnamon and  Honey & Berries) are finished and in my shop at this listing.  Light and Dark Sage are on the way.  FYI, the Cinnamon is just one bead different from the original (and popular) Bronze kits.

SPOILER ALERT!!!

I think these are close to colorways for the Winter kit releases,
 coming soon-ish to Haute Ice Beadwork.