Search This Blog

Showing posts with label butterflies. Show all posts

Sunday, May 20, 2018

Butterfly Bags Released into the World


I will release the Butterfly Bags I have made today around noon or 1pm, depending on how fast I can finish writing all the listings and this blog post.  It's COMPLICATED!  And you will have to make choices and I want you to be informed.  This is an easier, more pictorial way to show you what is being offered.

First, I want to show you my sample, using Applique A.  It's not a great applique, because the sides are not perfectly symmetrical. All the other are perfectly symmetrical. I have been hunting butterfly fabric for a year for this project!  I think the primary purpose of having an applique to bead is for inspiration, easy filling, and symmetry.  If you choose this applique, you will need to be sensitive to the lower wing area and make the two sides as similar as possible.

Having said all that, I want you to see my process.  I have a tutorial, for a slightly different Monarch without the pearls, but the possibilities are endless, and I want to give you a sense of how to make choices and move forward.  I think the tutorial is a good buy in terms of guidance in the process, even if you choose a different applique, like this one.

Here's the applique. Notice the flaws with me.  The upper wings are great, but they sit behind the lower wings, and on real butterflies the opposite is true.  Also the lower right wing in larger than the lower left, and patterned differently.  I did my best to ignore the stuff I didn't like as I started beading.


The first step with EVERY bag is to cover the body.  I like large matte black beads for this purpose.  Then the edges are outlined, to mask and protect the stitched and fused raw edge.  When that is done, the fill can begin.  I like to start with wing borders, and use a 3mm pearl and 8/0 matte black on the bottom, with more sizes on the top.  See how I corrected which wing lay over which? I didn't care for the green tones at the bottom of the butterfly and wanted to add a touch of pink and purple at the top, so you can see the start of that here.  Always work do what you do on one side to the other side before moving on, to help with symmetry,


Next, I added veins to the upper wings, with matte 15/0.  


Sharp contrast veining is really pretty, but if your applique is small, you need to skip the veining and just do directional filling, to indicate the sections of wing.   See what I mean on the previous post, called  "A Happy Little Bag" where I did no veining, but you can still see the shapes.

Here I have begun filling the upper wing, Notice how I do a section at a time on each side


Upper wings are finished, and I am ready to vein the lower wings.


I am using both 11/0 and 15/0 beads to do my fill.  I am careful not to overfill.  There can be small spaces between beads and they will not be noticed.  The fabric below is in deep shadow, and no one will think about what is down there except you with your magnifiers on, holding the fabric 6" from your nose.  RELAX.  Small gaps are fine, and too many beads is bad.


I added a little bead at most of the intersections of the quilting, to give it depth, but I avoided the two at the top of the wing, knowing they would mess with the nice clean outline.

Here is my recommendation for you.  Maybe just buy one bag.  I really want everyone who wants to try this to have a chance to do it.  You can only do one at a time, and I really will do more.  The next set will be silvery silk, and I have a pale green and rich bronze planned too,  And I will come back for more gold as well, if there is sufficient interest.  

Here's a link to the bags, and you can choose your favorite applique. 

Here's a link to the tutorial, helpful whether you plan to make one of these two options, or "bead by number on a different applique.

And here is a link for the monarch kit I have available.  If you want the Fantasy Butterfly, or possible beads for one of the other appliques, ask me.  I can probably help you.


Saturday, May 12, 2018

A Happy Little Bag


I am close to releasing the first set of Butterfly Bag bead embroidery projects and tutorials! If all goes according to plan, I will post a few of them next weekend in my Etsy shop.  

Carl walked past my bench yesterday as I was finishing up my original sample and said, "That's a Happy Little Bag!"  I loved the Bob Ross reference, and so this sample has a name!

Making this little bag, helped me figure out what might constitute a good size, shape, and expedited construction.  I carried it around with me over the last couple weeks, unfinished, just to test how it worked and felt, and I have made several design improvements as I worked my way along.

This idea grew out of wanting to pass along something I have enjoyed in the past.  I began using fabric applique about 10 years ago in my dancewear, and the idea translated really well to bead embroidery.

A little history...   Among of my first projects along this line was my "Falling" vest.  If you want to read more about this project, you can do that here


And after this, I made my Urban Safari Coat, again done with applique, and the same yummy quilted Dupioni Silk.  This was a competition piece for Battle of the Beadsmith, and if you like, your can find more pictures here, and read about the construction and beading process here.


I have to confess, the idea of creating clothing in all sizes imaginable was overwhelming.  So instead I decided upon a "wearable" handbag to serve as my offering to you to try out this technique.

I am planning a release for next weekend (June 19-20),  and will continue to make these for a while, as long as there in interest, I have stamina, and until I use up the fabric I have for the purpose.  I have gold, silver, and limited bronze and celadon silk.

First release will be bags made up in gold silk, with the two versions of the tutorial.  One will include instructions and approximate charts for two options, a Monarch butterfly and a Fantasy butterfly, based on the applique.

Here is my sample for these two options, and I will assemble kits for these.


There will also be a couple different applique options, and a minimal guide tutorial for those who are experienced bead embroiderers and would like to try filling the printed lines with beads of their choosing. You are also free to add anything else of your want; flowers, scrollwork, or filling the ditch in the quilted fabric with beads as below.


So if you enjoy bead embroidery, or are interested in a gateway to the craft,
stay tuned for a more detailed blogpost, and keep an eye on my Etsy shop next weekend!

Wednesday, May 3, 2017

The TOHO Challenge - Winter Garden of Discontent


Over the last couple years I have begun to get to know the nice folks at Bobby Bead, a local bead shop in Uptown Minneapolis.  And as a result of that, I was invited to be one of the featured designers in The TOHO Challenge.

Here's how it works.  Toho chooses a collection of beads, and each featured designer world wide gets the same box. Everyone beads, and then, there is a big reveal at the Bead and Button Show, where all the designer's work is featured in showcases neighboring the Bead Dreams entries.  Here are the 2016 featured designer's pieces.  Each year there are some fantastic pieces, and I always find it really interesting to see many varied designers working with the same collection of beads.  I encourage you to check out the show, just outside the shopping area in the Wisconsin Center.

At the show, interested beaders may stop at the TOHO booth and pick up their own mini kit of challenge beads, and submit an entry themselves.  Here are last year's public entries.


All work is kept secret until the big reveal, BUT LUCKY ME, I get to show my work early, because it was chosen to serve as the TOHO advertisement in the current edition of Beadwork Magazine.

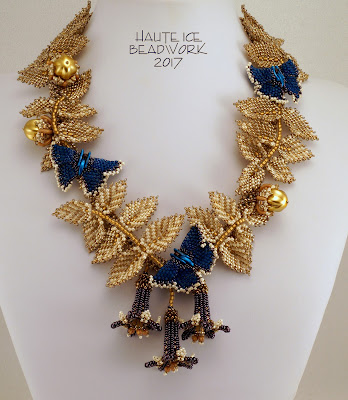
To tell you the truth, I personally found the colors challenging to work with. My beads arrived on Christmas Eve.  I opened the box, and was flummoxed.  Most of my work is nature inspired, and there was nary a leafy green bead in sight.  In fact, at first glance, not much color-wise from the natural world at all. But, thankfully, I am a gold-over-silver girl. I read somewhere recently that the colors were taken from the Hall of Mirrors at Versailles, which now makes good sense to me.

 I took a walk in the park at the end of my street in the late afternoon, and saw golden leaves, still clinging to sleeping branches, with a hint of sunset glow making ice crystals sparkle.  I thought, "here it is!" and decided to create a winter garden piece.  I found myself saddened by the political climate in my country, and the ideas in Richard III's "Now is the winter of our discontent..." soliloquy were in my mind.  I would make a stark, wintry vignette, and then infuse it with hints of hope and joy.  Because I simply refuse to be a saddened by circumstances beyond my control.


SO, "Winter Garden of Discontent" was born, and developed over the icy month of January.  It was nice making little golden leaves in the cold and darkness.  (For those who have asked, they are the same leaves in my Rose Hips tutorial, available on Etsy.) I saw a beautiful image posted by a friend on her fB page of dangling Brugmansia flowers.  They bloom only at night  and I loved that, believing it fit neatly with my theme, so I created a trio of them.


I have since been playing with this flower shape, and am REALLY looking forward to this Friday, when 50 new colors of Demi beads will appear at Bobby Bead.  I have two variations of these flowers ready to be illustrated and written up as components in a new piece I am envisioning.  And these new colors?  YUM!  Can't wait!  Here is a sneak peek of my variations.


I LOVE those new DEMI BEADS!!  Great structural potential, and unique accents too. 


The little butterfly may be involved too.  At first I thought it would be a blue bird of happiness, but the crescents and demi beads wanted to be butterflies instead.  The butterflies are an amalgamation of the blue Morpho and the little blue Skippers that flitted through my childhood on Mount Helena.


And the acorns?  I believe they will re-appear in a project for the fall.  I have ordered those beautiful Czech Melon beads in a a myriad of autumnal colors, and I can't wait to have time to play with them.


Thanks TOHO, for choosing me as a featured designer, and thank you also for the great introduction to Demi beads and Czech Crescents and Melons.  They are a delight!