Pages

Sunday, October 30, 2016

The Rose Hip Saga... it went on forever!!!


I have worked out several ways to make this project easier and tutorial-worthy, and am hoping for a release date just after Thanksgiving!  Never say never, I guess.

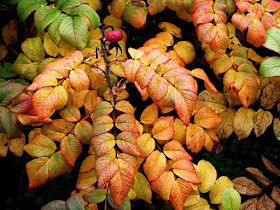
This idea came from a shrub rose cluster near my home.  I had taken pictures of it a year ago, in the fall, when it was colored, and had a few hips still dangling and I fell in love with the extraordinary look of the thing! Sadly, I could not find that image, but this exceptional one has the feel of the thing beautifully.


Staggering, right?  Yep, someday I'll have a go with the fall colors, because OMG!  But what I loved most was the little hip.  BUT, I have just played with fall color and leaves and I thought it might be time to move on.  So I did more looking about at my world.  The beautiful rose patch had changed.  It's been cut back to allow it to thicken for next year and just a few little leaves had begun to sprout.  But they still had that great TEXTURE.


I did a little more research with my BFF Google Images.  I believe in working from life (lol) as much as possible when I try to do botanical imagery, so I hunted for pictures of rose hips.  What I found showed me that they came in two different shapes, both oval, and like the rondelle shape I had seen.


So first I set out to create some leaves, with the cool, quilted texture and vein-y-ness of the shrub roses.  I had to remember how to make Russian Leaves first, and then I began playing with the texture, which I ultimately got with both a combination of cylinders and rounds, and also with finish, using a matte cylinder and a shiny round, and vice-versa.  I had to stop and draw bits of leaves to figure out how to get that all to happen.


After much color experimentation, (much of which I ripped out before finishing a leaf) I finally had leaves and colors I liked.  I thought I would do a less shiny, casual version first, and then explore using silver-lined beads too, for a dressier look.  But I never got past the casual version, and I think it's plenty dressy.

I also thought I might want to use thorns. Because, WOW!  Thorny!!!


Then I went on a hip and thorn hunt.  One of my local bead shops (J-Ring Glass) is closing.  I am sad about this, because I liked their semi-precious collection especially.  I found loads of possible dressy and casual hips there (both coral and glass) and some amazing red/gold daggers at Bobby Bead and brought them all home.  I added the actual thorn beads I had been hoarding.


And then, I played a bit with the funky ends of the hips, the part that would have been the base for the rose flower, before the petals fell off and the fruit matured.  Actually, I got completely obsessed with these.


OK, meanwhile, back at the ranch, I had my leaves assembled on a piece of Stren, the same magic that supports my lilacs.  I had a rope with the red dagger thorns, and I wove them together, and tried out the hips.  I hated the results. Clunky, awkward, the daggers were stealing the thunder from the leaves and hips, and I had imagined a cascade of hips, but they were fighting with the leaves. EGAD.
I rather wanted to quit.  You cannot imagine the difficulty of weaving this uncontrolled, catchy sprig of leaves into this insane thorny rope.  I gave it a couple days, and ripped the leaves out of the rope.  I did like the bright red berries against the dark forest-y green leaves, so thank goodness, all was not lost.


Then I made MORE leaves and attached them in a triangular shape, which thank heaven, I liked. But the darn hip-tip thingies (of which I finally had made ones I just loved) were totally wrong, and masked the berries. And I thought the fat rondelle berries were awfully heavy for the sleek leaves, so they were wrong too.  OF COURSE.  I think this was just that kind of project.  Although, I often do things so many times it makes me dizzy, so maybe because (like childbirth) while it's fresh, you remember all the agony, and then later on, you think... maybe another baby would be nice.  Anyhow...


Also, I thought the placement of the hips was just too perfect and inorganic.  I removed the hip tips, and put in more hips with just a tiny Czech rondelle and a gold picot, and did it as randomly as I could, although they arrange themselves despite my efforts to be organic.

So, finally, I like the dang thing!


And a back view, for structure.


Did you make it through all the angst?  I don't blame you if you didn't, because I nearly gave up several times.  But I am glad I didn't.  Happy beady trails to you!

Friday, September 2, 2016

"Aflame" and Friends


I have been playing with chenille stitch and gradation for over a year, and find there is a nice depth in working with the same idea over an extended period.  Part this work is the rope above, published in the October 2016 Bead & Button Magazine.


I submitted the project with a maple leaf pendant, employing the same gradation, but only the rope was chosen for publication.  One nice thing about working with Bead & Button is, although you cannot publish your accepted project anywhere else before they do, afterward, you may submit it for publication elsewhere, or self-publish, which I have done in my Etsy shop.  I have published a tutorial for the leaf, rope, and bail here, as well as a kit in the "Aflame" colors shown above.

I think they play nicely together, and really like the flame-ish aspect of the whole.  I tried to combine both the colors of the leaves I pick up on my daily walks, with the colors in the bonfires I find so appealing in my fire pit in the fall.  I love the crisp cool air on my back and toasty toes, and the blue-purple embers at the edges of the fire.  I tried to roll all of the juicy goodness of Autumn together into this work.

I worked up two other colorways to include in my tutorial.  I realize that "Aflame" is a very bold piece with bright colors.  So I did a much more subtle version.  This is "Singe". I made up jest a few kits in this color group, since the investment in the 24k beads is substantial.  They are available here!


It represents the leaves of the Silver Maples that fill my yard, which go almost directly from green to coppery topaz, bypassing all the reds and oranges of the Sugar Maples in the neighbor's yards.  They always seem a little burnt to me.  But they have their own beauty, and the colorway has more a feeling of proper jewelry, (a bit less fantastical than bold "Aflame") given the 24k gold edges and accents in the rope.

And then, there is "Psychedelic Scarab".  OK, get out the mushrooms. This might be a tribute to my coming of age in the early '70's. I had a few Scarabeus Green Swarovski beetles left over from a dressmaking project, and the color in that little piece of glass was pretty awesome.


I added a beetle to the bail, and despite the "tripiness" of the colors in the leaf, this baby looks awesome worn with either of my two cobalt blue tops, and turns heads. Ladies who share my table while I am sipping my tea at the farmer's market demand I take it off for closer examination. I have to admit, it might be my favorite.  And the ROPE!  The kit for this color is here in my Etsy shop.


Both pieces (rope and leaf) could also be worn separately, and I have made a few leaves as samples for another, larger project, which I am also selling in my shop.


These leaves use the same pattern, MOSTLY.  I have scaled the bail down for the thinner rope. As you might notice, I take liberties with the exact placement of the beads as I work this pattern.  You can bead both sides symmetrically if you like, but in my world, it looks much more natural if each side is a little different.  I suggest in my pattern that when you lay out the second side, you use the beads I suggest, but switch a few with their neighbors.  In my samples, I have fiddled further than that, and changed a few edges a bit, but it's nice to know that once you have the shape established, you can play with color placement to your hearts content.  I really look forward to seeing what you all will do with this pattern.

I hope your will enjoy the curly-edged, ripply-centered, funky shape of this project too, which also keeps the leaves looking realistic!


Happy Autumn to you!  I hope you will enjoy making your very own leaf pile!


Thursday, August 25, 2016

What Happens When You Buy My Work?

The first thing I do every morning is check my e-mail.  This morning, I found someone had purchased my "Butterfly Collection" necklace.  What happens next never ceases to amaze me!

I feel tremendously energized when someone decides to buy something I have made. I wonder if this is true for all makers?  Let me show you how my morning went.

First I auditioned velvets to be made into the box liner for this work.  I want the buyer to feel good when she opens her purchase.  I want my caring about the work I do, and about her purchase, to be visible in my presentation.  I decided the white allowed the work to show itself to best advantage.


Then I traced my pattern on the velvet, cut, pinned, and stitched it up, still in my nightgown, mind.


All this time, I am thinking about a new piece that has just occurred to me.

Then I created the shipping label, and discovered my print profile over charged her by $.70.  Rats!  So I processed a return for the over-charge, and stopped on my way up to the printer to pull out some materials for this new idea I have.

I hustled back to my studio and typed up a bit of info about the work, taken from my listing.  What I was thinking when I make it, why I chose the colors I did, why there is a tiny flower component, why the white pearls, why the fiery sparkle.  Because I am fully aware this buyer will have her own meanings to ascribe to this work, but I want her to know mine too.  We now share these ideas.  I have said before, and will always believe, her choice to buy and display my art on her body/gallery is for me, the final creative act in the process.  I add some care instructions for the beadwork, like, avoiding perfume, hairspray, lotions, things that can damage bead finishes, a great lesson from the Etsy Beadweavers Team.


I tied a little orange ribbon around the box, wrapped it in tissue, put it in its Priority Mail box, afixed the label, and out to the mailbox it goes.  (I did put on my robe for this part, in case you are concerned.) Then I made my breakfast, and ate it looking at the materials I had collected, and dreamed about how they will come together.

I had written in my listing (use the link and scroll down if you want to read it):
"I love this piece, and was not sure I wanted to sell it, but how many pieces of jewelry can a girl own?"  

I think there is some magic in sending work out into the world. I can draw some analogies, like sending a child off to college or to a first job.  My part is done, and now, that beloved baby has to stand on its own.  But I think there is also a new space left in my soul for further creation when my work sells.

I have spent the last year learning to write tutorials, and while I am a very long shot from perfect, that skill is functional, I think, and it's been interesting and rewarding.

But I think making is my first and best love.  And I am so glad today to celebrate the potential for more making, created by a simple sale.  How do you feel, when your work sells?

Monday, August 22, 2016

Finishing the Things I have Begun - Featuring Cherry Creek Jasper!

August has been a joy so far!  My new bead storage system has allowed me to find what I am looking for quickly and finish projects I have started over the last year.

A Brassy Blast

First, I finished a piece I began last Winter.  I have named it " A Brassy Blast of Autumn."  In February it was more about being colder than a witches... well, you get the idea.  When I put this together initially, it felt too crowded; desperately in need of breathing room. But now at the end of summer, surrounded by bounty and lush abundance, it seems fine as it is. Maybe even perfect. Someone suggested it looked like nuts and seeds, and I love that. Time sometimes heals my aversion to my work.  :)

I culled these cabochons from a big group of Cherry Creek Jasper, pulling just the golden green ones.


I thought it was done, but the tips of the three primary cabochons seemed blunt to me... so...


I contemplated a more substantial component as the drop.  But as soon as I laid it out, it looked like a little pursed-lipped, pouty face with a long beaky nose and slanty eyes.  Can you see that???  ACK! It is so easy to do that by mistake with symmetry.
So, you can guess what I did with that little component?


Earrings!

In the Jungle, the Mighty Jungle...

And then there was this other half finished piece... a spiral chenille rope and some cabochons.  I wanted to imply an animal, and had two pieces of stone that looked like a hoof print. But then I found this yummy marsala Cherry Creek Jasper teardrop and rounds, from Rainbow Artifinds, a lapidary couple in St. Paul, whose work I really love.  All kitties really have four toes, and a more oval central paw pad, but these had enough suggestive tiger-ish illusion when put together, to allow me to create "Jungle Boogie."


I like how the broken edge around the bezel kinda blends with the broken edge of the Chenille.

When I started this necklace, I was thinking specifically of a piece of fabric I have. I love animal prints, and will maybe make something for myself with it.  So I tried to think clean, simple, and bold, because the print is very busy!  The piece will need to be displayed on a plain (looks great on black!) ground, so the fabric could be a jacket, or skirt maybe.  Otherwise, the camo will eat the necklace!

  
Someone on Facebook suggested a jacket and LBD, and that sounds pretty good to me! But who knows when that might be.  It's funny, although I still have my Etsy shop, it almost never occurs to me to sell my work these days.  Maybe it should.  

I had fun with these claw/talon beads.  I am not sure of the official name, but I am quite sure they are Czech.  I give everything I make a "test wear day", and I put this on this morning, and when I looked in the mirror, I thought "claws out!" Brings up all the cat fight stuff floating about in my head.  If there were a buyer for this, who would that be?  Makes me smile thinking about it!


I could not resist the claw at the end of the extender chain! 

So, to list, or not to list.  I have some other beady work to list in a week or so, pertinent to another project. I'll contemplate between now and then, I guess.  

In the mean time, it feels good to be both organized and caught up.  Now there is only one thing to work on at my beading bench, but it's a long-term project, and it might wait a little while.  

Tuesday, July 26, 2016

New Bead Storage!

I am very excited about this!  I have been thinking about exactly what I want my bead storage to look like for months, and in baby steps, I have ended up with something I just love.

My criteria were many and varied.  First, I am a person who likes to have things out and accessible, rather than tucked away behind doors and drawers, so I wanted my beads visible.  They used to be in glass jars on my work space, but they were beginning to take over.


Secondly, I wanted all of the beads of a color and finish to be together, no matter size 15, 11, 8, 6, or packaging, so I decided that trays that held tubes, boxes and bags would be perfect. I did not want to do any repackaging or labeling.  I decided that my trays would need to be neutral in color, since the color and finish of the beads is to me the most important consideration in making choices.  I considered black velvet trays, gray cafeteria trays, and silver bakery pans.  I kinda wanted these trays to be pretty!

My third consideration was cost.  I did not want to spend hundreds of dollars.  I stumbled across these plastic trays at the Dollar Tree store and fell in love at first sight!  They are the perfect size for long tubes of beads, they have little handles that feel good in my hands, they are totally color neutral, and they even cast pretty shadows on my counter!  Best of all, $1 each, and compared to everything else I considered, BY FAR the best bargain.  And bonus, I can see the color range from the end of the tray!


 AND, these worked great for different sizes and kinds of containers, so no need to repackage and label!  I found them here at Dollar Tree.


Also, these trays are lightweight, but quite sturdy.  And let me tell you, beads are heavy things!  I can lift three trays at once with one hand.

I also can sort any way I like, and move things around without trouble.

But then there was the problem of how to store the trays.  I had then stacked in my beading space for a while, but with the trays 8 or 9 deep, it was hard to access the ones I wanted to pull out, plus I didn't like bending over to look for beads.  Bad light, bad back, bad knees, bad ankles, bad, bad, bad!


The Best Man Ever said he would make me cabinets to hold my trays, but I am not at an age where I want more furniture,  even super cool custom made stuff with tray slots, plus they would need to be HEAVY duty to support all the weight of the beads.  So I kept looking and thinking.

And then LO!  Last week at my Hancock Fabrics, which is going out of business, (insert HUGE sad face here) I spotted these!!!

FELT RACKS!!!
They were selling all their beautiful fabric racks, and everything else in the store and I thought... These!  I NEED THESE!!!  I dashed home, got a tray and it fit magnificently in the little slots.  So I held my breath and asked the price.  $5 each.  And they had two of them, which I bought on the spot.

Finally I have had a little time to move some things around and install the first rack.  I am planning to move some of my beading operation to my costume studio, and the racks fit perfectly on my counter, under my bookcases, so I took some time this afternoon and moved one of them in!


So, there you have it, my new bead storage.  This is ALL of my 15/0, 11/0. 8/0 and 6/0, and I have ANOTHER rack left to fill with cylinders, funky shapes, and Czech firepolish, but I may not get to them for a while.  

I have about 60 trays, and will buy maybe another 60, so a total of $120 on trays, plus $10 on racks.  

Feels great to have this sorted, and be really happy with my new bead storage!


Tuesday, July 5, 2016

Chihuly Garden and Glass

A day of inspiring imagery and fantastic depth and breadth in glass!
Starting point, the Glass Forest.  I thought it was much more like neon flamingoes in the dark.
I have gotten somewhat used to taking photos with my phone, because my otherwise practically perfect husband is annoyed by my DSLR camera. Apparently I squeal "OOOO, PRETTY!!"  and stop way too often when I have that tool in my hands. But I have never been quite as sad to be shooting with my phone as I was on the day we went to Chihuly Garden and Glass.  I could have stayed all day.
In the Northwest Room you can see the influence of Native Northwest art.
Motifs, shapes and textures from baskets, weaving, and vessels are obvious and elegant.
To quote from the little brochure you get when you pay your entry fee, " I want people to be overwhelmed with light and color in a way they have never experienced."  I was, Mr. Chihuly, sir. You blew me away.  Between the beautiful glass, the spectacular lighting and presentations, the massive installations, and THE GARDEN, I was frequently in tears from the beauty and joy and inspiration I was feeling.

In the Sea Life Room the central installation was gasp-worthy, churning and frothing
in a sinuous mass of color, creatures and foam.
Crabs from the Sea Life Room
My iPhone shots do none of this justice, but I put them here because I want to try to remember 
what I saw and how I felt.

Sea Turtles.  I just love the pedestal.  "Who lives in a pineapple under the sea..."
And the composition of this!!!  I wish I had a 3D image for you.
Then there was the Persian Ceiling.  The lighting design in this gallery is spectacular throughout, but for me, glass is all about transparency and translucency and shimmer and color!  This was a beautiful way to see those things! There is an aquarium that you can walk through and beneath in Minneapolis. This had the feeling of that place.

Persian Ceiling, with breathtaking backlighting.
And combined with some masterful reflections, it was water and wind and nearly alive.

I can't begin to describe the Mille Fiori installation.  
There were grapes and eggplants and grass and vines and ferns and flowers.

End view of the huge Mille Fiori Installation
Maybe even a few snakes?  Eden?

My photos of the Ikebana and Float Boat installation are especially lame.  Sigh.
I could really have used the panorama feature on my camera for this.  :(
I missed the floats entirely.
The monochrome chandeliers were almost relaxing. There is so much
energy in this huge body of work that it is a bit overstimulating!


And we had our picture taken.  

With The Best Man Ever and Most Excellent Son.  Do I look a bit over the moon?
In the Macchia Forest below, Chihuly challenged himself to make use of every color of glass available.  Often a layer of white glass made the inside of the vessel 
delightfully and dramatically different from the outside.


And then we saw the Glasshouse, which celebrates the artist's love of the conservatory.

Conservatory inside.
Conservatory from the outside.
And finally the Garden!!! 

Of course there was the perfect environment for each piece of glass... or would that be goose?  Note the BLACK grass!
No words for this!  But all the flora is Seattle is much larger than that in Minnesota.
Fern forms.
SO...   I have taken nearly a year off from competition and larger work. I have played a little, but mostly I have spent a year teaching myself to illustrate and write tutorials.  It has been a huge learning experience.  The best thing I have gotten from this time spent is a new design tool.  I now have the ability to draw and adjust my design before I pick up a needle. 

I have been plotting a new, bigger piece in my mind, and seeing Chihuly Garden and Glass has pushed my thinking about it much further forward.  I have one final tutorial in editing stage, and will release it later this summer, but then, I am going to step back to M A K I N G, because I have this thing demanding to be made, and many beautiful new ideas and approaches in my heart to finger out. I am sad to have mostly ignored my blog this year.  Hopefully that will revert to past form a bit too.  

Should you ever find yourself in Seattle, navigate to the bottom of the Space Needle, and see this gallery.  It is a true work of art, and labor of love.